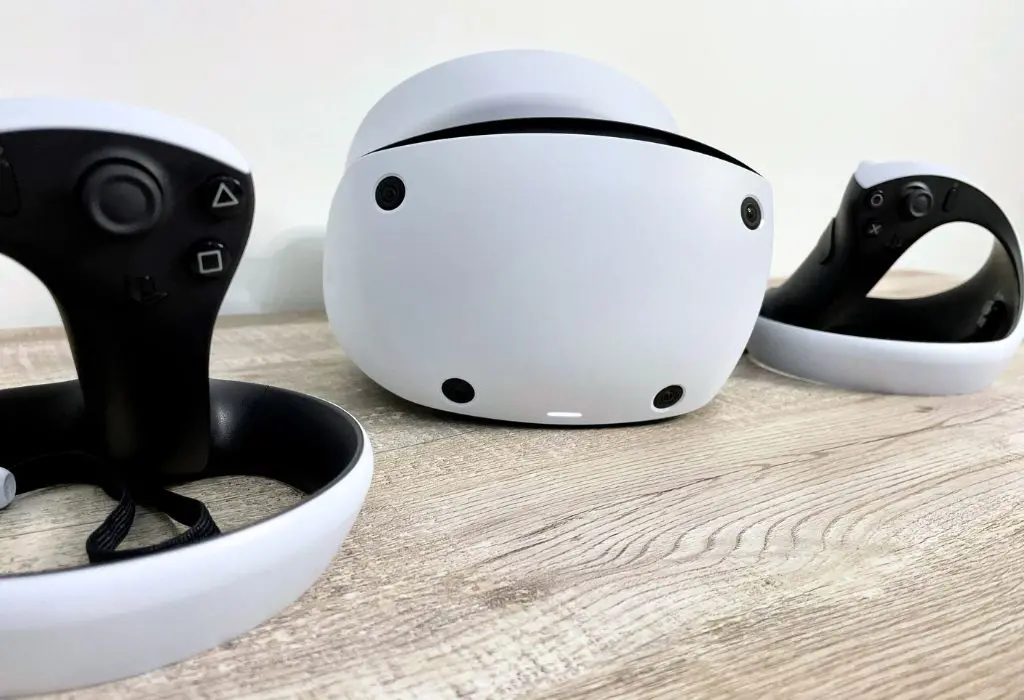
If you want to get the most out of your PlayStation VR2, here are some tips and tricks to enhance your experience. I conducted a full review of the PS VR2 when it launched and have been playing it ever since. Along the way, I picked up plenty of helpful tips that improved my experience with the virtual reality platform. In this guide, I’ll share my top recommendations for optimizing your setup, ensuring comfort during extended gaming sessions, and sharing lesser-known features to help you get the most out of your PlayStation VR2. Let’s dive into the basics of set-up and move up to more advanced tips to get the most out of the hardware.
Setting up the PS VR2 correctly is essential for peak performance
Setting up your PlayStation VR2 correctly is crucial for the best gaming experience. This is especially important because the lenses have a more defined “sweet spot” when it comes to displaying the proper “3D effect”. The visuals from the PlayStation VR2 look stunning, so you want to be sure everything is set up correctly to get the full effect. Along with adjusting the headset, playing in a well-lit room is important. This helps the camera track your movements more accurately.
Steps to get up and running with the PS VR2
Sony details some of these steps with their set-up documents included with the device. As always be sure to review the manufacturer’s instructions and safety warnings first before use. When it comes to getting up and running you first want to update your PlayStation 5 to the latest firmware. This will ensure compatibility with the PS VR2 and make sure it is properly recognized by your console.
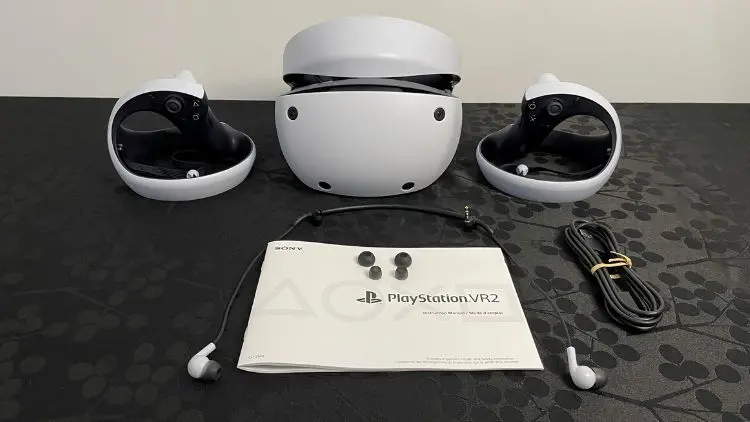
Unpacking and connecting the PlayStation VR2 headset
Plug the PS VR2 headset’s USB-C cable into the front of the PS5 console. Make sure the connections are secure and that the cable has enough slack for you to move comfortably during game play. Turn on the PS5 first, and then the PS VR2 in that order. After your console is on, press the power button on the PS VR2 headset. You can find this on the underside of the view-finder module. Follow the prompts on your TV first, before putting on the headset. Otherwise, you’ll miss important steps.
Adjusting the PS VR2 to your head and sight lines
When prompted in the set-up process, put on the headset and adjust the headband and visor until it fits comfortably and securely. There are 3 main points of adjustment. The first is the headband, which is used to tighten the headset and keep it secure:
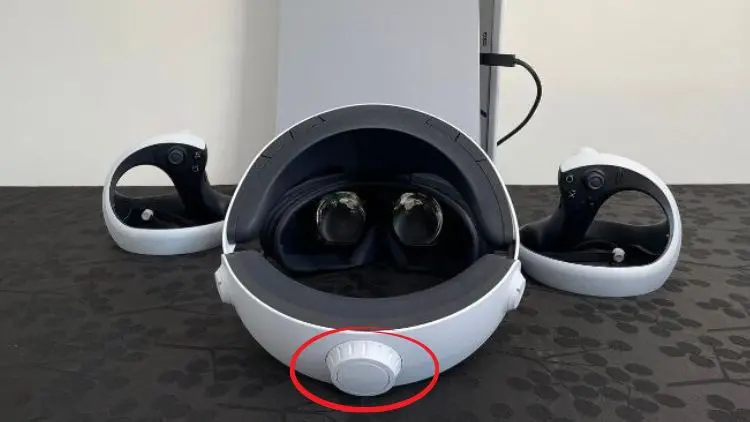
The second is the “eye-to-eye” distance adjustment. The PS VR2 allows users to adjust the distance between the lenses to match their interpupillary distance (IPD). IPD is the measurement between the centers of the pupils of both eyes. Adjusting the IPD ensures your eyes are aligned with the lenses, offering the sharpest image possible and reducing eye strain.
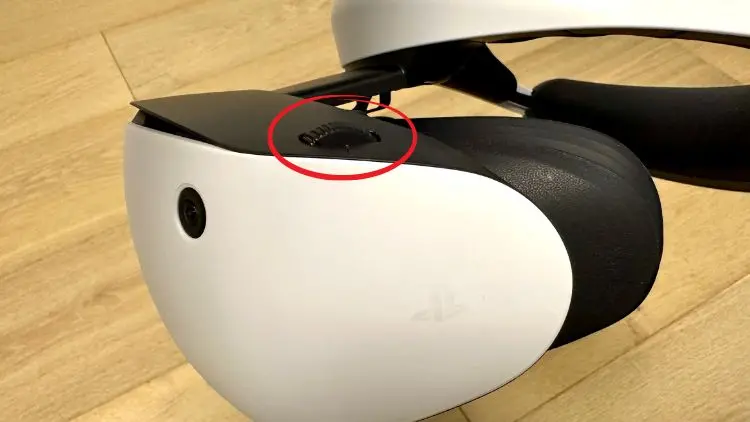
This adjustment can be made using the dial mechanism on the top of the headset’s viewfinder area (pictured above).
The third is a front-to-back slider adjustment.
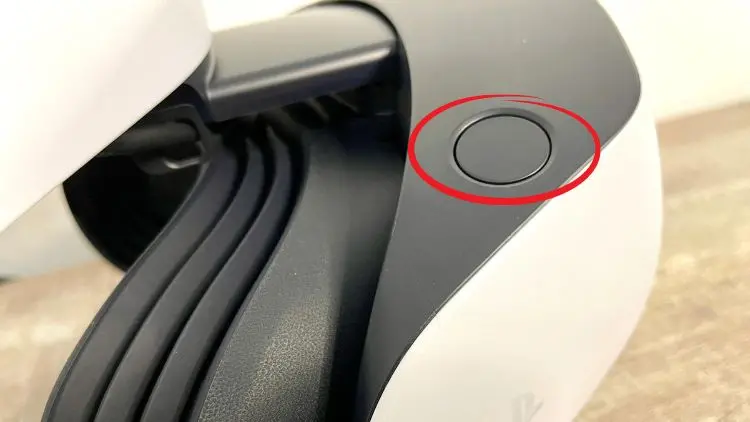
This helps to customize the distance between the headset’s display and your face. This adjustment is important for accommodating different face shapes and ensuring that your eyes are at a comfortable distance from the display.
Calibrating the PS VR2
Follow the on-screen prompts to calibrate the PS VR2, which includes adjusting the visor and headband, setting your eye-to-eye distance, and defining your play area.
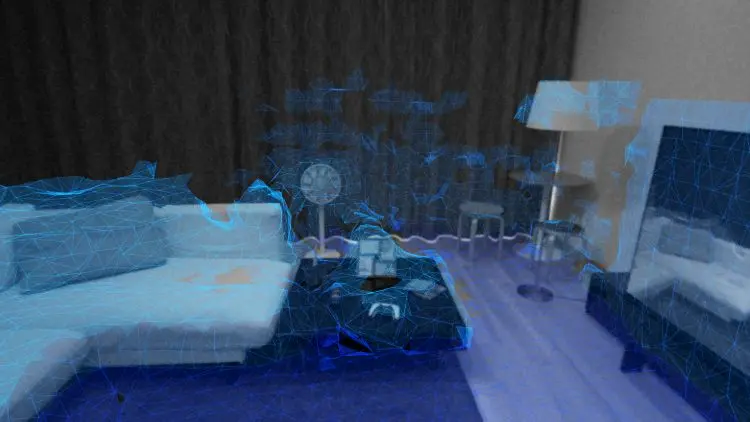
The process to define your play area is very cool as it scans your entire room and maps out a “safe area.”
Play in a well-lit room
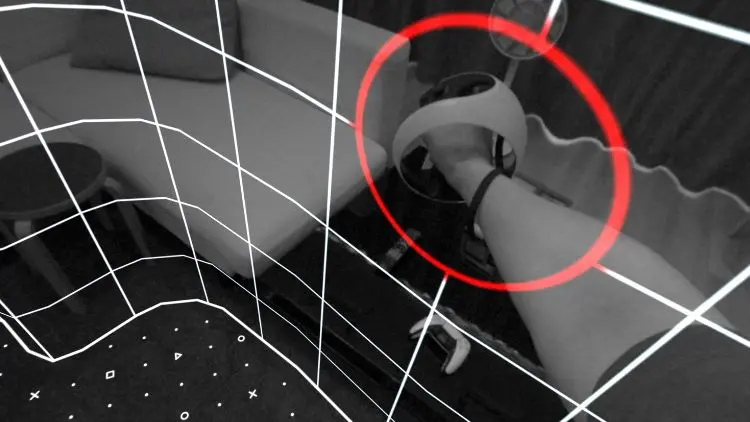
In the past with the PS VR1 darkness was good, now with the PS VR2 the tracking system needs proper lighting to perform at its best. You can play in dimmer settings, but the hardware isn’t as responsive to your movements. This is especially true with smaller hand-based movements. While you are in a well-lit space turn on and pair the Sense controllers with the console. Once your PlayStation VR2 is set up correctly, you’re ready to dive into some virtual reality gaming.
Play in a spacious, safe area
Remember to give yourself enough space to move around safely. If you are using the PS VR2 near other people be sure they are over 7 feet away. You’ll need an open area of roughly 3.5′ by 3.5′ to play safely and take breaks to avoid motion sickness or discomfort.
Other PS VR2 tips and tricks
Outside of set-up and initial use tips, here are some other features that your PS VR2 has to offer that are great for levelling up your gaming experience.
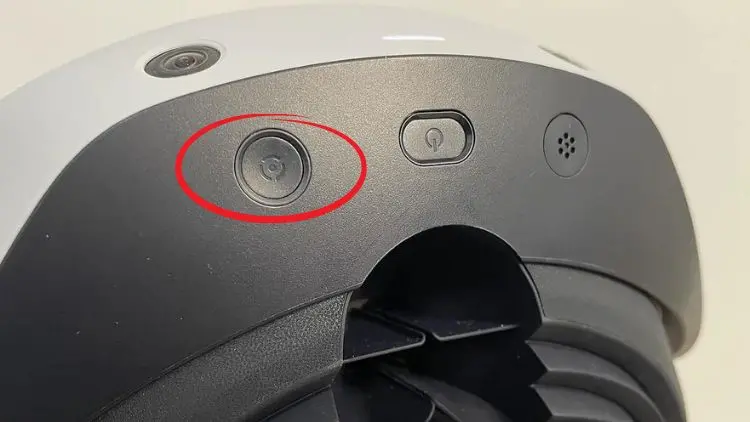
Use PS VR2’s pass through view to see your surroundings
One of the smartest additions to the PS VR2 is the ability to use pass through mode. This allows you to press a button and see your real-world surrounding without removing the headset. It saves so much time and can help you avoid trips and falls if used correctly. To access this, you’ll want to use the button on the bottom of PS VR2’s viewfinder. Pressing it gives you one-click access to the headset’s pass through view.
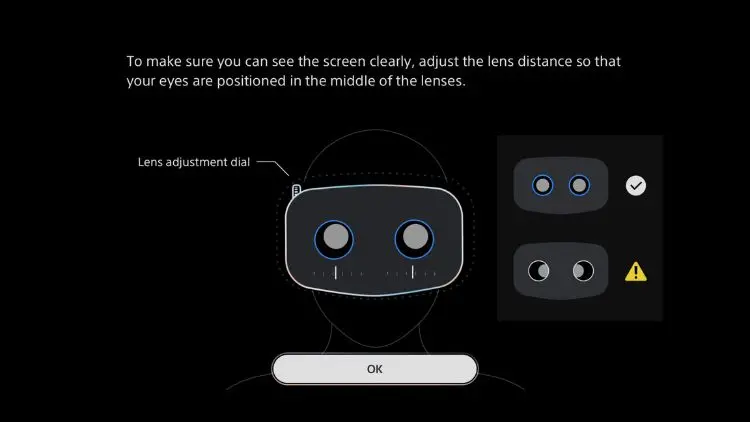
Re-calibrate your PS VR2 lenses after a few uses
To calibrate the lens on PS VR2, follow these steps: double-tap the PlayStation button on the controller and select “Adjust Visibility” from the quick settings menu.
You can play the PS VR2 without a TV connected
The PS VR2 projects, or “mirrors” what you see onto your connected television, but doesn’t require a TV to function. The hardware can function with the TV turned off, or even disconnected completely. This is a bonus, especially if someone else in your household wants to use the TV for something else. You will need your television for the initial set-up of the PS VR2 but after that, you can enjoy your VR adventures without needing the TV.
Use the PS VR2 as a 120Hz big-screen HDR display
The PS VR2 can also double as a new way to play “standard” PS5 games with “Cinematic Mode.” This simulates a massive screen within your field of view that is 120Hz HDR compatible. The image quality is fantastic, and it’s an excellent way to play games like Astro Bot, Horizon Forbidden West, God of War Ragnarok, or The Last of Us: Part I.
To access this feature, simply launch a “non-VR” game or app on your PS5 and use a PlayStation 5 DualSense controller for game play/navigation. The PS VR2 offers a high refresh rate (120Hz) with HDR, enabling it to display games with stunning fidelity. Standard PS5 games that support a 120Hz performance mode with HDR will display like a giant high-end TV. The PS VR2 defaults to 120Hz with HDR for VR games, but when it comes to displaying standard “flat” PlayStation 5 games, you’ll need to activate 120Hz and HDR settings.
To access the feature through the PS5’s menu, navigate to Settings > Accessories > PlayStation VR2 > Cinematic Mode. Select “Video Output for Cinematic Mode”.
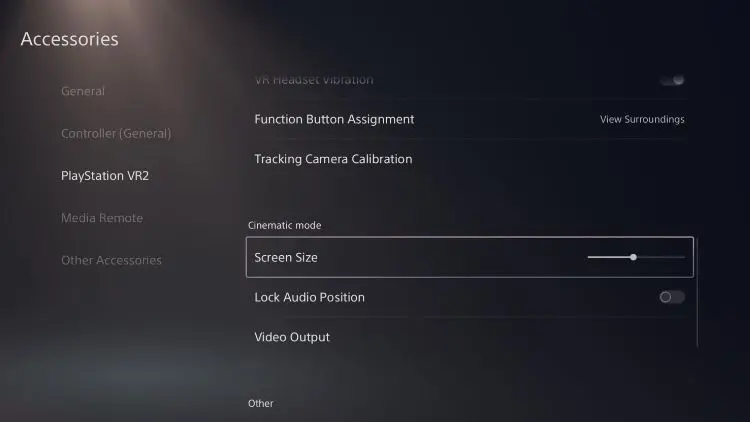
Adjust the PS VR2’s “Cinematic Mode” screen size and position
Now that you know how to simulate a 120Hz HDR display within your PS VR2’s field of view, here’s how you can customize it. To make the most of this feature, you can easily adjust the screen size and position to suit your preferences. To access and customize the “Cinematic Mode” settings, follow these steps on your PS5: Double tap the PlayStation Logo > Use “quick settings” > use the slider to shrink or enlarge the screen. You can also select Settings > Accessories > Screen Size (and use the slider).
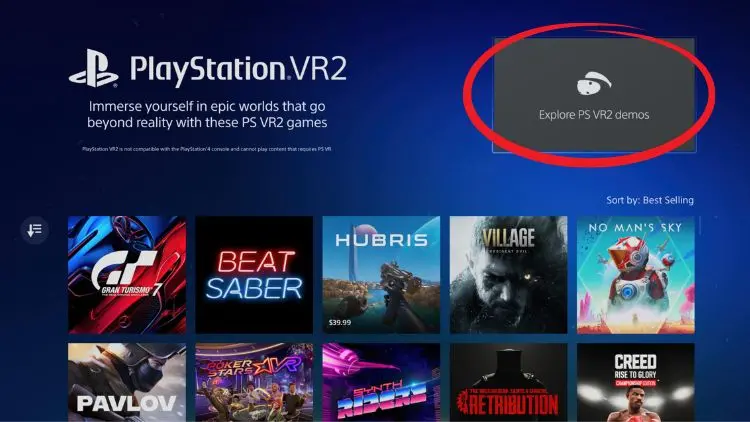
Upgrade your game library to VR
Some PlayStation 5 games can be upgraded to be compatible with the PS VR2. Titles like Gran Turismo 7 and Resident Evil 4 can be upgraded for free. Other titles might require a fee to upgrade either online or in-game, this varies per title. Check out the PlayStation Store for details, or look for the “VR Upgrades” tab when viewing game pages.
To do this on your PS5 you can also go to Games > Game Library > Your Collection and see if there is a VR upgrade available.
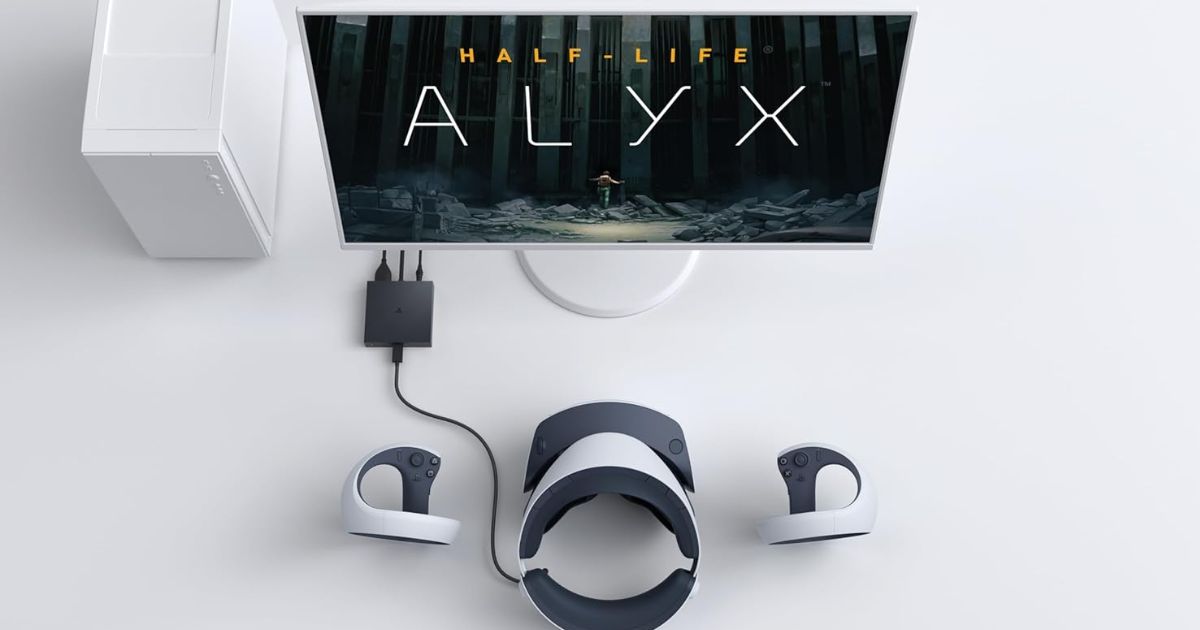
Expand your PS VR2 library with PC games
Sony recently released the PlayStation VR2 PC adapter, which connects the PS VR2 headset to your PC. With this adaptor, you can purchase and play a vast array of SteamVR titles, significantly expanding your options. The adapter supports the PS VR2’s 4K OLED display, 110-degree field of view, and 3D audio, offering a high-fidelity experience. It’s important to note that some advanced features like eye-tracking, HDR, and adaptive triggers are not supported when using the adapter. If you are considering getting the adapter, ensure your PC meets the minimum requirements outlined by Sony. If you’ve got the proper PC hardware and a PS VR2 headset, you’re all set to dive into a broader and more diverse world of VR gaming.
Get the most out of your PS VR 2
The PlayStation VR2 delivers a fun and immersive virtual reality experience, and you can enhance it even further with my tips and tricks. Following the steps above for system set-up, safety, and optimizing your play conditions, you’ll get the most out of the hardware. Lesser-known features like using the PS VR2 as a 120Hz big-screen HDR display can open up new ways to enjoy both VR and standard PS5 games. And, with the new PlayStation VR2 PC adapter, you can unlock even more games!
With these recommendations, you’re ready to get the most out of your PlayStation VR2. Enjoy your VR adventures and be sure to comment below with any tips of your own in the comments.
Click here to see the full line of video game software available at Bestbuy.ca
Click here to see digital video game downloads offered at BestBuy.ca



The most useful tip was to recalibrate after a few uses as I would not have thought of that.
most helpful tip that I read was to play in a well lit room
Making sure to calibrate the system
Adjusting the IPD ensures your eyes are aligned with the lenses, offering the sharpest image possible and reducing eye strain.
Knowing that a well lit area is important for the tracking features of VR2 is a great tip, would not have occurred to me after last generation.
lens calibration has some great tips, hope to use them
The adjustment tips so that it fits your head/face properly is such a good one!
Most helpful tip that I read was to play in a well lit room
most helpful tip that I read was to play in a well lit room
Most helpful tip that I read was to play in a well lit room
I think the best tips were for adjustment and calibration!
The most useful tip was to recalibrate after a few uses as I would not have thought of that.
Adjustment tips are always nice
THe best tip is to reAD ALL of the safety warnings before using it. Too MAny People ignore them. Safety first!!!!!!!!
ALso the setting to change the screen to cinematic for non-VR COntent
I like the tips to calibrate the PS VR2, which includes adjusting the visor and headband, setting your eye-to-eye distance, and defining your play area, for optimal play.
I would like adjustments. Also be in a bright light gives more responsive.
adjustment tips so that it fits your head/face properly
The adjustment tips are key to having a good game especially the eyes
The adjustment tips to make sure it’s on properly
I find the adjustment tips to be the best.
The adjustment tips are very useful.
Adjusting the IPD ensures your eyes are aligned with the lenses, offering the sharpest image possible and reducing eye strain.
Playing in a well lit room is the best tip
Setting up the PlayStation VR2 (PS VR2) correctly is essential for an optimal gaming experience, as highlighted in the article. The most helpful tip for someone setting up a PS VR2 for the first time is to ensure proper calibration and adjustments. This includes:
1. **Updating Firmware**: Start by updating your PlayStation 5 to the latest firmware to ensure compatibility with the PS VR2.
2. **Physical Setup**: Plug the PS VR2 headset into the PS5, ensuring secure connections. Turn on the PS5 first, then the PS VR2. Follow on-screen prompts before putting on the headset to avoid missing important steps.
3. **Adjustments**: Adjust the headband, visor, and the distance between the lenses to match your interpupillary distance (IPD). This ensures a comfortable fit, sharp image quality, and reduces eye strain.
4. **Calibration**: Follow on-screen prompts to calibrate the PS VR2, including setting your play area. This mapping of a “safe area” within your room enhances safety and immersion.
5. **Well-Lit Room**: Play in a well-lit room to ensure accurate camera-tracking, as the PS VR2 requires proper lighting for responsive movement tracking.
6. **Adequate Space**: Allocate enough space for safe movement during gameplay, roughly 3.5′ by 3.5′. Maintain a distance of over 7 feet from others when using the PS VR2 to avoid collisions.
Additionally, the article mentions other features of the PS VR2, such as passthrough mode for seeing your surroundings without removing the headset, the ability to play VR games without a connected TV, and using the PS VR2 as a 120Hz HDR display for standard PS5 games.
In summary, the key takeaway for setting up the PS VR2 is meticulous calibration and adjustments to ensure comfort, visual quality, and safety during gameplay, making it the most helpful tip for first-time users.
Recalibrating the lense after a few uses is definitely the most helpful tip here. Having used a friends, we found it to shift with time as well as obviously being different from user to user.
I think the best tips were for adjustment and calibration!
the most useful tip that I read was to play in a well lit room
The adjustment tips are very useful.
Making sure to calibrate the system
Play in a well-lit room which helps the camera-tracking pick up your movement more accurately.
I found the use of passthrough mode was the most helpful – it may be something I would overlook initially.
The most helpful tip is that the PS VR2 tracking system needs proper lighting to perform at its best.
Playing in a well lit room is any easy tip that shouldn’t be overlooked.
I think remembering to do the eye to eye distance adjustment is super important
The well lit room probably tip will help me the most.
I usualy play on darker rooms. This should help me set it up to optimize the experience
You will need your television for the initial set-up of the PS VR2 but after that, you can enjoy your VR adventures without needing the TV.
The hardware can function with the TV turned off, or even disconnected completely. This is a bonus, especially if someone else in your household wants to use the TV for something else.
I find the adjustment tips to be by far the best tips in the article!
most helpful tip that I read was to play in a well lit room
The Tip that I liked most, and will make a huge diff., while playing with the Playstation VR is to always make sure to be in a well lit room for best effect!
Play in a well-lit room gives the best responsiveness.
I find the adjustment tips to be by far the best tips in the article!
Playing in a well-lit room is a helpful tip
Since I am such a novice still, my most useful Tip so far was to insure that you are in a well lit room for optimal play!
Thx kindly
The tech in this headset is mind-blasting! I need this for GT7.
Corbin’s VR Studio here, thanks for all the tips and tricks! The well lit room seems like an easy one not to think of! I appreciate that. It makes sense so the tracking can find you easier. Thank you
The tips for adjusting the PS VR2 to your head and sight lines is critical indeed!
How to calibrate the lens on the PS VR2 was a very helpful tip
Playing in a well lit room is great advice.
So many good tips. I have to leave 3 – Updating the software. Adjusting the headset and eye to eye distance for clarity and true 3D effect
one thing discussed : Adjusting the IPD ensures your eyes are aligned with the lenses, offering the sharpest image possible and reducing eye strain.
Comments are closed.