
Nothing kills the vibe in a good game faster than a broken gaming headset. One minute you’re mid-battle or deep in a squad chat, and the next, you’re dealing with silence, static, or a mic that’s mysteriously gone mute. Gaming headsets can stop working for a number of reasons, and they’re hard to diagnose right away unless there’s an obvious tell, so it could be everyday wear and tear to software glitches and outdated drivers. The good thing is you may not have to toss your headset in the bin or rush out to buy a new one.
In this guide, we’ll walk you through how to fix a broken gaming headset, covering common problems like no audio, mic failure, connectivity issues, and physical damage. Whether you’re using a wired or wireless headset (for PC or console), we’ll show you how to troubleshoot and repair it at home or when to seek help. Let’s start with the basics.

No sound or one side not working
Not hearing sound is one of the most frustrating issues but also surprisingly common. Before you panic, try these steps:
1. Check your physical connections
Start by inspecting your plugs and ports:
- Make sure the 3.5mm jack, USB plug, or wireless dongle is fully inserted into the correct port.
- Try wiggling the connector gently. If sound cuts in and out, you might have a loose or damaged connection.
2. Test it on another device
Plug your headset into another phone, console, or PC. If it works there, your original device or settings may be the culprit—not the headset itself.
3. Inspect the cable
Cables are a common failure point, so inspect further and look out for:
- Frayed or exposed wires
- Kinks, bends, or signs of stress near the connector
If your cable is detachable, try swapping it with a known working one. To fix a loose headset cable, gently bend it near the connector while plugged in to check for sound changes. If that solves it temporarily, you’ll likely need a replacement cable.
4. Check the volume controls and mute toggles
Some headsets have built-in controls:
- Look for a volume wheel on the earcup or inline control box
- Ensure you haven’t accidentally hit a mute button or flipped a boom mic to mute position
5. Update or reinstall audio drivers
If you’re using a USB or wireless headset on PC:
- Right-click Start > Device Manager > Sound, video and game controllers
- Find your headset, right-click, and choose Update driver
- If issues persist, uninstall the device and restart your PC—Windows will reinstall it
If that still doesn’t work, look to the headset’s companion software (like Logitech G Hub or Razer Synapse) in case there’s a firmware update available.
Mic not working
If you’re yelling into the void and no one can hear you, your mic might not be the problem, but rather a simple setting. Here’s how to fix it:
1. Check your mic input settings
On Windows:
- Right-click the sound icon in the taskbar > Sound settings
- Under Input, make sure your headset mic is selected
On consoles:
- Go into audio or chat settings and confirm your headset mic is the active input
2. Look for a mute switch or flip-to-mute boom
A surprising number of users report “gaming headset mic not working” only to realize there’s a mute switch they forgot about. Check the mic arm or inline control for a toggle or switch.
3. Test the mic on another device
Try plugging the headset into your phone or a different PC to test the microphone. If it works, the problem is likely with your device settings.
4. Allow microphone permissions
On Windows:
- Go to Settings > Privacy & security > Microphone
- Make sure microphone access is enabled for your device and apps
5. Clean the mic port
It might be a long shot but dust and lint can clog up connectors. Use a soft brush or compressed air to gently clean the mic port.
6. Try a mic replacement
If your headset has a detachable boom mic, replacements may be available from the manufacturer’s site or third-party sellers. Just make sure it’s the correct model.
Static, crackling, or distorted audio
Hearing crackles, popping sounds, or robotic voices during gameplay? That’s usually a sign of interference or poor connection.
Fixes for common audio interference:
- Move the wireless dongle: Keep it away from routers, cellphones, or metal objects.
- Switch USB ports: If you’re on a desktop, try the rear USB ports, which offer better power and signal integrity.
- Try a different connection method: If your headset supports both USB and 3.5mm, switch to analog to see if the issue improves.
- Update firmware/software: Use the appropriate software suite (e.g. SteelSeries GG, Logitech G Hub, Razer Synapse) to check for updates.
Static can also indicate a damaged cable or a failing speaker driver. Try testing with another headset to confirm, if possible.
Headset not connecting (wireless only)
Wireless headsets are super convenient until they stop connecting. Whether you’re on Bluetooth or a USB dongle, try these steps.
1. Check the battery
Seems obvious, but low or dead batteries are often overlooked. Charge your headset fully and try again.
2. Re-pair the headset
- For USB dongles, press the pairing button on both the dongle and headset (check your user manual)
- For Bluetooth, go to your device’s Bluetooth settings and remove, then re-add the headset
3. Update drivers and firmware
Wireless drivers can get buggy, especially after an operating system update. Check your manufacturer’s software for the latest updates.
4. Avoid USB 3.0 port interference
USB 3.0 ports can emit noise in the 2.4GHz range, interfering with wireless dongles. Try plugging into a USB 2.0 port or use a USB extender to create distance.
Physical damage (cushions, bands, booms)
Let’s talk about the physical wear and tear because no headset lasts forever.
Worn earcups
If your cushions are flaking or flat:
- Order replacements from the brand’s site
- You can often find compatible third-party pads on Amazon, eBay, or audio accessory shops
- If you can’t, then you may not be able to replace them. Note that if you’re headset is still under warranty, you may be eligible for a replacement because of this
Loose or broken headband
If the headband is cracked or stretched:
- A zip tie or two can hold things together as a short-term fix
- Use epoxy or plastic glue for a more permanent fix but it may not look pretty
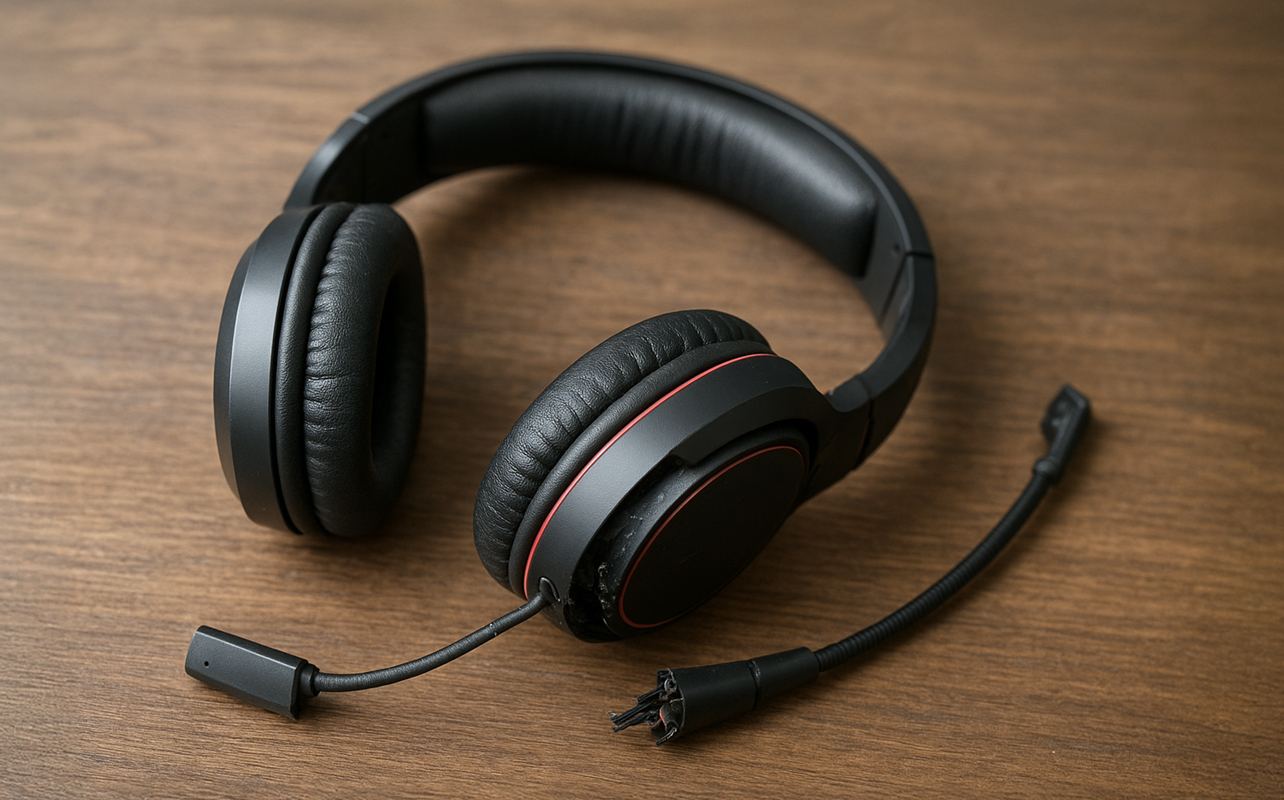
Broken mic arm or cable
Boom mics that snap off or cables that split at the base usually need replacement parts.
- Don’t attempt soldering unless you’re confident in your skills (and you’re outside warranty)
- You can often find replacement booms online, including for older models
Out of warranty?
You may be able to replace individual components rather than the entire headset:
- Search your exact model number on eBay or Amazon
- Check Reddit communities for DIY part swaps or headset mods
When to replace or seek professional help
While a lot of issues are fixable at home, not everything is worth the hassle or the risk of making things worse.
Here’s when to step back and consider alternatives:
- Internal speaker or mic driver failure
- Non-detachable cable damage
- Severe distortion or blown speakers
- Battery won’t hold a charge (wireless models)
Check your warranty
Most headsets come with a 1–2 year manufacturer warranty. Don’t void it by cracking the thing open. First:
- Visit the brand’s website and look for warranty options
- Take note of what the warranty actually covers, as damage caused by different factors can affect coverage
- Keep your receipt or Best Buy Canada proof of purchase handy
Geek Squad at Best Buy Canada
Best Buy Canada’s Geek Squad may offer in-store diagnostic or repair support. They offer:
- In-store diagnostics and troubleshooting
- Repairs, replacements, or warranty claims
- Expert advice on whether to fix or upgrade
If repairs cost more than 50–60% of the original price, you’re likely better off buying a new headset.
Final thoughts: Repair or replace?
Common issues with gaming headsets can vary but so can possible solutions to get you back in the game. Whether it’s no audio, a mic that’s stopped working, a loose cable, or worn-out ear cushions, you can usually fix those at home with a bit of patience and the right tools. Don’t rush to replace your headset until you’ve checked your warranty status and explored do-it-yourself solutions, especially if the fix is simple and low-cost.
If the problem is more complex or the device still falls under manufacturer coverage, visiting a Best Buy Canada store for Geek Squad assistance can save time and prevent further damage. They offer in-store diagnostics, repairs, and can help with warranty claims or product replacements. And if it turns out your headset is beyond repair or the cost of fixing it is too expensive, it’s worth looking into headset accessories or replacements online or in-store as a next step.
Still building your ideal setup? Don’t forget to check out our PC Gaming Buying Guide for expert advice on all things gaming.

This article was drafted using AI technology and then reviewed, fact-checked, and revised by a member of our editorial team.


