As a photographer I need to know a lot about image file formats. Whether I’m printing a photo, publishing one online, or worrying about the size of my memory card, file formats are never too far from my mind. Today I’m looking at some of the most common image file formats and giving you the knowledge you need to choose the right one at the right time.
JPEG for photos
When it come to photos, the most common image file format is the jpeg, and if you’ve ever shot a digital image you’ve almost definitely used this format, whether you knew it or not. JPEG actually stands for Joint Photographic Experts Group, named for the committee that originally agreed the standard for the jpeg. The reason the jpeg came into existence was because there was a need for a compression algorithm that could reliably reduce the size of image files to make them easier to store and distribute.
When you compress an image file into a jpeg, you essentially discard some of the information within that file. This is referred to as ‘lossy’ compression—there is no way to get the discarded information back. There is a trade off that occurs within the compression process where quality is sacrificed for the sake of file size; basically the smaller the size the lower the quality. It’s a little bit more nuanced than that, but it’s a good rule of thumb.
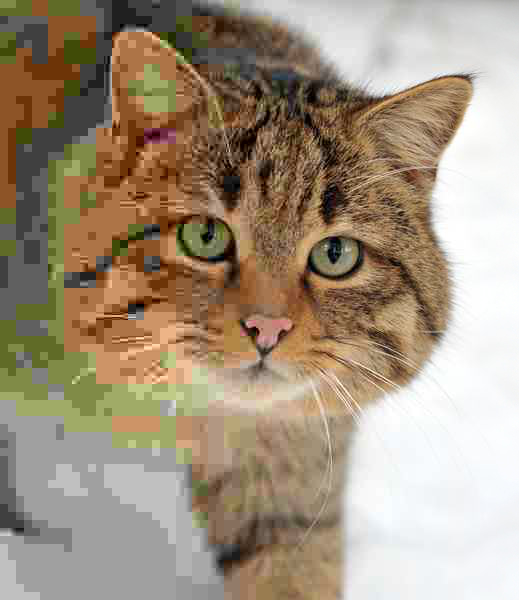
The beauty of jpeg compression is that it can be tweaked; you can manipulate the compression factor so as to maintain the quality standard you need for your particular purpose. In the image below the quality varies from very low on the left to very high on the right. It’s interesting to see what happens in the middle where things are starting to look good but you are still seeing some funkiness, or ‘artifacting’ as the technical term goes.

One of the important things to note about working with jpegs is that every time you edit one, and save it again as a jpeg, there is a further loss of quality. So if you edit and save the same image repeatedly, you’ll eventually start to see artifacts of the compression process appear.
RAW files for processing
Before I go any further let me take a step backwards in the process, to the point where the image is actually produced. Most of the time that will be a digital camera, a smartphone, or a tablet—although taking photos with a tablet is a major faux pas nowadays—especially if you have kids!. When the device reads the information coming from the sensor, it writes to something called a RAW file. ‘RAW’ is not an acronym, it doesn’t stand for anything, it’s just the term that we use to refer to the uncompressed image file straight from the sensor. Canon cameras produce CR2 files, Nikon cameras produce NEF files and Sony cameras produce ARW files, but they all equate to the same thing—RAW files.
In automatic mode, cameras will convert the RAW files to jpegs by default and save only the jpeg version, but you can change the settings so that the RAW file is saved, or the RAW file plus a jpeg. In order to view RAW files you need special software that can decode the information into something viewable. Manufacturers will supply such software for free, but most photographers prefer to use something like Adobe Lightroom, which is often faster and more intuitive than the proprietary software offered by manufacturers. The beauty of jpegs is that they are accepted as a standard format and viewable by a host of applications, including web browsers.
Jpegs are also a good format for printing, whereas RAW files are used for post-processing. They contain a lot of color and luminosity information that is discarded upon compression to jpeg. If, for example, the sky in your photo is overexposed, or the shadows underexposed, you can often fix that by teasing out more to the information contained in the RAW file.
Did you know that Best Buy now stocks external drives that are 5TB and bigger?!
DNG for archiving
As I mentioned earlier, RAW files are uncompressed, and so they form part of the ‘lossless’ group of file formats. DNG (digital negative) is an Adobe-patented lossless file format specifically used for archiving photographs. Some photographers will convert their RAW files to DNG in order to archive them, because they see it as a more stable standard that might outlive the proprietary RAW formats.
Another popular lossless file format is the TIFF file, which is popular among graphic artists and photographers alike. It is often used when exporting images from Photoshop, as is PDF, which is commonly considered a document format, but it can also be used for images. These files can be used for further editing or printing.
GIF and PNG for screens
Two of the most important file formats for the web are GIF and PNG. You’re probably familiar with GIFs because they are used to create very short animations on the web and are meme-creators weapon of choice.

The GIF format was designed specifically for screens, so it has a very small color space, a mere 256 colors, which means it’s not very good for reproducing photos. This is not a format you will often use for printing, but it is useful for logos and graphics where there are limited color gradients. By the way, GIF is generally pronounced with a hard ‘G’ like ‘gift’. Just sayin’.
The PNG file format falls somewhere in between the jpeg and the gif in terms of functionality. It is an excellent format for use on-screen, with small file sizes which are quick to download. In fact it was designed to replace the GIF. It has a much wider color space than a gif, so it can be used to display photos. It can incorporate transparent areas of the image, which is very useful in web design, but it cannot do animations. Gifs also support transparency, by the way.
The PNG and GIF formats are both lossless, which means you can edit pngs and gifs as often as you like with no loss of quality.
Be sure to check out all the external hard drives available at BestBuy.ca.


