
 Smart home products make great gift items for anyone with a Google Assistant or Amazon Echo speaker. With a little creativity, smart home gadgets add practical value to our day-to-day lives.
For example, my coffee maker is connected to a smart plug. Every morning when I wake up, I tell my bedside Amazon Echo speaker to make coffee. By the time I get to the kitchen, a fresh pot of coffee is ready. Winning!
In this review, I’m looking at the Lutron Caseta Wireless Bundle. These are a pair of smart light switches that replace existing ones. These switches work with 600W incandescent, halogen, 5-amp LED, and CFL bulbs. They can also be used with 3-amp ceiling and exhaust fans, but I’ll discuss a trick below to get a 2-in-1 solution.
Be advised, this installation requires minor electrical work. If you’re not comfortable working with electrical wires, I recommend hiring an electrician. I’ll still detail the correct steps and tips for anyone looking to do a DIY install.

Unboxing the Lutron Caseta Wireless Bundle
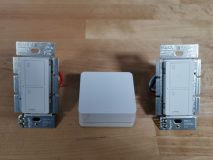
 The bundle comes with two smart light switches and a smart bridge. The bridge connects to a Wi-Fi router. The light switches connect to the bridge to access the wireless network. Also included is a Pico Remote that looks like the light switch, but it can be installed anywhere.
The smart switches are designed to replace existing light switches. The kit includes everything you need to retrofit old light switches with new ones. Inside you’ll find machined screws, electrical twist-on wire connectors, wall anchors, and faceplates. An Ethernet cable is also included to connect the smart bridge to a Wi-Fi router.

Selecting light switches to retrofit
For this review, I wanted to select a light switch that would add the most value. The best location was the bathroom light in my Airbnb suite. It solves a big problem I’ve been having with guests.
I noticed a lot of humidity inside the Airbnb suite after guests checked out. The bathroom fan was not being used during showers. To solve this I wired the bathroom fan to the light switch so the fan and lights go on together.
The new issue is guests leaving the bathroom light on. Unlike most houses, the light switch is not on the outside of the door. Instead, it’s inside the bathroom behind the door in a very awkward location.
The bathroom also has an electrical heater. With the light (and fan) on, the heat was being sucked up leaving the bathroom cold. Guests would then crank the heat up instead of just turning the light (and fan) off.
The Lutron Smart Switch should solve this problem. Over time, it should help save money on energy bills too. If the bathroom light is left on, I’ll switch it off myself on the app, with the Pico Remote, or via voice.
Installing the Lutron Caseta Wireless Bundle
 In the bathroom, I have two switches beside each other. One is left blank because the fan is now wired to the light switch. I turned the light on, went to my breaker panel, and turned my breaker switch off. This is a critical step that cannot be skipped. When I returned to the bathroom, the light was off. This indicates the power is indeed shut off.
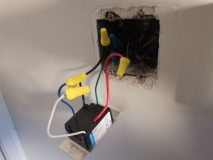 When it comes to electricity, I like to be extra careful. After unscrewing the old light switch, I used an electrical circuit tester to verify the wires were not hot. I removed the old electrical twist-on wire connectors and connected the Lutron Smart switch. Since it has a retrofit design, I was still able to use the old dual faceplate. After turning the breaker back on, the Lutron switch worked like an ordinary switch.
In all, the installation took about 5-10 minutes. The kit comes with clear instructions and wiring diagrams. I recommend you take a picture of your old switch before removing the wires. This helps determine the wire placement with the Lutron Caseta Smart Switch.
Configuring the Lutron Caseta Bridge
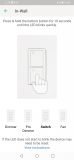 I connected the bridge to my modem, downloaded the Lutron App, and followed the steps. Since Lutron has many different switches, it’s important to select the right product in the app. Thankfully, it displays pictures, which makes it easy to find the right switch.
After pressing and holding the bottom button on the switch, the app instantly recognized it and connected to the wireless network. From there, I was able to assign it a room name and turn the bathroom light on and off from the app. This verified that the installation was successful.
Using the Lutron Caseta Wireless Bundle
Now that the Lutron switch was connected, I paired it to my Amazon Echo and Google Assistant speakers. Whenever I see the bathroom light on from outside, I can manually turn it off myself using the app, Pico Remote, or via voice. I found voice to be the quickest method, but you have to be within earshot of a smart speaker.
The Pico Remote is battery powered and comes with a faceplate that can be installed anywhere. This basically replicates a light switch without electrical wiring. Since I use voice commands, my plan is to install the Pico Remote in front of the bathroom door where it typically would be.
For that reason alone, the Lutron Bundle makes sense for anyone who wishes their light switch was in a different location. Another option is to use it as a remote in a living room or bedroom.
Setting schedules
The Lutron App provides a lot of options for light switches. I set a timer to turn the bathroom light off after 1AM. This ensures the light never stays on at night, but guests can still override it at the switch. Another feature I like is the sunset tracker. As the sun sets, the lights automatically go on. This is great for outdoor lights and can provide security to dark areas at night.
Final thoughts
Smart home lighting is one of my favorite hobbies. Over the years, I’ve learned that each solution has its pros and cons. For instance, as great as smart light bulbs are, if someone turns the light off at the switch, they won’t respond to voice commands. Smart light switches in the Lutron Caseta Wireless Bundle solve that problem. Users can still turn lights on and off at the light switch, or use voice. The best of both worlds!
Even if someone didn’t want to use the voice commands, having the ability to set light schedules is a useful feature. I would use this for kitchen and bedroom lights in the morning and turning the living room and hallway lights off at night.
I also found the installation process to be super easy. It makes for a great DIY project for anyone comfortable working with electrical wires. I only wish it didn’t require a bridge, as I now have multiple bridges connected to my Wi-Fi router. It would be great if manufacturers worked together to create a master bridge for various smart home devices. Perhaps that technology can go into the next generation of routers. At this point, I’m going to need a switch if I need to connect another bridge to my router. We shouldn’t have to do this; we have the technology!
Whatever the case, retrofitting your lights with smart switches is a great investment. The Lutron Caseta Wireless Bundle is also a great gift for anyone interested in smart home products.


