
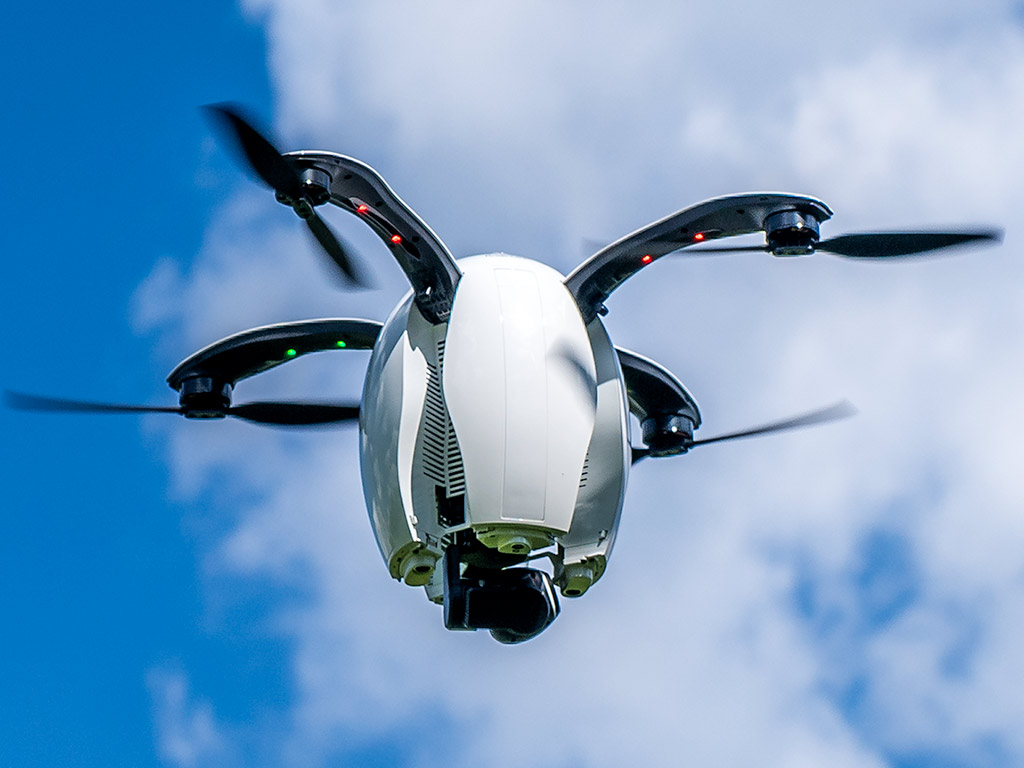
There are few drones that look odder than the PowerEgg, but it does fly, and once you get past the setup hurdles, can fly pretty well.
PowerVision even makes drones for underwater use, but this one is your standard quadcopter that flies in the air. Its form factor, however, is considerably different than others on the market. Putting the form factor aside, it has real capability to it, though you will need to learn a lot before even taking it to the skies.
You may also want to look at the current rules for flying drones in Canada, the latest of which went into effect on June 1, 2019.
Design
The egg-shaped build is unique unto itself, even by drone standards. Some other models may fold in to reduce the overall footprint, but this is altogether different. The propeller arms manually pull out of the frame, whereas the landing gear is mechanical. You can’t just push the legs back in or pull them out.
The reason why is because the landing gear retracts when the PowerEgg reaches a certain altitude after ascending from its takeoff position. With the legs up, the camera gimbal then has full range to look around 360-degrees, as well as straight down at a 90-degree angle. Its pitch and yaw are also mechanical, letting you control where the camera looks at any time. More on that in a bit.
PowerVision includes a base for the drone to sit on, but you don’t need it to actually fly. The landing gear needs to come out before even placing it on the ground for takeoff. I’ll get into the setup in the next section, but suffice it to say, you need a few components to do everything properly.
That means you need to also use the included remote controller and what’s called the Base Station. The controller and station connect with each other via an included Aux-In cable. It’s the station that pulls in the GPS signals and ultimately communicates with the drone. There’s also a second remote—a gesture-based one called the Maestro Motion. Using hand motions with the latter, pilots could control the drone’s movements, offering an alternative to the typical remote controller.
Connections
The PowerEgg uses the 2.4GHz band to communicate over Wi-Fi. That enables longer range to the Base Station, which then works with either the remote controller or Maestro Motion controller. There’s built-in GPS, though the drone also supports China’s own BeiDou satellites (though that latter system won’t be a factor when flying).

Setting up to fly
This was the part of the review that easily frustrated me the most. The biggest issue is the lack of information and clarity with the instructions. PowerVision doesn’t explicitly state that users should download the full manual online. The quick start guide that comes with the drone is far too basic to get off to a good start.
The full manual is fairly long, but there are important informational tidbits in it. Unfortunately, it can also be a little confusing. For example, when first looking at the diagram for the remote controller, you would think that the takeoff and landing button turn the motors on and off (as with most drones). Not the case. You have to pull the joysticks down and in toward each other to get the motors going first. Not only that, but you pull the left joystick up to elevate it from its takeoff position.
I had to dig in the manual to find this sequence. It was never mentioned in the welcome tutorial video on the Vision+ App, either. This lack of clarity cost me a day of flying on one occasion because I couldn’t understand why a button clearly labeled as “takeoff” in the manual didn’t actually propel the PowerEgg into flight.
Moreover, the drone was a bit finicky over distance. It requires that pilots stay about 30 feet away when taking off. Every time I got close, this annoying voice on the app would tell me I had entered a “protected area.” At first, I thought it meant a no-fly zone under the law, but it actually referred to my position (and the remote controller).
Then, there was the part where the red lights on the propeller arms had to face out, away from me as the pilot, before takeoff. When I tried flying in Easy Control Mode, the annoying voice piped up about a “weak” GPS signal. The manual states that 13 satellites is a good lock. I had 18-21 routinely in the open field I tested it in. For whatever reason, I never got Easy Mode to work, even once.

Where the app comes in
I’ve already mentioned the Vision+ App, but it’s also a key part of the whole operation. Setting up an account was initially problematic until I realized I had erred, and so was fine soon after. Linking it to the drone was relatively simple, and calibrating the PowerEgg was fine too.
One thing I really liked was the “system check” that green-lights all the different aspects to show they’re connected. From the drone’s sensors, to the remote controller, Base Station, and GPS, the scan is an initial indicator that everything is in order.
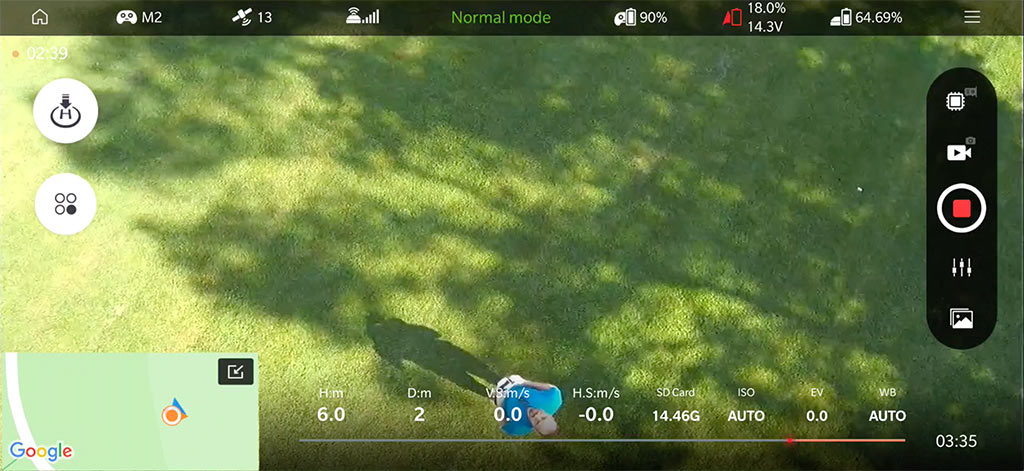
The app’s layout is also fairly straightforward, showing either a camera or map view from the drone itself. You can change flight paths, set waypoints, and otherwise adjust settings related to using the remote controller, or changing the SSID and password for the drone’s Wi-Fi connection.

Camera
The Vision+ interface also includes all the camera settings. Most of these are automatic, though pilots can also manually adjust shutter speed, ISO, and white balance, if need be. The onboard 4K camera can shoot good photos and video, even though it doesn’t always seem that way when looking at the live feed on the phone.
By default, it’s in 4K resolution, with an option to drop it down to 1080p, if desired. The gimbal has freedom of movement, and when I got it to work, I liked how easy it was to change the pitch and yaw, veering laterally or looking down more vertically to capture scenes from above in a variety of ways.
The challenge is to capture good footage in differing conditions. The PowerEgg, like other drones, is sensitive to wind. Easy and Normal modes include GPS to keep the drone focused on staying where it’s supposed to. Professional mode takes away all automated input and leaves it all to the pilot. It was a true free-for-all that way, and is really only useful for experienced pilots.
As for image quality, so long as the drone flew in more stable conditions, video wasn’t bad at all. Still photos turned out okay too, except that it’s better to veer slightly away from the sun so that it’s not in the middle of the frame. I found everything would wash out when it was. The lens flare effect greatly dissipates when the sun is off to the side a little.

Flying the PowerEgg
I already pointed out some flight-related things, but what I can say is that I enjoyed the drone when it was actually in the air. Not so much when it wasn’t. The landing gear helped the PowerEgg descend nicely onto the ground. The only rocky landing I had was a crash whereby I selected an orbiting mode that had a wider radius than I anticipated.
For that reason, I strongly recommend flying the PowerEgg in an open field with plenty of space all around. The fewer people around, the better. Otherwise, it’s hard to really experiment with the various flying modes it offers. There’s plenty to do in freewheeling flight, whereas the modes make things interesting.
What is helpful is that it’s easy for the PowerEgg to come back to its takeoff point—and to maintain a distance to the pilot. Getting to that point takes time with any drone, but with this one, it takes longer, in my estimation. There is trial and error involved, and its unique design makes it a little more susceptible to weather changes.
Battery life
PowerVision rates the drone’s battery to last about 20 minutes per flight. I never hit that number once in my testing. The only way I can see it happening is if the drone is mostly hovering in place during flight and not doing much with the camera.
Start moving the gimbal around, use the automatic flight modes, generally fly around, and you get a shorter life per charge. I hit between 15-17 minutes in my testing. Decent performance, but not an amazing figure. Getting a second battery may be necessary if you need more time in the air.
Final thoughts
Flying a drone is more complicated now than it was before. Not only because of the tighter rules, but also because it requires more time and effort to learn features and performance. The PowerEgg is precisely that kind of drone, and where PowerVision fell short was empowering users to feel comfortable with it off the bat. That’s how I felt after dealing with the confusing instructions.
Once I got it in the air, I warmed to it. I liked how it flew, and how functional it turned out to be. PowerVision is playing in a tough market, given DJI’s product line, but the PowerEgg is worth a look if it comes at the right price.
The PowerVision PowerEgg is available now.


