
Photography and cameras play a powerful role in how we tell stories and preserve memories, no matter what it is we’re trying to share and convey with others. It also varies widely, be it precious family moments, documenting travel adventures, or creative pursuits. The same fundamentals can apply whether you’re snapping photos on a smartphone or using a high-end DSLR because the ability to take better pictures is a skill anyone can develop—with the right guidance.
You take photos and they come out blurry, washed-out, or with awkward framing. All of these can feel like frustrating misses, especially when you know the moment was worth capturing. Many new photographers also struggle with knowing which settings to use or how to make the most of their gear.
This guide will walk you through essential photography tips—covering composition, lighting, camera settings, and gear—to help elevate your photos instantly.

Understand your gear
Know the basics of your camera: DSLR, mirrorless, or smartphone
The first step to better photography is knowing your tools. Are you shooting with a DSLR or a mirrorless camera? Or is your smartphone your go-to? While each type of camera has its strengths, understanding what yours can (and can’t) do is essential. DSLRs and mirrorless cameras offer more control and image quality, but smartphones have come a long way and can produce stunning results with the right techniques. Not to mention they’re more portable.

Importance of reading the manual and exploring settings
Yes, we’re suggesting you read the manual. Why? Because that little booklet is packed with tips that can instantly improve your photography. More importantly, they outline and explain what each dial, button, and setting does, particularly things like exposure compensation, white balance, and metering modes. Photography is about experimentation and you can always reset if things go off track.
When to use auto mode vs manual mode
Auto mode is great when you’re learning or in a hurry, but it’s worth switching to manual mode to truly unlock your creativity. That includes more control or how soft a blurry background should be or capturing motion blur in a waterfall, among many others. Long exposure photography to get low-light scenes or even shoot for the stars. The beauty of manual mode is it puts you in charge. Start small—adjust one setting like aperture or shutter speed—and build confidence from there.
This is also where modes like Aperture Priority or Shutter Priority come in. In Aperture Priority (set as A or TV depending on the camera), you manually set aperture and the camera will adjust shutter speed on its own. Shutter Priority is the opposite. In either mode, you have the choice to either manually set ISO (which is sensitivity to light) or go to Auto and let the camera set it instead. Give it time, and you’ll learn to set it yourself at all times based on what you’re photographing.
Master lighting basics
Natural light vs artificial light
Light is the foundation of every great photo. Natural light tends to be softer and more flattering, while artificial light can be controlled and sculpted for dramatic effect. Pay attention to where your light source is coming from and how it interacts with your subject. For portraits, window light is a game changer. For flat lays or product shots, experiment with side lighting. If possible, try to shine light on a subject from both directions, unless you’re looking for a bolder look.
Golden hour and its benefits
There’s a reason photographers love golden hour. This magical window—just after sunrise or before sunset—casts a warm, soft amber glow that’s flattering on skin and rich in tone. Landscapes pop, portraits shine, shadows add contrast, and everything just looks better. Set an alarm or time your evening walk to catch this natural filter in action.
Blue hour and its benefits
Blue hour is a great time to capture a cityscape or architecture. It’s a brief window in twilight after the sun has already set and the night sky hasn’t fully turned dark yet. Though called “blue hour” the sky doesn’t always stay blue for one hour. It can be shorter or longer depending on latitude and time of year. The influx of blue hues also amplifies yellows and oranges, making cities and streets look vibrant and cinematic.
Tips for indoor lighting and using a flash wisely
Indoor lighting can be tricky, often resulting in yellow casts or harsh shadows. Try using lamps with daylight-balanced bulbs, or bounce your flash off the ceiling for a softer look. Consider investing in lighting equipment from Best Buy like ring lights or external flashes to level up your indoor game.
It’s best not to point a flash directly at a subject because it can cast a harsh shadow. That proves difficult to do with a smartphone because there’s no way to point it in a different direction. One way to get around that is to utilize ambient light around the subject or to utilize the flashlights on other phones. For example, if you’re with friends and family, use the flashlights on two other phones to cast light on the subject from the left and right—and make sure not to use the flash on the phone capturin gthe photo. You can also use this trick when taking the same photo with a DSLR or mirrorless camera.
Nail your composition
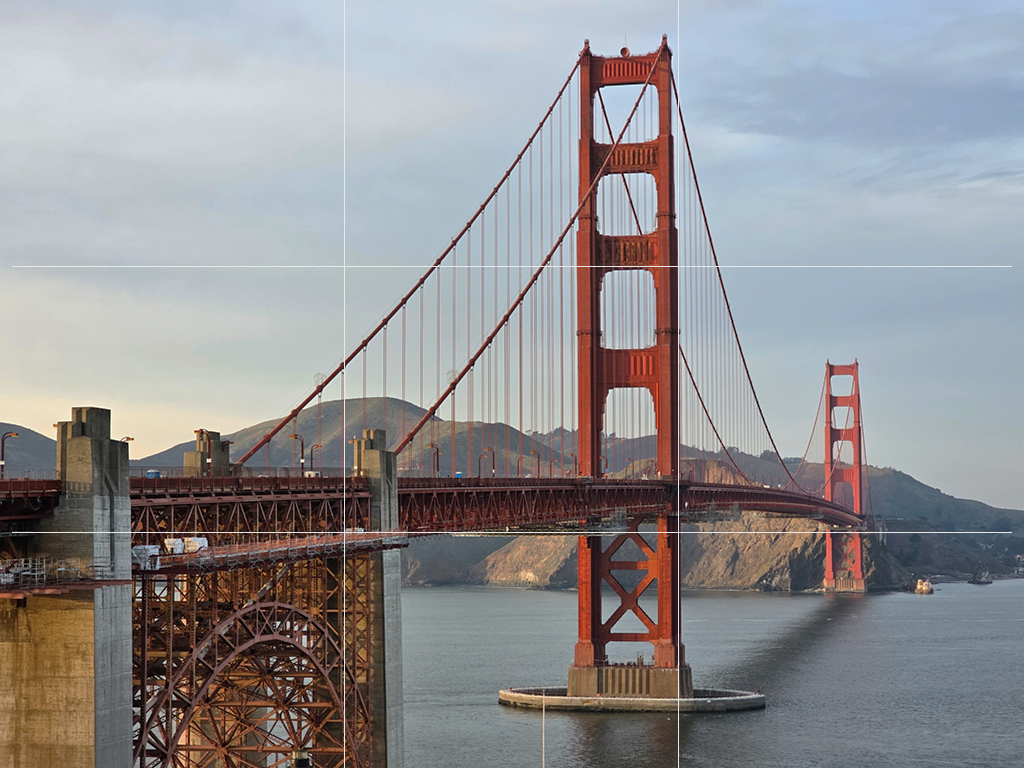
Rule of thirds explained with examples
Good composition turns an average photo into an extraordinary one. The rule of thirds divides your frame into nine equal parts using two vertical and two horizontal lines. Placing your subject along these lines—or where they intersect—creates visual tension and balance. Try placing a person’s eyes along the upper third or lining up a horizon on the lower third for instant improvement. Cameras and smartphones offer the option to use a grid on their screens to help you better frame your shot. Following this principle is key in how to take great photographs.
Leading lines, framing, and symmetry
Use natural or man-made lines—like roads, fences, or shorelines—to guide the viewer’s eye to your subject. Frame your shot with elements like archways or branches to create depth. Don’t shy away from symmetry; reflections and architectural lines often shine when perfectly balanced. Symmetrical elements in a photo can add depth to a photo as well, which you can find in a number of places. Think of a hallway, dock, or road as examples. You can also utilize framing in ways that are interesting, like focusing on a subject through a hole in a fence or window, for instance.
Keeping the background simple and clean
What’s behind your subject is just as important as the subject itself. A cluttered background competes for attention. If possible, move your subject or shift your angle to eliminate distractions. Or use a wide aperture to blur the background into a soft, creamy bokeh.
Using negative space creatively
Sometimes, less is more. Leaving space around your subject can add elegance and drama. Whether it’s a single flower against a blank wall or a lone hiker in a vast landscape, negative space can elevate a photo with emotional weight. This sometimes has an even broader effect with black and white and street photography as well. Experiment and you’ll build a style in due time.
Keep your shots sharp
How to avoid blurry photos: shutter speed and holding techniques
Blurry photos are often caused by camera shake. Make sure your shutter speed is fast enough for the scene. A general rule? Use a shutter speed that’s at least 1 over your focal length (e.g., 1/100s for a 100mm lens). Brace your elbows against your body, hold your breath, and gently press the shutter.
Importance of using a tripod or monopod
For crystal-clear shots—especially in low light or long exposures—a tripod is a must. Want to capture silky waterfalls or starry night skies? A steady base is your best friend. Browse tripods and monopods on sale at Best Buy to find one that fits your style and budget.
Play with depth and perspective

Using aperture to create background blur (bokeh)
A wide aperture (low f-number like f/1.8) blurs the background more, making your subject pop. This is good for portraits and detail shots. The dreamy blur, known as bokeh, adds a professional touch to any photo. If, however, you want to retain some of the background, you can try a higher number like f/8 to reduce the level of blur.
Try different angles and viewpoints
Stand on a chair, lie on the floor, or shoot from the side. Changing your angle adds energy and intrigue. Try photographing kids at their eye level or capturing architecture from below to make it feel grand. You don’t always have to keep the subject in the centre of the frame, either. Try setting the subject further to the side and angle the perspective to create depth and contrast to the broader scene. This technique can work really well when capturing someone in front of a landmark but it otherwise has very wide applications.
Incorporating foreground for a layered effect
Foreground elements like flowers, fences, or even people can add layers and depth. It creates a 3D-like feel and invites the viewer to explore the whole image. You can get a similar effect by photographing a scene that reflects off another surface, especially water.
Looking to create more depth? Explore interchangeable lenses at Best Buy for creative options.
Focus on your subject
How to use focus modes effectively (manual vs auto)
Autofocus is fast and smart, but sometimes it chooses the wrong thing. Learn to use single-point focus or switch to manual when you need precise control—especially for macro or low-light shots. DSLR and mirrorless cameras will offer features like focus peaking to illuminate the focused portions of an image on the LCD screen. Not all phones do though some third-party camera apps might.
Tips for portraits vs landscapes
For portraits, use face or eye detection and focus on the eyes—always. For landscapes, use a smaller aperture (f/8-f/11) and focus one-third into the scene to keep everything sharp.

Making your subject stand out using lighting and contrast
Direct the viewer’s attention with light and contrast. A backlit subject can create a beautiful silhouette, while rim lighting makes people glow. Experiment until your subject becomes the undeniable star of your frame.
Take multiple shots and experiment

Why burst mode and bracketing are useful
Burst mode captures multiple frames per second—perfect for action shots, jumping poses, or toddler antics. Bracketing takes the same photo at different exposures, which is great for challenging lighting situations or HDR editing. DSLR and mirrorless cameras hold an advantage here because they offer better optics, whereas phones have faster processors. You can get great results in either case, though you will have to undergo some trial and error to get better.
Embracing mistakes and learning from them
Some of your favourite photos might come from accidents—a sun flare, a light leak, a motion blur. Photography is as much about curiosity as it is about precision. You will come away surprised sometimes at how good or interesting photos like that can turn out.
Keep shooting in different conditions to improve
Challenge yourself: photograph in fog, rain, snow, or at night. Each condition teaches you something new about light, exposure, and creativity. Take note of the metadata as well. This way you can remember what settings you used to shoot in certain conditions. If they were overexposed or underexposed, you’ll know what adjustments to make.
Edit with intention

The role of post-processing in photography
Editing doesn’t mean fixing bad photos—it means enhancing great ones. Crop for better composition, tweak lighting, boost contrast, or bring out hidden colours. Done right, editing turns a good photo into a showstopper.
Basic tools in Lightroom or smartphone apps
Start with exposure, contrast, highlights, and shadows. Tools like Snapseed or Lightroom Mobile make editing accessible even on the go.
Enhancing but not over-editing your photos
Avoid the temptation to go too far. Oversaturation, extreme sharpening, or heavy filters can ruin an otherwise beautiful shot. Less is often more.
Back up your photos
Why photo storage and organisation is important
Imagine losing your entire camera roll—ouch. Whether you’re taking hundreds of photos a month or just a few gems, backing them up is crucial.
Tips for memory cards, external drives, and cloud storage
Use high-speed memory cards from Best Buy, and always carry a spare. Transfer photos regularly to an external hard drive or upload them to cloud services like Google Photos or iCloud for safe keeping.
Keep shooting: Great photos start with practice
Photography isn’t about perfection—it’s about persistence. The more you shoot, the better your eye becomes. Try different subjects, settings, and styles. Review your work, seek feedback, and don’t be afraid to fail. Like any craft, honing skills takes time and repetition.
Ready to level up your photography? Check out cameras, camcorders, drones, and accessories at Best Buy to find the tools that match your growing skills. Because the perfect shot might be just one click away.

This article was drafted using AI technology and then reviewed, fact-checked, and revised by a member of our editorial team.


