

Webcams bring new levels of personalization to calls with friends, families, and coworkers. Today, video communication has become bigger than ever. Webcams have seen a huge surge in demand globally due to increases in social media and work from home. People are turning to webcams for their improved video and audio hardware. Today I will be reviewing the ASUS C3 webcam. Will this be your next web camera? Check out this review to find out.
Why do we need web cameras?
If you have a laptop with an integrated webcam you might be wondering why anyone would need an external web camera. In the world of cameras, sensor size plays a huge role in image quality. The sensor size of a camera determines how much light it can collect, which has a direct correlation with image quality. While laptops do come equipped with cameras, their small size often results in a lower image quality. On the other hand, external webcams come with larger image sensors leading to a better image quality, colour, and resolution.
Another benefit of external webcams is their ability to include features that aren’t found in laptop cameras. For example, higher end web cams come with features such as autofocus and microphones that can reduce ambient noise. All together, there are advantages to use external webcams as part of your video and audio set up.
ASUS C3 delivers a great image quality and is easy to set up
The ASUS C3 webcam is a mid-tier webcam that provides fantastic video and audio for an affordable price. The C3 comes with a HD 1920×1080 video resolution at 30 fps, autofocus, and beamforming microphones.
ASUS skipped the bells and whistles and made the unboxing experience very simple. When you open the small box, you are immediately greeted by the C3 webcam and its documentation.
Using the ASUS C3 was incredibly easy with little to no set up. The C3 connects to your computer via a USB-A port and is designed to be plugged and played. Unlike other webcams, the ASUS C3 doesn’t require you to download any software or install any drivers in order for it to work. I tested the C3’s compatibility on my Windows, Mac, and Chromebook laptop. I was surprised to see that on all devices, the ASUS C3 was instantly recognized and usable. The only setup that I had to do was set the C3 as the default camera and microphone.
When the C3 is in use, you will notice a small white LED on the front of the camera light up. For privacy, I would’ve preferred that ASUS include a hardware cover for the camera when it is not used.
The ASUS C3 webcam can be easily mounted
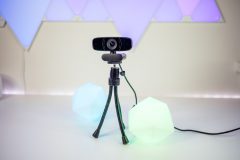
ASUS made mounting the C3 web camera very simple. Using the included clip, the ASUS C3 can be mounted on your laptop, computer monitor, or on the table. The C3’s clip moves up to 90 degrees so that you can easily adjust the vertical angle of the camera. The C3 also comes equipped with a ¼” thread on its base. This allows the webcam to easily be mounted on a tripod. As someone who does a lot of streaming, the ability to mount a webcam on a tripod is essential. It gives streamers the flexibility to find the perfect height and angle when mounting your camera.
In addition to easy mounting, the C3 comes with other fine tuning adjustments. The C3’s base allows for horizontal adjustment by tilting the camera towards the left or right side. The base also allows you to rotate the camera up to 360 degrees. Unfortunately, the base does not allow fine tuning of the camera vertically. Instead, all vertical adjustment must be done by changing the angle of the camera clip. In my real world use, I found this to be somewhat inconvenient. Finding the ideal angle required a combination of adjusting the camera clip and moving my laptop screen.
The ASUS C3 webcam offers a superior image quality
When comparing the C3’s video quality to my laptop’s internal camera, the C3 is a clear winner. Because the C3 has better all around hardware, it shows a significant improvement in video and audio quality. The larger camera sensor creates a better image fidelity and its 1920 x 1080 resolution leads to more fine details.
When you look at the C3’s image processing too, it’s clear that ASUS added a filter to the video output. Colours in the video are cooler with an emphasis towards green hues. While I do like the pre-set colour filter, it would be nice to have the option to apply custom colour tones to the image.
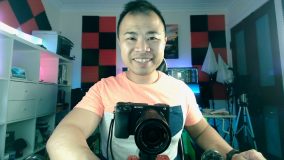
Another strength of the C3’s camera is its field of view. The ASUS has a 78 degree field of view which is significantly wider than the standard web cams. On most standard webcams, I feel like I can’t freely move around without some part of my body disappearing from the frame. The ASUS C3’s wider view means that you can fit more of yourself (and friends) into the video without having to back up or push the camera further away.
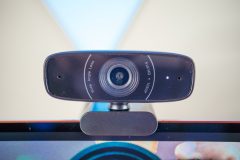
The ASUS C3 webcam delivers a clear and crisp audio
If you look closely at the front of the ASUS C3, there are microphones located on the left and right side of the camera. These are beamforming microphones that are meant to reduce the ambient noise while emphasizing your voice. In my tests, the beamforming microphones produced a very loud and clear audio. On video calls, l usually find myself speaking louder so that my audience can hear me clearly. However on the C3, speaking at a normal volume was more than enough. While the Asus C3 uses beamforming microphones, it does not have any noise cancellation technology. This means that listeners will still be able to hear ambient sounds around you, such as fans, and the sound of mechanical keyboards typing.
Final thoughts on the ASUS C3 web camera
If you’re in the market for a web camera, the ASUS C3 should definitely be on your list for consideration. The C3 delivers a fantastic video and audio for a reasonable price. Its plug and play nature and cross device compatibility make it perfect for anyone who wants a camera that works in a simple way. Finally, the C3’s small form factor makes it the ideal accessory for anyone on the go. If you don’t mind the preset colour filters and don’t need a noise cancellation system, the ASUS C3 might just be the perfect camera for you. If you’re interested in seeing what other products are available from ASUS, check their products here.


I always set up my home office lighting before an online meeting to counteract the uneven light from my office window.
One tip that helps me prepare for a video meeting: turn on lights so people can see me clearly.
A tip to help prepare for a video meeting: When starting the meeting, make sure you don’t have any unnecessary programs running in the background, in case you ever have to share your screen in a hurry and forget to double-check what you’ve got opened.
I find that getting fully dressed in professional clothes as if I were actually going into a physical meeting room gets my in the right mindset. That means the bottom half, too, that no one on video sees.
Always checking that my camera angle is correct and if it is too dark or not. If too dark, open light or remove shades in front of windows.
Double-check your background contents!
My tip is to check that my lighting and framing is good.
My daughter makes sure to let the rest of the household know she is about to start a conference and we should be mindful of this as to not make noise or walk into her room!
when preparing for a video meeting I make sure that the background is not too personal and the lighting is flattering
Always ensure that my audio is working before the meeting
I check the background and volume level on the computer
clear all background of objects as this is very distracting in meetings
One tip is previewing beforehand so I can adjust lighting and angle before the meeting starts.
The one thing so many do is have a bright window behond them. Really makes for poor vids.
I only have a laptop camera, so a few minutes before each teams meeting I have to adjust my desk, move my monitor and open my laptop, adjust the light behind me, and of course make sure my hair looks good 😉
I don’t do a lot of video meetings but I always make sure I have everything I need before I sit down… water, notepad, pen, well lit area….
Sign in a few minutes early to preview sound, lighting, and appearance of yourself and your background.
I go to the virtual meeting 10 minutes early to make sure everything is working and I have good light.
I always get myself prepared for the meeting in 10 minutes earlier just incase I need to readjust the setting of my webcam.
I use a headset so that I get better incoming and outgoing audio.
I find good lighting and try to be in the quietest spot in the house. It also helps if I take a minute to sit and breathe, to release some stress.
There are many tips but the most importants are, get a bottle of water ready, a good snack and blur that background because no one wants to see those weird posters in your background! 🙂 Also have good lightning.
Finding a quiet, private space to test my hardware and internet connection and perform a trial run beforehand. The trial tun allows me to perform a lighting check, sound check and background check – no pun intended.
Lighting I close my drapes so that I don’t get blinded by the light and helps with the glare on my laptop.
Lighting. The last thing you want to do is highlight your bald spots! Be sure to stay away from any spotlights that focus from the top down.
Since I have a very old computer, I need to remember to close all the apps that I don’t need for the meeting so I don’t end up with a ragged video.
Get to the virtual meeting space a few minutes early where you can see your camera and make sure everything is working.
Something that helps me prepare for a video meeting is setting up my laptop, turning on the camera, and sitting down exactly where I am going to sit during the meeting, so I can make sure my clothes, lighting, internet connection etc. are all acceptable! Then I can call my client and being the meeting.
Make sure that the camera angle is correct and have decent lighting for the meeting.
Test your equipment before the meeting begins.
I double check how I appear on the screen
I always check my lighting and make sure that I’m not sitting in front of a bright window.
I put a sign on my den door indicating I am in a meeting so nobody walks in or talks inappropriately!
Check to ensure your camera angle is correct and have proper lighting for the meeting.
I make sure I have nothing else open on other pages which may emit sound during the meeting. It has been known to happen…also turn volume off of cell phone!!!
After I see how I look for the camera I usually fix the flaws I never saw in my mirror.
I try to adjust the screen so the camera catches my face at a pleasant angle before I turn it on.
Before a video meeting, I check how I and the background appear on the screen.
I always make sure my background is prepared and neat.
An important thing for me with this cam is the autofocus. My current ancient cam doesn’t have autofocus so it’s a pain to get it properly focused. It doesn’t help that it’s maybe 720p at most. On top of that, the complete plug and play nature of it is a great feature to have. I’ve had SO many issues with my current cam. I’ve always had to download drivers to make it usable. It works for most programs but for some reason windows camera app shows just a black screen but says it’s connected? Not very fun because I can’t preview the cam before using it!
All of that being said, having a cam that works without any setup is key for getting quickly set up for a meeting. Not having to worry about the quality, focus and whether it actually works or not before getting in to it is a HUGE plus.
Before a video meeting, check how you and the background appear on the screen.
I make sure the sound is off in case a conversation is already in play.
After I see how I look for the camera I have to brush my hair so I look decent!
I try to adjust the screen so the camera catches my face
I close the window blinds because the light reflects on my screen
I think it is very important to preview and make sure that everything is running the way it is supposed to be and that the camera is pointing where it should be and nothing distracting showing up in the background
Before logging onto a meeting or class or whatever, go into the Zoom settings preview or the Teams preview and check and see your mic is plugged and sounds good, check your camera to get the right angle and ensure your background is not distracting, and that your lighting doesn’t look to dark or too bright.
Before a video meeting, or before speaking at an event, I always ensure my angle is correct (no one wants to be looking up my chin), my background is clean and my lighting looks flattering!
I always double check to make sure I’m wearing pants before logging in to a zoom meeting. Also be careful of wide lens cameras, they might capture more than what you need to show.
Check to ensure your camera angle is correct and have proper lighting for the meeting.
Comments are closed.