

Webcams bring new levels of personalization to calls with friends, families, and coworkers. Today, video communication has become bigger than ever. Webcams have seen a huge surge in demand globally due to increases in social media and work from home. People are turning to webcams for their improved video and audio hardware. Today I will be reviewing the ASUS C3 webcam. Will this be your next web camera? Check out this review to find out.
Why do we need web cameras?
If you have a laptop with an integrated webcam you might be wondering why anyone would need an external web camera. In the world of cameras, sensor size plays a huge role in image quality. The sensor size of a camera determines how much light it can collect, which has a direct correlation with image quality. While laptops do come equipped with cameras, their small size often results in a lower image quality. On the other hand, external webcams come with larger image sensors leading to a better image quality, colour, and resolution.
Another benefit of external webcams is their ability to include features that aren’t found in laptop cameras. For example, higher end web cams come with features such as autofocus and microphones that can reduce ambient noise. All together, there are advantages to use external webcams as part of your video and audio set up.
ASUS C3 delivers a great image quality and is easy to set up
The ASUS C3 webcam is a mid-tier webcam that provides fantastic video and audio for an affordable price. The C3 comes with a HD 1920×1080 video resolution at 30 fps, autofocus, and beamforming microphones.
ASUS skipped the bells and whistles and made the unboxing experience very simple. When you open the small box, you are immediately greeted by the C3 webcam and its documentation.
Using the ASUS C3 was incredibly easy with little to no set up. The C3 connects to your computer via a USB-A port and is designed to be plugged and played. Unlike other webcams, the ASUS C3 doesn’t require you to download any software or install any drivers in order for it to work. I tested the C3’s compatibility on my Windows, Mac, and Chromebook laptop. I was surprised to see that on all devices, the ASUS C3 was instantly recognized and usable. The only setup that I had to do was set the C3 as the default camera and microphone.
When the C3 is in use, you will notice a small white LED on the front of the camera light up. For privacy, I would’ve preferred that ASUS include a hardware cover for the camera when it is not used.
The ASUS C3 webcam can be easily mounted
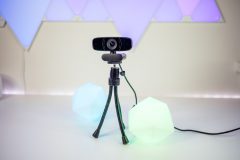
ASUS made mounting the C3 web camera very simple. Using the included clip, the ASUS C3 can be mounted on your laptop, computer monitor, or on the table. The C3’s clip moves up to 90 degrees so that you can easily adjust the vertical angle of the camera. The C3 also comes equipped with a ¼” thread on its base. This allows the webcam to easily be mounted on a tripod. As someone who does a lot of streaming, the ability to mount a webcam on a tripod is essential. It gives streamers the flexibility to find the perfect height and angle when mounting your camera.
In addition to easy mounting, the C3 comes with other fine tuning adjustments. The C3’s base allows for horizontal adjustment by tilting the camera towards the left or right side. The base also allows you to rotate the camera up to 360 degrees. Unfortunately, the base does not allow fine tuning of the camera vertically. Instead, all vertical adjustment must be done by changing the angle of the camera clip. In my real world use, I found this to be somewhat inconvenient. Finding the ideal angle required a combination of adjusting the camera clip and moving my laptop screen.
The ASUS C3 webcam offers a superior image quality
When comparing the C3’s video quality to my laptop’s internal camera, the C3 is a clear winner. Because the C3 has better all around hardware, it shows a significant improvement in video and audio quality. The larger camera sensor creates a better image fidelity and its 1920 x 1080 resolution leads to more fine details.
When you look at the C3’s image processing too, it’s clear that ASUS added a filter to the video output. Colours in the video are cooler with an emphasis towards green hues. While I do like the pre-set colour filter, it would be nice to have the option to apply custom colour tones to the image.
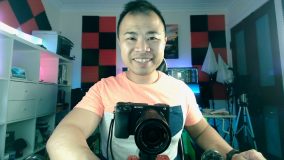
Another strength of the C3’s camera is its field of view. The ASUS has a 78 degree field of view which is significantly wider than the standard web cams. On most standard webcams, I feel like I can’t freely move around without some part of my body disappearing from the frame. The ASUS C3’s wider view means that you can fit more of yourself (and friends) into the video without having to back up or push the camera further away.
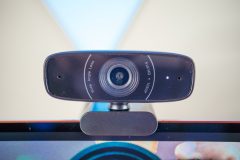
The ASUS C3 webcam delivers a clear and crisp audio
If you look closely at the front of the ASUS C3, there are microphones located on the left and right side of the camera. These are beamforming microphones that are meant to reduce the ambient noise while emphasizing your voice. In my tests, the beamforming microphones produced a very loud and clear audio. On video calls, l usually find myself speaking louder so that my audience can hear me clearly. However on the C3, speaking at a normal volume was more than enough. While the Asus C3 uses beamforming microphones, it does not have any noise cancellation technology. This means that listeners will still be able to hear ambient sounds around you, such as fans, and the sound of mechanical keyboards typing.
Final thoughts on the ASUS C3 web camera
If you’re in the market for a web camera, the ASUS C3 should definitely be on your list for consideration. The C3 delivers a fantastic video and audio for a reasonable price. Its plug and play nature and cross device compatibility make it perfect for anyone who wants a camera that works in a simple way. Finally, the C3’s small form factor makes it the ideal accessory for anyone on the go. If you don’t mind the preset colour filters and don’t need a noise cancellation system, the ASUS C3 might just be the perfect camera for you. If you’re interested in seeing what other products are available from ASUS, check their products here.


test, test, test
Always check the audio and lighting… and go to the bathroom!
Prepare everything in advance to avoid last minute hiccups
Lighting is crucial, and don’t direct any lighting towards the camera
Good lighting so you don’t look washed out in the video.
do a test run to make sure everything is positioned in the correct place and check for things that are around you that could show up in the background that might not be appropriate…
An agenda meeting is required and sticking to it to keep a meeting moving and to stay on target.
Always test your setup in advance.
I try to have a plan in place for any interruptions, so I’m not caught off guard and they can be dealt with quickly.
make sure the angle and lighting is adequate
Always check the camera and microphone a few hours before meetings to allow for time to troubleshoot any issues that show up.
i always make sure to eat before and have some water close by
One tip that I use before meetings is so have a notepad or a blank document nearby to make notes. I also remind myself to look directly at the camera as much as possible to “make eye contact.”
Tip before meeting: look into mirror and comb your bed hair!
I have everything prepared beforehand and make sure the camera angle is right!
Just because they can’t see your legs doesn’t mean you don’t have to wear pants.
I like to keep a selection of scarves close at hand to dress up my outfit in an instant when an unexpected meeting occurs!
Check my lighting and make sure I have a coffee 😉
To not think about it 😛
Lighting is crucial, and don’t direct any lighting towards the camera. Best to have the light directed at urself or near you.
Tip: get your hot bevvy ready
Be wary of background light sources. Be mindful that an unshaded window that looks ok in the morning can be overwhelming bright light source by the afternoon.
Tip: Test Camera and Mic before meeting and inform family members about meeting time to prevent them from interrupting.
prep and test your connection lighting and devices as well as your audio .. ahead of time
I always move my main monitor to the side and put my laptop on a stand (plus some books) to put it at a better height. It makes the call much nicer if I’m looking straight at the people rather than down at them or worse at their faces on a different monitor so I’m staring above them on their screens. I guess I should stop using the laptop camera and use an external one instead.
I have everything prepared beforehand and turn on my ring light.
I always test the system setup first so I know everything is ready to go and working
I like to read my notes over before the meeting starts
I work with a large secondary monitor (with no camera) so I turn it off for web meetings so that I don’t accidentally look at the wrong screen…lol
make sure your pets are taken care of so they don’t disrupt you
Good lighting so you don’t look washed out in the video.
Tip: wear pants.
Tips:
Make sure you’re in a space that is away from all the noise in your house
Check the lighting in your space so it doesn’t look like there’s a sun in the middle of your room
tip: lock the door/wear pants
Best tip: dress for the office. At least, from the waist up!
Check that web cam shows you off best with seating, lighting & background being considered.
Prep before hand & check that web cam shows you off best with seating, lighting & background being considered.
Prep before hand & Test seating, lighting & background.
One tip that helps you prepare for a video meeting-be aware of your enviroment:)Super review!
When I prepare for an online video meeting, I also do a check of the picture quality (AND what might be lurking in the picture that I thought was outside the frame) using the preview options.
Little or no setup required- suits me to a ‘t’.-easily confused by multi instructions!
I would certainly check if my lighting is good enough, along with my background
I don’t have a webcam for my desktop so I use my tablet for video calls, so one tip that helps me prepare is to use the front facing camera to ensure the tablet angle is ok. Sometimes I have to use a shoebox underneath the tablet stand to get it to the right height. It’d sure be great to win the ASUS webcam so I no longer have to do that lol
Test your audio/video prior to a meeting. Check your room lighting and make sure you have a good angle.
Check lighting (diffuse bounced off the wall is usually better than direct) and background (the blur filter can be handy). Make sure all is ready before things start.
Before starting the meeting check for appropriate lighting and adjust you seating or location as needed.
Before I make a call I check and make sure the lighting and my background are what I want seen, also, make sure you use the washroom before your call, lol
I like to make sure the camera angle is right!
wear pants
One tip I use is in my Zoom meetings I use the blurred background option so it doesn’t matter what kind of mess the room is that I’m working from. Also puts the focus more on the person in the conversation vs. all the other clutter in the background (in my case).
Comments are closed.