
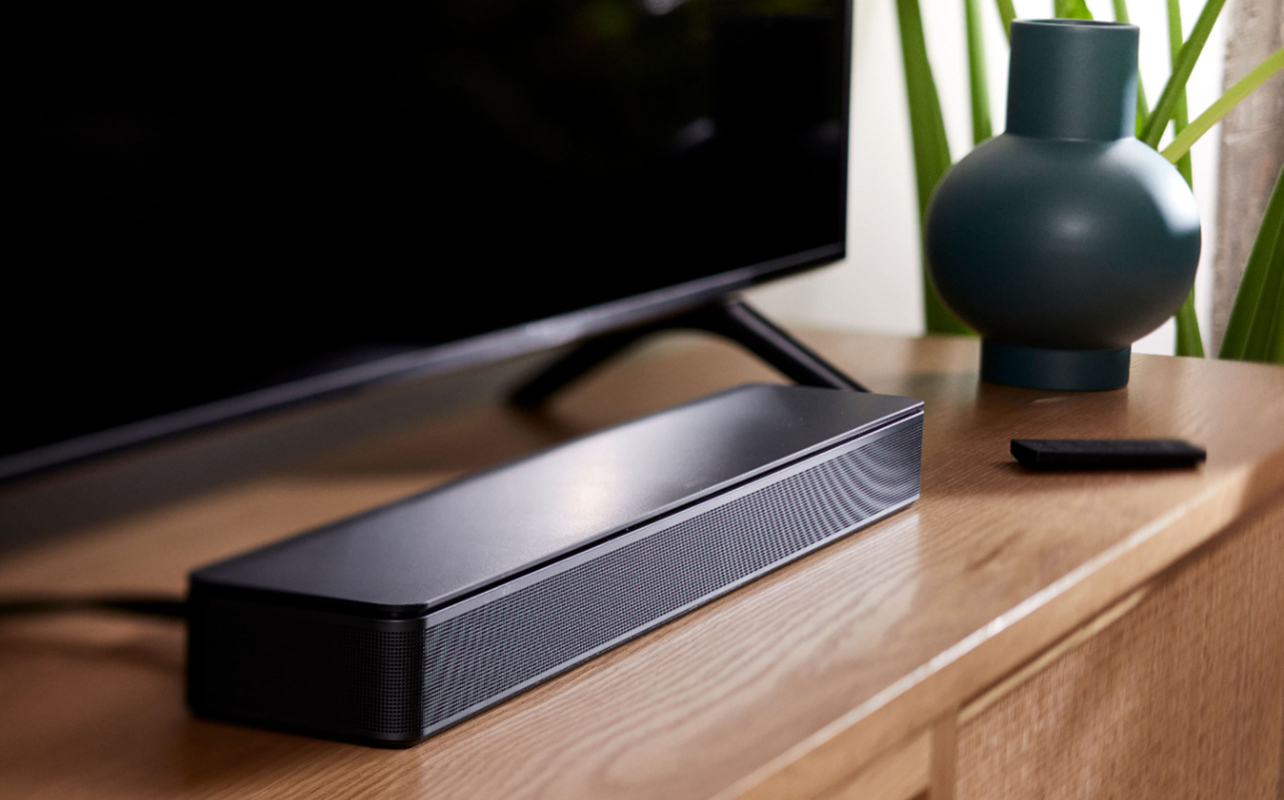
So you’ve picked up a shiny new sound bar and you’re excited to finally upgrade your TV sound. But now you’re staring at a jumble of cables, blinking ports, and a remote that might as well be a spaceship controller. Sound familiar? Whether it’s no sound, syncing issues, or simply not knowing where to start, connecting a sound bar to your TV can be more frustrating than it needs to be.
Let’s avoid all that. This guide breaks down how to hook up a TV sound bar using four main methods: HDMI ARC, optical cable, Bluetooth, and auxiliary (AUX) or RCA connections. Each has its perks, and we’ll walk you through which one best fits your setup.

Understanding your setup
Before we dive into the step-by-step guide, it’s important to understand the connectivity options available. Most TVs and sound bars will support at least one of the following:
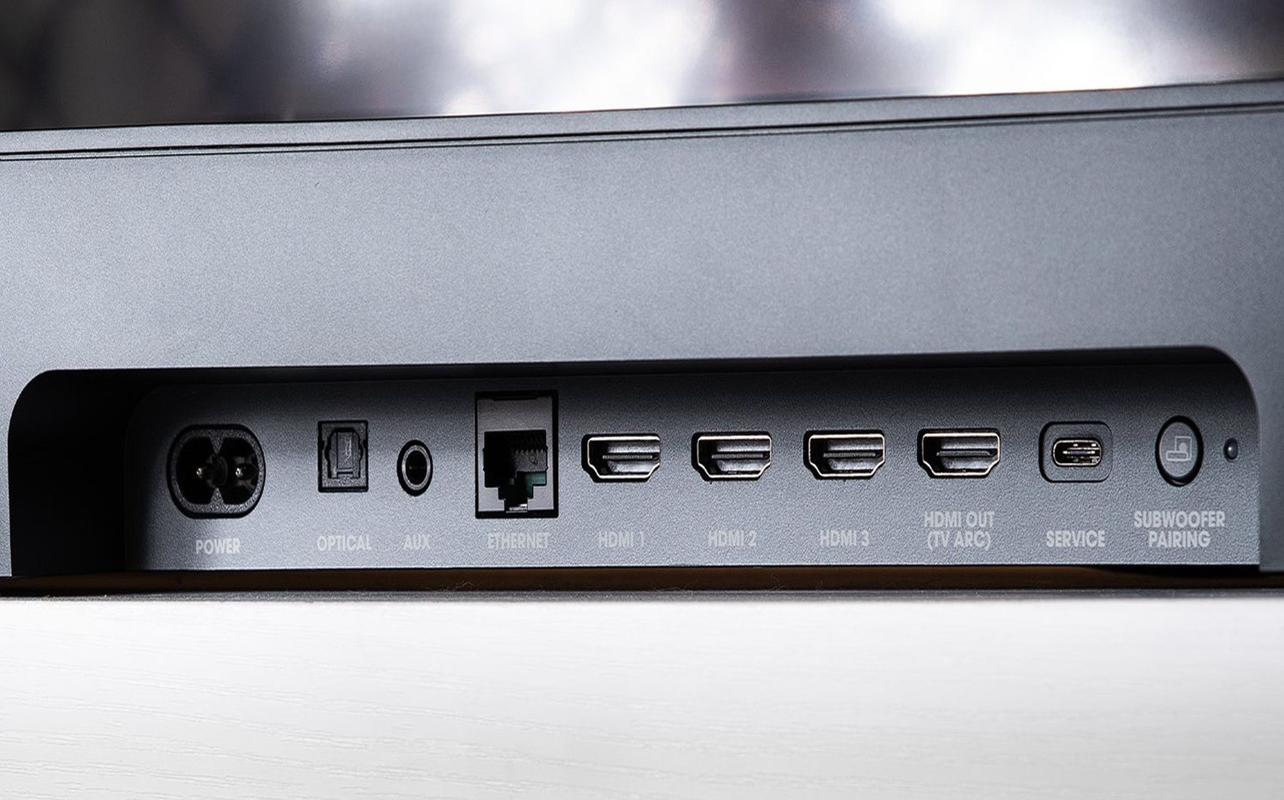
- HDMI ARC or eARC: ARC (Audio Return Channel) allows audio to travel both ways between your TV and sound bar using a single HDMI cable. eARC is a newer version that supports higher-quality audio formats like Dolby Atmos. Both make setup simple and allow your TV remote to control volume.
- Optical (TOSLINK): This square-shaped digital port transfers high-quality audio via light signals. It’s a reliable alternative to HDMI ARC, especially if your TV or sound bar don’t support HDMI audio output.
- Auxiliary (3.5mm): This is the same headphone jack you’ll find on many devices. It’s an easy way to connect sound bars to older TVs, though the sound quality isn’t as sharp as digital methods. Keep in mind that many newer TVs no longer include a 3.5mm headphone output, so AUX connections are most commonly found on older television models.
- Bluetooth: A completely wireless option that pairs your sound bar and TV via Bluetooth. It’s clean and cable-free but can occasionally introduce audio delay or connectivity issues, although newer TVs and sound bars often include low-latency technologies that help reduce synchronization problems.
- Wi-Fi Direct vs Wi-Fi: Many sound bars today connect through your home Wi-Fi network rather than Wi-Fi Direct. Depending on the model, this may enable features such as Apple AirPlay 2, Google Cast, Spotify Connect, voice assistants, multi-room audio, and higher-quality music streaming than Bluetooth. Availability varies by manufacturer and model.
- RCA (red and white connectors): The classic analogue connection. Not the best sound quality, but a solid option for vintage TVs without newer audio outputs.
Need help choosing? Here’s our guide on choosing the right sound bar for your home.
Step-by-step guide to connecting your sound bar to TV
Now that you’ve got a handle on the different types of connections, get the best audio experience possible by considering key factors such as sound quality, ease of setup, and compatibility with your devices. Evaluating these aspects will help you choose the most suitable method for your audio needs.
Connecting via HDMI ARC (best option for high-quality sound)
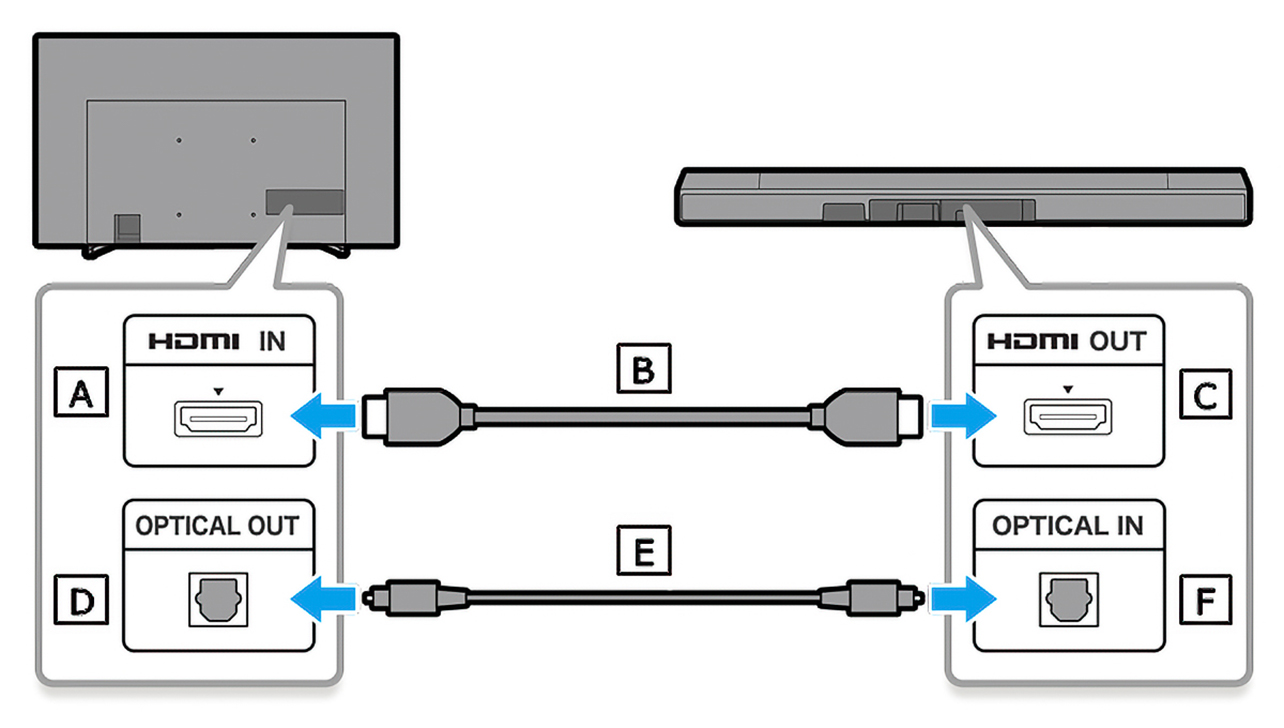
If both your sound bar and TV support HDMI ARC (Audio Return Channel), this is your best bet. HDMI ARC delivers rich digital sound and keeps your setup simple with just one cable. It also allows for features like volume syncing between devices, which means fewer remotes to juggle. If your TV and sound bar support eARC, you’ll also enjoy even higher-quality sound formats like Dolby Atmos for a more immersive experience. Ensure seamless connection by following these steps:
- Locate the HDMI ARC port on the TV and sound bar
- Plug one end of the HDMI cable into the HDMI ARC port on your TV and the other end into the HDMI ARC port on your sound bar.
- Turn on both the TV and sound bar.
- On your TV, go into the audio or sound settings and set the audio output to HDMI ARC or Receiver.
- On your sound bar, make sure the input is set to HDMI.
- Troubleshoot common issues (e.g., no sound, settings adjustments)
Make sure you’re using an HDMI cable (1.4 or higher), and that HDMI-CEC is enabled on your TV to ensure both devices talk to each other properly. ARC and eARC are not the same. eARC allows for higher-quality audio formats. For HDMI ARC, a High Speed HDMI cable is usually sufficient. For eARC and newer home theatre setups, manufacturers commonly recommend an Ultra High Speed HDMI cable to ensure reliable support for advanced audio formats such as Dolby Atmos and DTS:X.
Connecting via optical (digital audio) cable
If your devices don’t have HDMI ARC, optical is the next best thing as a solid digital connection. It uses light to transmit sound, giving you clear, digital audio that’s great for everyday viewing. However, it doesn’t support higher-end audio formats like Dolby Atmos. It may also negate your ability to control the sound bar’s volume with your TV remote, depending on your specific models. Try these steps to connect:
- Identify the optical ports on both devices
- Plug one end of the optical cable into the Optical Out or Digital Audio Out port on your TV.
- Plug the other end into the optical port on your sound bar.
- Change your TV’s audio settings to Optical or Digital Out.
- Select the correct input on your sound bar.
Connecting via Bluetooth (wireless setup)
Prefer a cable-free setup? Bluetooth is your friend—especially in condos, apartments, or for wall-mounted TVs where running cables is a hassle. But it comes with trade-offs—audio delay or syncing issues can creep in during fast-paced scenes or gaming. Sound quality is also typically compressed compared to HDMI or optical connections. The good news is connecting is easy—here’s how:
- Turn on Bluetooth on your TV (check your settings menu).
- Set your sound bar to Bluetooth pairing mode.
- Select the sound bar from the list of available devices on your TV.
- Confirm the pairing, and you’re good to go.
Connecting via Aux or RCA cables (for older TVs)
If you’re working with an older TV, don’t worry—you can still get better sound with a sound bar using analogue connections. While these methods don’t deliver the clean digital sound of HDMI or optical, they’ll still give you a big step up from built-in TV speakers. Just don’t expect surround sound or rich bass. Here are the steps to connect your sound bar to TV using Aux or RCA:
- For Aux: plug one end of a 3.5mm aux cable into the headphone jack or audio out on your TV, and the other end into your sound bar’s aux input.
- For RCA: use red and white audio cables to connect from your TV’s audio out ports to your sound bar’s RCA inputs.
- Set your sound bar’s input to Aux or Line In.
- Adjust your TV audio settings if needed.
Tips to optimize sound quality
Once you’ve got your sound bar connected, here’s how to make it sound even better:
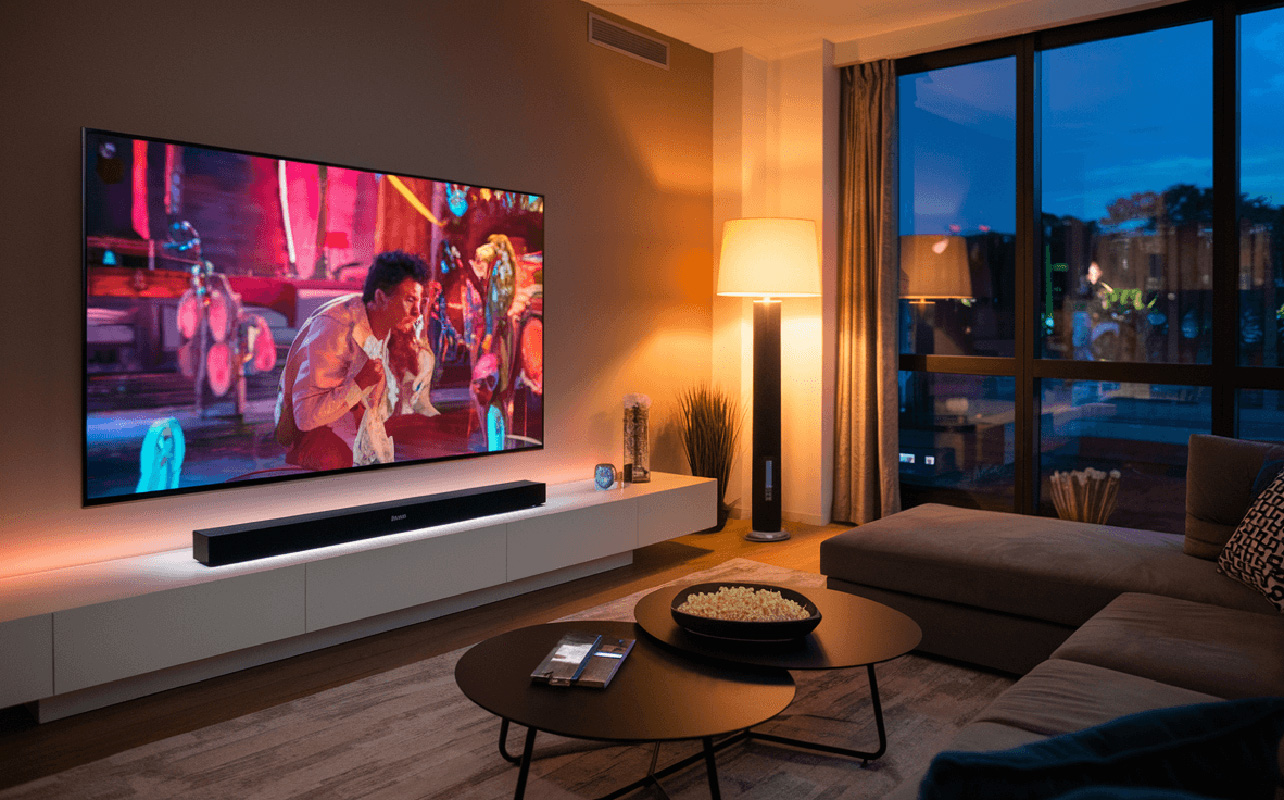
- Position it properly: Place your sound bar directly in front of your TV, ideally centred and at ear level. This ensures that sound travels straight to you instead of bouncing awkwardly off furniture or walls. Avoid obstructions: Don’t place your sound bar behind your TV, inside a cabinet, or behind any decor. Blocking the speakers can muffle audio and reduce the clarity of dialogue and effects. Make sure it’s exposed.
- Turn off TV speakers: Most TVs will still play sound through their internal speakers unless you turn them off in the settings. This can create an annoying echo or hollow effect. Switching them off ensures the sound bar delivers clean, focused audio.
- Check your TV’s audio settings. You can choose between PCM, Dolby Digital, or passthrough. PCM is a safe, widely compatible option for basic stereo sound. Dolby Digital delivers fuller, more immersive audio if your sound bar supports it. Passthrough lets your sound bar handle audio decoding directly, preserving sound quality. If audio seems off, try switching formats—just changing from PCM to Dolby can noticeably improve the experience.
- Enable sound modes: Most sound bars come with presets like Movie, Dialogue, or Music. These modes are designed to enhance specific types of content. Try them out to see which one matches what you’re watching—Dialogue mode, for example, can make conversations clearer without needing to turn up the volume.
- Adjust EQ settings: If your sound bar has bass, treble, or EQ settings (or an app), take a few minutes to customize the sound. You can reduce bass at night or boost vocals during talk shows. Many sound bar apps also include room calibration to tailor audio to your space.
Troubleshooting common issues
Sometimes things don’t work right off the bat. Here’s what to check:
No sound at all?
- Confirm the TV’s audio output is set to the right connection type.
- Make sure your sound bar is on the correct input mode.
- Try a different cable or port.
Audio delay or lip-sync issues?
- Look for an Audio Delay setting in your TV or sound bar and adjust it manually.
- If using Bluetooth, consider switching to a wired connection.
TV remote won’t control the sound bar?
- Use HDMI ARC and enable HDMI-CEC in your TV settings (this allows device control).
- Some sound bars support IR learning—check your manual.
Which connection should you choose?
When deciding how to connect a sound bar to TV, it’s not just about the cables—it’s also about getting the best performance out of your setup.
- Start by updating firmware on both your TV and sound bar. Manufacturers regularly release software updates that fix bugs, improve compatibility, and sometimes even boost audio features.
- Consider placement carefully. Even the best sound bar won’t impress if it’s shoved in a corner. Ideally, your sound bar should be centred, unobstructed, and at ear level when seated. Wall-mounting can work too, but make sure it’s not too high or low—sound travels in straight lines, not around furniture.
- Thinking about upgrading? If you’re using RCA or Aux connections and not getting the sound you expected, it might be time to upgrade your sound bar. Higher-end models offer HDMI eARC, built-in or wireless subwoofers, and smart features like voice control or multi-room audio. If you want immersive sound (think Dolby Atmos or DTS:X), investing in a premium sound bar is totally worth it. In addition, Wi-Fi or Bluetooth connectivity allows you to play audio from other devices, like your smartphone, tablet, or computer.
For a dive deep into the specs and features, check out our sound bar buying guide.
Make the most of your sound bar
A sound bar can seriously elevate your TV-watching experience—from richer dialogue to heart-thumping bass during action scenes. You just need to set it up correctly to really enjoy what it’s capable of. Choosing the right connection method and tweaking your settings can make the difference.
The best way to connect your sound bar to TV depends on your setup. HDMI ARC (or eARC) is the gold standard for both sound quality and simplicity, while optical is a solid backup. Bluetooth is great for avoiding wires, and AUX or RCA can still get the job done on older TVs. Once connected, don’t stop there—tweak those sound settings! Whether it’s enabling sound modes, adjusting EQ levels, or turning off your TV’s internal speakers, a few small changes can seriously improve your experience.
If you’re still not getting sound, double-check your cable connections, make sure the TV is set to the correct audio output, and ensure both your sound bar and TV firmware are up to date. Restarting both devices can often clear up minor syncing or pairing glitches too.
Ready to go even bigger? Explore home theatre upgrades from sound bars to surround sound systems to create a truly immersive setup.

This article was drafted using AI technology and then reviewed, fact-checked, and revised by a member of our editorial team.


sspunde@icloud.com
Mobile 1 705 943 7474
Hi I would like the geek squad to set up my TV and sound bar but I do not want to mount my tv. Could you please give me the item Number of the cables I need or the name of the cables
Hi Susan, thanks for reaching out! We recommend contacting Geek Squad directly. They’ll be happy to guide you through the setup process and let you know exactly what you need. You can reach them at your local Best Buy store or on this page: https://www.bestbuy.ca/en-ca/services/geek-squad-remote-support/blt79aa22d87c60ba92?cmp=knc-c-340656376&geek%20squad&o&utm_source=bing&utm_id=240828gsp545&utm_medium=cpc&utm_creativeformat=standard-text&&msclkid=8d8846e6a84116720c0d2ec5003bac6d&gclid=8d8846e6a84116720c0d2ec5003bac6d&gclsrc=3p.ds&gad_source=7.