
If anyone can appreciate wireless home security cameras, it’s me. Back in university, I had a part-time job installing Closed Circuit Television systems (CCTV) in retail stores. As fancy as that sounds, I mostly ran long cables through ceilings to connect cameras together.
It’s no wonder that I love reviewing new wireless cameras. Compared to the old CCTV cameras, they’re easy to install, semi-wireless, and offer homeowners a DIY security system that can be managed on a smartphone.
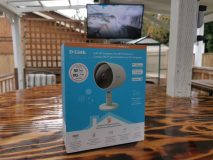
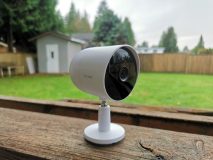
In this review, I’m installing the D-Link Full HD Outdoor Pro Wi-Fi Camera. It provides 1080p resolution and infrared night vision up to 16 ft. Previously, I reviewed the D-Link Full HD Spotlight Camera. That camera featured a built-in LED spotlight, which the Outdoor Pro does not have. Without a light, I’m curious to know how well it functions at night.
Let’s begin the review at the unboxing to see what’s included.
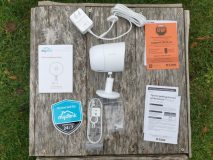
Unboxing the D-Link Outdoor Pro Wi-Fi Security Camera
Inside the box, you will find the camera, the power adaptor, screws, wall anchors, quick ties, the installation guide, a support page, and a D-Link security sticker. On the bottom of the camera is a faceplate that mounts to a wall or post. From there, the camera screws onto the faceplate and can be adjusted as needed.
The camera itself can connect wirelessly, or through an Ethernet cable. The camera has an Ethernet port, but I don’t think it provides power over Ethernet. It will still need power, with or without an Ethernet connection.
I imagine most people installing this camera outside will connect over Wi-Fi. I highly recommend taking the time to read the installation and tips guide. Many people have experienced connectivity issues with Wi-Fi cameras, especially outdoors. The tips guide helps ensure a successful install.
Selecting a location for the D-Link Outdoor Pro Wi-Fi Security Camera
The camera is weather-resistant and operates in extreme temperatures ranging from -25 to 45 degrees Celsius. While it’s made for outdoor use, it needs to be covered.
I decided to install it on my back deck facing the entrance to the backyard gate. I have an Airbnb suite, and I want to see guests arriving and leaving the property. The D-Link Spotlight Pro Camera is already set up to record guests entering and exiting the suite. These two cameras together ensure I have full continuity of guests coming and going.
In the event of an issue, I can use the footage as evidence in an Airbnb complaint. Uninvited guests beware!
Improving outdoor Wi-Fi
While I’m a huge fan of wireless outdoor security cameras, I cannot stress enough the importance of improving your Wi-Fi signal and range. Failure to do so will lead to disappointment. In most cases, it’s not the camera, it’s your Wi-Fi.
I recently reviewed the D-Link AX4800, a new Wi-Fi 6 router. I think that’s where most people should start. If you still have wireless issues outdoors, adding a new Wi-Fi 6 Extender will extend the range to eliminate any dead spots.
Installing the D-Link Outdoor Pro Wi-Fi Security Camera
Once I selected a location, I used a Wi-Fi signal strength app to measure the signal strength in the area. Because I have a mesh Wi-Fi system, the signal strength was strong, so I proceeded with the install.
Unfortunately, I had to install the camera twice. The first time, I mounted it to the ceiling. In this position, it was upside down. I assumed I would be able to flip the image in the mydlink App.
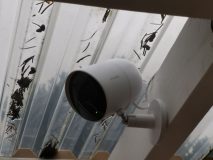
Turns out I was wrong. That feature is not available, or at least I could not find it anywhere in the camera settings. I then moved the camera by installing it on the ceiling rafter. In this position, the camera was upright looking down.
I hid the wire in the corrugated roof, down a post to a power bar. The only issue with this setup is that someone could easily unplug the camera. Ideally, the power source should be high up and out of reach. I may relocate the power at a later time to make it more secure.
After the camera powered up, I added it inside the mydlink App by scanning the QR code on the quick start guide. Once I saw the footage, I adjusted the camera until I got a good view of the deck entrance.
In total, the entire installation process took about 10-15 minutes. This is definitely a DIY project, and it will require a ladder and a drill.
Using the D-Link Outdoor Pro Wi-Fi Security Camera
One of the advantages of D-Link wireless security detection is the built-in AI. It enables person detection by identifying human motion. On the Outdoor Pro Spotlight Camera, this feature worked perfectly.
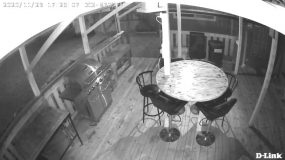
I did not have the same success using the Outdoor Pro Wi-Fi Camera. I received a person-detection alert, checked the footage, and it was a car driving by in the very top corner. The second person-detection alert was a cat walking on the deck. Both of these false notifications happened at night. Clearly, something wasn’t right.
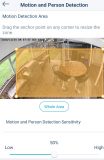 Getting false-positive security alerts is something I’ve experienced before. I instinctively knew what to do. In the settings, I resized the motion zone to avoid vehicles driving by in the upper left corner. Next, I reduced the person-detection sensitivity to 50%. This should reduce the false notifications I receive at night.
The Outdoor Pro Wi-Fi Camera has two storage methods. The first is the cloud, with free and paid plans available. The second option is with a MicroSD card up to 256GB. I prefer cloud connectivity, and all the camera activity is nicely displayed in the mydlink App. Footage can be downloaded from the cloud to the device (as the free plan offers limited cloud storage).
Final thoughts
This is now the second outdoor D-Link camera I’ve installed. The installation process could not be easier, and it’s something I really appreciate. However, I hope D-Link will update the firmware and allow the camera image to be flipped. That allows users like me the ability to install it onto a ceiling upside down. I’ve seen this feature in other brands, so I imagine it’s only a matter of time before it comes to the mydlink App.
In terms of image quality, it’s fantastic. If you’re storing footage on a microSD card, I would set the resolution to 1080p. If you are storing in the cloud, I recommend 720p. This gives you a faster ability to watch footage after alerts. There is a lag between an alert and when you can watch the footage. Having 720p resolution ensures you’ll be able to watch the footage faster.
Now for the big question: Should you get the Outdoor Pro Wi-Fi Camera or the Outdoor Pro Spotlight Camera? It’s pretty simple. The Spotlight Camera is a great deterrent tool. If you’re trying to prevent theft or break-ins, then I would choose the Spotlight Camera.
The Outdoor Pro Wi-Fi Camera can be used more covertly. While you can see the red infrared light at night, it can monitor a certain area without capturing a lot of attention. I was impressed with the night footage, but I’m still confused why the person-detection feature did not work well on default settings. My suspicion is that it does not work well in low-light/dark conditions. Hopefully this can be tweaked in future firmware upgrades. For now, adjusting the motion sensitivity and range seems to reduce false alerts at night.
Getting a wireless security camera is a great investment that brings much peace of mind. If you’re in the market, I highly recommend you check out the D-Link Outdoor Pro Wi-Fi Camera. Provided you have a good outdoor Wi-Fi signal to work with, I doubt you will be disappointed.


