 High Dynamic Range (HDR) photography has been one of the big photographic movements of recent times, and although the form has existed since the 1800s, it’s really taken on a life of it’s own since the Digital Boom.
Even if you’ve never heard the term ‘HDR’, you’ve undoubtedly seen some examples, and probably taken a second look, as in many cases the images have an otherworldliness that makes them particularly eye catching. They’re characterised by the presence of more vivid and saturated colors. They have a certain vibrancy that almost makes them glow.
Check out some examples from Flickr here, and you’ll see what I mean.
Sometimes our photographs fail to capture the beauty and vivaciousness of places we’ve visited. Proponents of the style argue that HDR photography allows you to capture great scenes in a way that recreates that awestruck feeling that you get when you experience such scenes with your own eyes.
So what’s behind this piece of photographic wizardry? Today I’m going to take a peek behind the curtain, and give you the ingredients and know-how you need to try some HDR for yourself.
The first step to understanding HDR is understanding the concept of dynamic range.
Dynamic range refers to all the levels of luminescence that your camera’s sensor can capture in a single frame.
When you take a photograph, your camera’s light meter will average out the amount of light it sees in the scene and the camera will set the exposure accordingly. What the camera is doing is basically trying to ensure that detail is visible in as much of the final image as possible.
An over-exposed image will lose detail in the bright areas of the photograph while an under-exposed image will lose detail in the dark areas.
What HDR does is to artificially stretch the dynamic range of an image so that detail is visible in areas where you wouldn’t usually see any.
For example, if you take a photograph at noon on a sunny day in June, when the sun is at it’s high point in the sky, you can imagine that you’re going to have areas of the image that are very bright and others that are in deep shadow. Our eyes can actually do a pretty good job of balancing out the differences because they have a really big dynamic range. Our cameras on the other hand will struggle to capture detail in all the areas of this scene.
The concept behind HDR is actually a pretty simple one – take multiple shots of the same scene with different exposures and merge the results.
So you might take three shots; one over-exposed (to capture detail in the shadow areas) one correctly exposed, and one under-exposed (to capture detail in the highlight areas). You then need to feed the images into a program like Photoshop, Photomatix, or the free program Fusion. (Photoshop isn’t actually the best tool for HDR. I recommend using a dedicated HDR program.) Most programs will allow you to tweak the results to suit your tastes.
You can also use a technique called Tone Mapping to achieve a similar effect. When you work with RAW images, there is actually a lot more information (or detail) in the file than you’ll see when you first open it up. if you make local adjustments to the image you can bring out a surprising amount of detail in both the shadow areas and the highlight areas.
One of the key techniques you’ll want to get familiar with when shooting HDR is bracketing, whereby your camera will take three shots at three different exposure levels; one over-exposed, one correctly exposed, and one under-exposed. A lot of recent models will allow you to choose how wide a variance you want between the three photos. Some cameras, like the Nikon D800 actually allow you to up to nine photos, which means you get four under-exposed to various degrees and four over-exposed to various degrees.
Check your manual to find out how your camera handles bracketing. I shot my sample images above with the Canon T5i, and if you’re in single shot mode it requires you to press the shutter button three times, but if your in continuous mode you can hold the shutter button down and it will shoot three images in quick succession.
It is possible to create a HDR image from just two photos, but really you need five images for optimal results.
I recommend using a tripod when making HDR images, because you want to minimize any movement of the camera so that the images can be perfectly aligned.
So your ingredients for HDR are:
– Camera and lens
– Tripod
– Software program like Photomatix or Fusion
And that’s it!
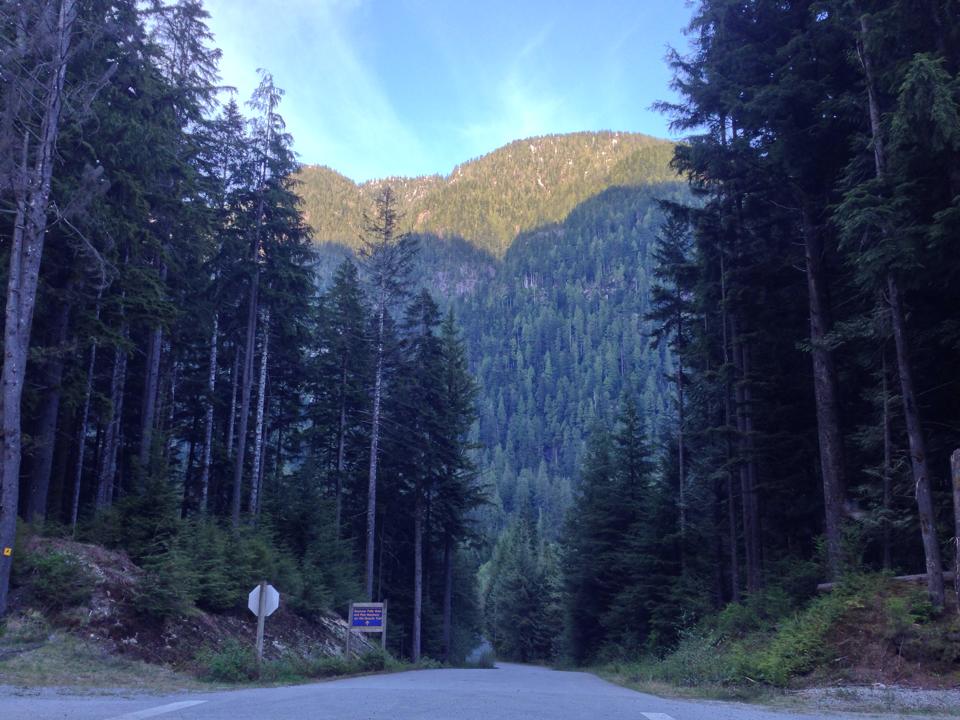
Nowadays, smartphones are even offering a HDR option, which essentially works just as I’ve described above, where three photos are taken in quick succession, and automatically merged. A friend of mine posted a nice example recently which he’s kindly allowed me to publish here.

Notice how you get really good detail in the shadow area on the mountain and the sunny area above? Only possible with HDR.
Some cameras (like the Canon T5i) are now offering a HDR mode which will merge three images into one right there on the camera. The results probably won’t be as exciting as the images you’ll see posted on Flickr though, those require a little more time and effort in the digital darkroom.
It’s difficult to effectively include people in your HDR images, because people tend to move and this can throw the process off. There are loads of other situations that are well-suited to HDR, but what they have in common is the presence of a wide variety of light intensities, so lot’s of landscape scenes will work, but equally you could experiment with nighttime, or late dusk images in the urban environment.
HDR is one of those photographic endeavours that requires patience and practice to to master. You need to get there and try, try and try again till you start achieving the kind of results you’ll be proud to hang on your walls.
I’ll leave you with a joke, dedicated to my wife who loves a good pirate joke:
What’s a pirates’ favourite kind of photography? HD-Arrrrrrrrrrrr!!


