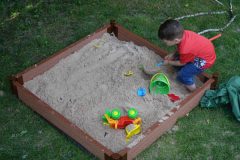
 What kid doesn’t like playing in sand? Outlining the letters of their name with a finger, filling, emptying, and refilling a bucket, adding some water and building fantastic castles? It’s a staple part of any child’s life. And having one right in your backyard can make it even more fun, not to mention accessible.
For most parents, the first go-to in the backyard once your child is of age to play is a swing set. And as you’d find at most public playgrounds, a sandbox or pit often accompanies it. Luckily, there are plenty of options for creating a neat sandbox at home. With the Frame It All square sandbox, there’s the added benefit of being able to use it as a raised garden once your child no longer has interest in playing in sand.
Design
Made of eco-friendly and splinter-proof 2” thick composite timber, the sandbox measures 48” x 48” x 5.5”, or about 4 x 4 feet. The materials are made from recycled plastics and natural fibres that won’t rot, splinter, or warp over time. If you’ve ever had to remove a splinter from the foot of a toddler, you know just how reassuring that is.
Ideal for kids aged 2 and u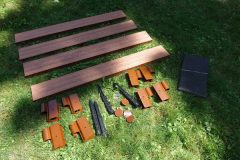 p (though I could easily see a younger baby playing around inside, with supervision, of course). It can help encourage co-operative and imaginative play, as well as develop motor skills and sensory development. Naturally, you’ll need to
grab some toys to go along with it. I opted for a set that included a sandpail, shovel, sifter, and dump truck, since my son loves cars. But there are lots of options from which to choose.
One accessory that is an absolute must, however, is the custom fitted cover (sold separately, or you can buy it bundled with the sandbox), which will protect the sand when the box is not in use. T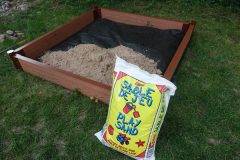
his is not only important in the event of rain or snow (who wants large clumps of wet sand?) but also to keep the sand cool during particularly hot days. The cover comes with an inflatable ball that you can place in the centre of the box to keep it tented and prevent water from pooling. Additionally, the cover can double as a canopy for providing shade. Alternatively,
you can buy a small tarp and use that as a cover, though you’ll need to find some way to secure to over or under the box so it doesn’t fly away.
The wood is finished in attractive brown, making it an ideal complement to any garden or backyard.
I say garden because, as noted, arguably the best part of this “sandbox” is the fact that you can keep using it well beyond those preschool years. Once your child decides he’s too old (or gets too big) to play, you can repurpose the box into a raise garden bed. Remove the sand, throw in some dirt, and plant your favourite fl owers, herbs, or fruits and vegetables.
Setup
When this box arrived, it was a bit daunting given the size – it’s similar in size and shape to a boxed Christmas tree. But once I opened it up, I was pleasantly surprised to see that there are actually very few pieces.
It includes the four pieces of wood, eight brackets with end caps, four ground stakes, 16 screws, and material for the bottom. The included instructions (just a single sheet) includes details for setting up various-shaped boxes, like hexagonal ones as well, along with stacked boxes should you want a higher edge (more useful for gardens, not sandboxes.)
While the details suggest that all that’s needed is a screwdriver and hammer, I found it difficult to get the screws through the wood manually. (There aren’t 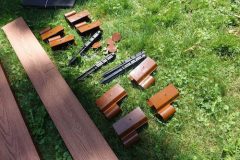 any pre-drilled holes.) So I opted for a small battery-powered electric drill to get the job done more quickly. With
that, it was a breeze: just line the brackets up on each side of the four pieces of wood, placing one right side up and the other upside down, and screw one on both sides. Altogether, with a few breathing breaks since it was an especially hot day, this step took me about 20 minutes.
Then, find your desired location, position the wood into a square, unfold the base material and tuck it underneath, and place each ground stake through the holes of the brackets and into the ground. You’ll need to grab a hammer to pound them in and ensure they’re secure, especially if the ground is very hard, as mine was following a hot and humid Toronto summer with little rain. Once everything is in place, pop on the end caps to finish the seamless look. The base material is larger than the sandbox itself, so you’ll have to tuck it underneath once everything is in place to get a nice, seamless look. This was a bit frustrating; I’d advise tucking it under before you place the wood down. If you want to be extra diligent, you might want to cut it to size, or fold it nicely.
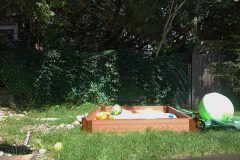 You can set it up on virtually any surface, like grass, cement, or wood if you want to keep it on a deck, for instance. I opted to position it close to our deck so that my son could play near the bottom of the deck stairs while we relaxed at the top. I was also thinking ahead, as this would be an ideal spot for a raised garden once he no longer has interest. But another option we toyed with was placing it in front of the swing set, so we’d have our own little parkette area in the backyard.
Next requirement, of course, is the sand. Despite the advice that I’d need 10 bags, I grabbed just five 20kg bags of play sand (you can also get coloured sand for a super-fun look), and that seemed to fill it enough to allow for enjoyable play. Ideally, though, I’d recommend getting a few more bags to fill it at least halfway all around. Don’t forget to involve your kids in this part of the setup: I poured the bags into one big pile, and my son had a ball using his mini shovels to spread everything out evenly.
How does it work?
Once it’s finished, it’s playtime! The size is good enough to fit two small kids comfortably with toys, though there isn’t much room to wiggle around. It might be best suited for one child, or you can opt for a larger-sized sandbox: Frame It All also makes a 7 x 8-foot hexagonal version that’s essentially almost twice the size. If you have two kids who will be playing in it often, I’d recommend this size instead, if your backyard can accommodate it.
The cover, which is available, as noted, as a separate purchase or together with the sandbox, did not come with instructions on how to attach it, so I wasn’t quite sure how to do it. In the end, I simply secured each of the four sides to the corners, and hoped for the best. At the time of my review, Toronto was enjoying some pretty heavy rainstorms. On one occasion, water still pooled up on one side of the cover. And without securing it all the way around, curious raccoons likely snuck their way inside at night. That said, this may also have been because I did not have enough sand inside to raise the ball to a proper level for full tenting.
Bottom line
The design is simple, setup super-easy, and versatility great when you consider that you can prolong the life of the product by using it for a garden later. Even that process marks a good way to extend playtime with your child by making it his garden, where he can plant his desired herbs, vegetables, or flowers, for example. Make him responsible for watering and taking care of them. And in no time, he’ll forget it was ever a sandbox.
But for a small-sized child or toddler, you’ll get plenty of use out of this as a sandbox for daily play. And even if you don’t want to scoot yourself inside to play along, the design makes it easy for mom, dad, or other caregivers to sit on the sidelines and help make some great sand creations.


