

As an early adopter of smart home tech, I was one of the first to retrofit their entire home with Smart Lighting and Switches. In particular, I’m a huge fan of voice-activated LED Strip Lights like the new ones by Twinkly that I’ll review in this article.
Whether it’s behind a TV, under a table, or above cabinets—LED strips can transform any room with colourful lights. That said, the LED strip lighting currently in my home is limited. They can only change to a single colour at a time. My tech dream is to program effects on LED light strips to display multiple, moving colours. If you ever saw the front of the car “Kitt” on the 80’s TV show Knight Rider, you know exactly what I’m talking about.
Finally, a company has a solution that does just that. I’m reviewing the Twinkly Flex LED Tube and the Twinkly Line LED strip. These are app-controlled, flexible RGB (Red Green Blue) lights that provide an endless amount of lighting effects in any colour spectrum.
This is perfect for movie nights, holiday festivities, game rooms, and more. To say that I’m excited about this review would be an understatement. So let’s get our geek on, starting with the unboxing.
Unboxing the Twinkly Flex and Line lights
The Twinkly Flex is unlike any LED light I’ve reviewed before. It’s a flexible LED tube light that resembles retro neon lights. The Flex unit I received is 6.5 feet long but a 7-foot version is available online. A long power cord is connected to the tube with a big power button. Included in the box are small plastic clips, double-sided adhesive, and small screws.
The Twinkly Line starter kit comes with a 5-foot LED strip connected to a long power cord. Unlike the Flex, the Line LED strip is extendable with an additional 5-foot extension kit. Two 5ft LED strips can be connected to create a single 10ft strip. The extension kit also includes a black extension cable that allows you to connect two LED strips, but not continuously.
This is helpful if you need some flexibility in your design and placement. An adhesive strip is pre-installed on the back with additional plastic clips to keep the strip and power cable secure.
Setting up the Twinkly Flex and Line lights
As soon as I unboxed both lights, I had one of those rare tech Eureka moments. I knew exactly where I was going to install the Twinkly lights—in my home studio where I film all my tech product reviews.
I hate seeing exposed wires so I carefully planned how I was going to run the power cables. Thankfully, the Twinkly lights come with super long power cords which gives users a lot of placement flexibility.
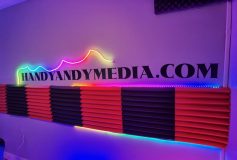
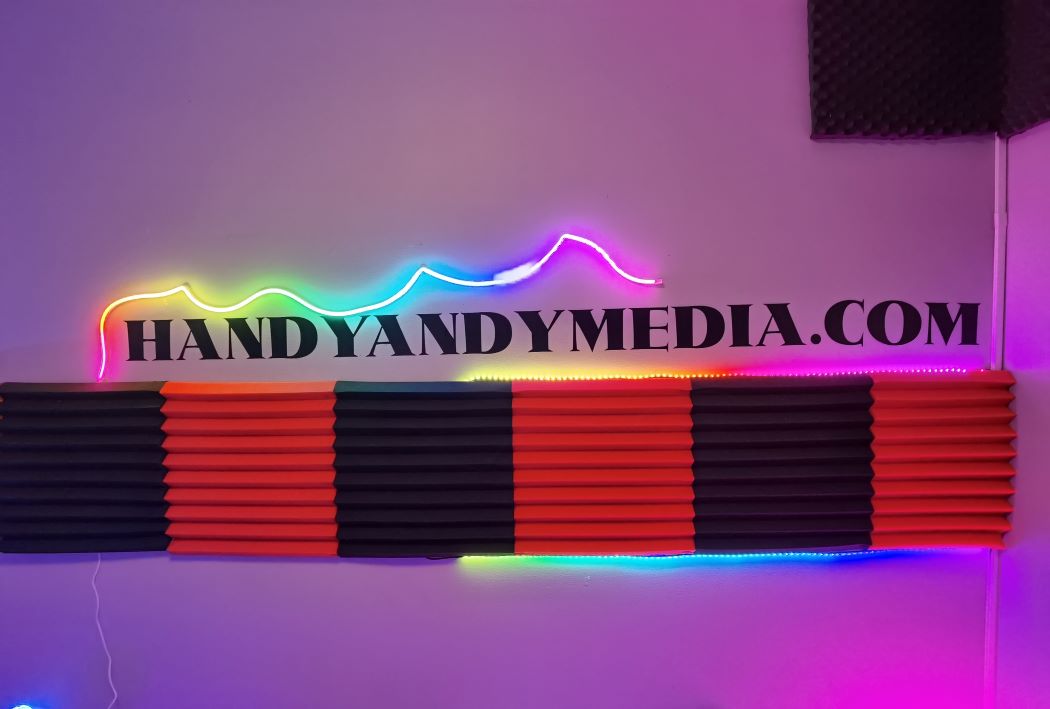
In my studio, I have foam sound tile diffusers on the wall. I carefully ran the power cord on the sidewall where I already had a plastic cord cover installed. From there, I ran the 5ft line strip on top of the foam tile. I then connected the extension cable and ran it behind the tile. From there I connected the extension strip and ran it underneath the tiles. Now the top and bottom of the foam tiles had LED strip lighting with no exposed cables.
For the Twinkly Flex, I decided to mount it on the wall above the sound tiles. Initially, I used adhesive tape to mount the plastic clips on the wall. However, with the weight of the LED tube, the plastic clips fell off. I used the small screws to mount the plastic clips to the wall.
The hardest part was figuring out a design. I ended up changing mine many times. After some trial and error, I ended up with a design that simulates a mountain range. Once again, I used the foam tiles to hide the power cables. After it was all said and done, I was very happy with the final result. My studio backdrop now has a futuristic look that looks great on camera.
Installation tips and tricks for LED light strips
In installing the Twinkly lights, there’s a couple of things you need to know. First, to get the best lighting, install the Twinkly Line LED strips under or over surfaces. Basically, you want to avoid having to see the LED lights. Each 5ft strip has 90 LEDs on it.
From my extensive experience with LED lights, they look the best when the light is being reflected upwards or downwards without seeing all the individual lights. This is why I installed the strips above and below the sound tiles.
Second, get some help to install the Twinkly Flex LED tube light. Figuring out a design by yourself is hard. I ended up installing and removing a lot of plastic clips. If you’re by yourself, you’ll have to use additional clips to keep the tube on the wall. To avoid putting unnecessary screw holes in the wall, get help.
Using the Twinkly app to control lights
Once the lights were installed, I downloaded the Twinkly app and connected the lights. The setup uses a combination of Bluetooth and Wi-Fi to connect the app to your home network. Once connected, the Twinkly app provides endless lighting effects. To my surprise and delight, both Snake and Kitt (Knight Rider) effects are included in the app. There are also holiday-inspired effects such as Snow, Candy Cane, and even Flag colours.
The effect options are endless. Users can edit effect colour combinations, speeds, and even set up effect playlists. It’s basically every customization feature I wanted with LED lighting inside one app. I’m a kid in a candy store.
The Twinkly lights also support Google Assistant and Amazon Alexa. This makes it super easy to turn the lights on and off via voice. The app also gives users the ability to set schedules for turning the lights on and off.
Final thoughts on the Twinkly Flex and Line lights
To me, the Twinkly Flex and Line lights demonstrate the true potential of LED lighting. They’ve created solutions that are easy to install with an accompanying app that brings endless effects and customization options. That said, there are things that I would like to see.
First is the ability to connect multiple Flex LED tube lights. While I love the ability to design the lights, 7 feet is just not long enough. It’s such a tease. You want to continue the design but you can’t. I don’t know if that’s possible with LED tube technology, but I sure hope they figure it out.
Second, they need to offer longer LED strips. The 5ft line starter kit will not be enough for most users. I highly recommend you consider purchasing the 5ft extension kit with the starter kit. Hopefully, they will offer extension kits that are longer than 5 feet.
Still, Twinkly has thoroughly impressed me with Flex and Line lights. I honestly can’t get enough of the LED effects. It already has me reimagining how I would light my entire home. Imagine having LED strips above the crown molding of a home and the snake-effect running around your home. That would be so geeky, so cool.
As a tech reviewer with over a decade of experience I’m a tough fella to impress. Out of all the tech gadgets I reviewed for Best Buy this year, I would have to say this is my top gadget for 2021.
If you’re into mood lighting and want to take advantage of everything LED lighting technology has to offer, I highly recommend you try the Twinkly Flex and Line lights. These are 100% Handy Andy approved.


My favorite feature is being able to create whatever our hearts desire and that we cab even preview it on the app! I have to admit I am completely addicted to anything that cab be controlled from my phone! And let’s be honest here…who doesn’t like pretty lights?
I like that they are app-controlled and you can customize the effects
I really like the effects with the app. Snow and Candy Cane would be great in the winter and I would enjoy using different colour effects.
I like that they are app-controlled and flexible.
The thing that I liked the most was that they were extendable
I like the long power cords so I can choose to place the Twinkly lights in many areas in my home.
I appreciated the comment about not seeing the individual LED lights themselves, but the glow that comes from them on the wall. I like the black cable that can connect to the strips of lights so that you don’t have to have a continuous LED light, but can actually place them where you prefer to light up an area.
My favorite thing is being able to usethe Twinkly app to control the lights for a combination of colour, speed and colour .
The app and google assistant support will be great to integrate into my on-going smart home conversion!
I like the ability to connect multiple Flex LED tube lights so I can make them as long as I wish!!
I like that there’s an app to customize effects, colour combinations, speeds, and set up playlists.
Flexible Red Green & Blue lights that provide an endless amount of lighting effects in any colour spectrum.
I like how customizable the Twinky Light effects are by using the app :)!
Love the app control.
I love the fact that the lights are App controlled and that they have long extension cords so that you have more options of where you can place the lights.
The app controlled effects.
Love how many effect options there are!
I love that I can use the Twinkly app to control these fabulous lights.
I love the flexibility of both the Twinkly flex and the Line lights and that you’re limited only by imagination (and the length of the kits ).
The endless lighting effects
I like the moving light colour.
I like that you can control the lights with an app
Love the mountain design you made! Having the ability to change the Flex one into the shape you want is cool!
These seem cool. I like that they have lots of lighting effects.
The feature I like the most is the long power cords so I have a lot of placement flexibility.
I like the ability to control them with Alexa
The extra long power cord
Love the Twinkly app to control the lights for a combination of colour, speed and colour playlist. That’s pretty unique customization just for lights.
I love that they have a long power cord so that you have more options on where to place them throughout your home
I like being able to use the Twinkly app to control the lights!
I liked the Google Assistant support.
I like that they have an extra long power cord.
I love that the colour and light combos are customizable from your phone with the app and that you can shut it on or off with Alexa via your voice.
I like that These are app-controlled, flexible RGB (Red Green Blue) lights that provide an endless amount of lighting effects in any colour spectrum.
Love the fact you can control them using the Twinkly app!
I like that you can set up playlists.
i love the Google Assistant support.
I definitely love the ‘endless effects’ that you could do through the app! They look fantastic, so good that it will make it seem like a professional lighting job!
I like that the app seems easy to use, all the modes are fun to look at. It sounds like the plastic clips and the adhesive makes it easy enough to install.
Great that there’s an app! Also good tip to get the best lighting, install the Twinkly Line LED strips under or over surfaces
Thank you for mentioning the limitations. 7ft certainly should have its fair share of uses, especially in smaller places. But I can definitely see how it might be a tease for larger projects.
I liked using the Twinkly app to control lights.
I like that it is extendable for the longer walls in my home.
I like the app has lots of effect and easy to set up and the lighting strips install is easy
The app seems very easy to use and full of flexibility
The Twinkly app for providing endless lighting effects
I like that there is an adhesive strip that is pre-installed on the back to make for easy setup and that they have super long power cords so that I can configure the lights properly.
Voice control is always a big selling point for me.
I like that there is a Twinkly app for tons of special effects!
I like the long power cords which gives users a lot of placement flexibility.
The Flex is the vibe!
I love that the shape and colour pattern can be customized.
Comments are closed.