
 Singing is one of the most popular musical activities on the planet. From singing along to your favourite songs in your car to imagining a performance in front of a sold-out arena in the shower, it’s an awesome way to have fun and express yourself. For the budding singers out there, there’s never been a better time to try your hand at recording yourself. There are many tools available to create high-quality recordings of your vocals, and this guide will help you get started. If you are completely new to the studio environment, make sure you check out my beginner’s guide here.
Microphone varieties
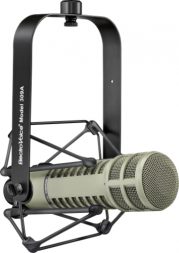 There are many microphones to choose from, and things might get a little confusing at first. There are several ways to transform air pressure (sound) to an electric signal. The electrodynamic (or simply dynamic) type is the most common and, usually, is a relatively inexpensive place to start. Their ruggedness and versatility make them a great buy. They produce a mellow, well-rounded tone. Although generally preferred for live situations, popular models such as the SM7 and RE20 are commonly used in vocal recordings.
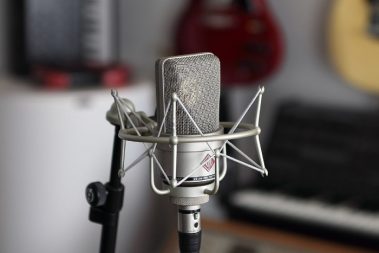
The most common variety for vocals is the condenser. The membrane of such a model is very sensitive, thus reproducing a very detailed reproduction of the original tone. They usually sound crisper and airier than their dynamic cousins. For singing, this is ideal, especially for the refined passages of pop, jazz, and classical music. Although they are often expensive, you can find some affordable units such as Audio-Technica’s AT2020.
There are also ribbon microphones. These are less common but can offer some interesting, mellow colouring. Silky smooth jazz singers sometimes prefer these, but they come with a trade-off: most of them are rather fragile, so make sure you take care of them!
One last consideration: mics have polar patterns which are essentially the direction(s) from which they pick up the sound from. For singing, I recommend cardioid patterns. Any other type (such as bidirectional or omnidirectional) exposes you to added reflections and ambient noise that can wreak havoc on your perfect takes.
Preamp/audio interface considerations
The signal that comes out of the microphone is very weak. It needs to be amplified to line level by a preamp to be useable in various circuits/effects and audible in your speakers. Quality models will amplify the source without any noise or distortion. However, there are some legendary units that add sought-after colouration and warmth. Depending on your voice, you might eventually want to explore various options to find the one that compliments it the best. If you use a standalone preamp, you’ll also need some way of converting that signal into digital information. Dedicated converters or an audio-interface can accomplish this.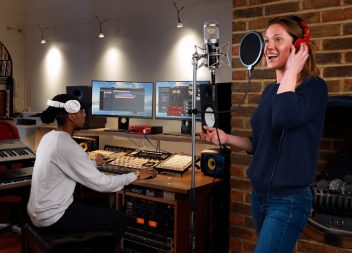
An audio interface usually has at least one mic preamp. In my experience, they are loaded with neutral and functional models that get the job done. They are a great way of getting started in your recording journey. Focusrite’s scarlet series is an excellent option. The Clarett range, although more expensive, has some interesting options and a more “expensive” sound.
Some microphones are USB and come loaded with preamps and audio interfaces. Although they do not get the same love as conventional models, it’s a great way to save on equipment costs.
Recording techniques
There are a lot of details when it comes to recording vocals. They all have a certain effect on the end result, and they can easily compound to create either an excellent track or a muddy and unappealing mess.
Distance from the microphone
You should carefully consider the distance between the vocalist and the mic. Things drastically change the closer you get. The main thing to understand is the proximity effect. When singing or talking against the microphone, the reflections from the back add up in the low end and can drastically modify the original timbre.
This can be an interesting colouration, especially for spoken word and podcasting. That being said, it may not be ideal in the context of music and mixing a singer into a song. The proximity effect can muddy things up a lot, and this can cause a lot of problems. Our ears are also accustomed to vocals that have been chiselled vocals by EQing in popular music, and it can sound inappropriate in some cases. Make sure you test different distances to best complement your voice or the one you’re recording.
Being close also makes unwanted sounds more noticeable. For example, the letters b, p, and t produce an intense rush of air that are called plosives. You can compensate with a high-pass filter (an EQ that reduces the low range), but be aware that not everything is possible to correct after the recording. Sibilance is another issue to look out for when getting too close. This is the very zingy and piercing tone from consonants such as s, z, and the “sh” sound. A de-esser can work magic, but again, it may also not quite fix the problem.
Backing away has a different set of issues. You may find that your voice becomes thinner and thinner the further away you get. Also, as you turn up the gain to compensate for the distance, you might pick up unwanted sounds. This includes the traffic outside, foot taping, or any other noises that occur.
Room considerations
The physical dimensions of your room greatly impact the result of your recordings. Square/rectangular spaces are notorious for producing standing waves. These reflections build up and amplify the low end, increasing muddiness and making everything sound as if a heavy blanket was covering everything. We don’t necessarily notice these effects in regular life, but when confronted by a recording in this environment, it’s hard to ignore.
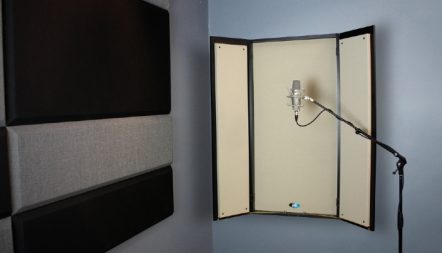
Although treating a room’s acoustics is out of the scope of this article, you can explore various sound treatment products and see what works best for your situation. Just be aware that low frequencies require particular absorbers called bass traps to effectively reduce the low-end.
Pop filters and shock-mounts
Pop filters are little screens that are installed in front of a microphone to reduce plosives. They are a great investment, especially if you like to complement your voice with extra body courtesy of the proximity effect.
Shock mounts are elastic suspensions made to help you keep your recordings clean by virtually eliminating the low rumble noises picked up by your microphone. These aren’t absolutely necessary, but they can add a little insurance that a great take won’t be ruined by a bump of the stand.
Recording vocals is a lot of fun, and there are many details to get lost in. That being said, it’s easy enough to get started, and the more you do it, the better they will sound!
Check out all the recording equipment on Best Buy’s website.


