 Virtual desktops are nothing new, many operating systems have had them. A feature that started out on UNIX based operating systems, virtual desktops allow you to create entirely different desktops for various users, various projects and for different purposes.
The way this would work is if you have a basic desktop with all the apps and widgets you need to take care of basic work tasks. This would have your email application, a browser or any number of applications you need for scheduling, word processing, spreadsheets and presentations.
You can create other desktops that are geared towards specific tasks or activities. If you’re working on a multimedia project, for example, you might have a desktop with a black background (so you can see and edit images and video more accurately), links to various folders where video or photos are as well as anything pertinent to that particular project.
I do a lot of photo editing and resizing on my PC so I have a specific virtual desktop that’s tuned to my specific needs. Black background, links to Adobe Photoshop and Adobe Lightroom, shortcuts to the networked servers where I have my photos backed up as well as links to various websites and resources for inspiration.
Same thing goes for gaming, sometimes you want to be in the right headspace before you go and get your game on. A virtual desktop with the wallpaper of my favourite game, shortcuts to game files or online services like Steam as well as any other information I need when I’m questing of fighting galactic invaders is quickly within reach.
Setting up virtual desktops is easy and has very little impact on system resources since you are basically just creating a variety of links and icons to applications and programs you already have. Here are some tips.
Creating a virtual desktop on Windows 10

Windows 10 brings a variety of new features including the ability to keep organized using virtual desktops. To my knowledge, there’s no limit to the number of virtual desktops you can create on Windows 10 and doing so is quite easy.
To begin, click on the Task View icon on the Taskbar. This is the icon with three small squares (representing screens) that’s located next to the Cortana “Ask me anything,” window.
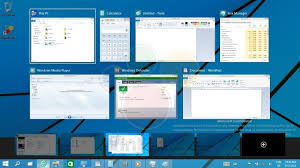
Clicking the Task View icon will trigger an animation that shrinks all your open apps and windows and places them on the desktop in an easy to see and control manner. At the bottom right corner of the screen, you will see the option to + New Desktop.
 Click on + New Desktop and a new desktop appears at the bottom of the Task View. To navigate between them you can choose between Desktop 1 and Desktop 2. From Task View, you can also drag-and-drop open program windows from the current desktop into a different one, or onto the “+ New Desktop” link to create a new virtual desktop housing the software.
By default, each virtual desktop shows only the active programs and windows for that particular desktop. If you’d rather know what programs you have open regardless of the desktop you’re on, you change this by opening the Settings app in the Start menu and going to System > Multitasking > Virtual desktops.
You can manage the elements of each desktop. Unlike OS X or Linux, which use grid layouts, Windows 10 organizes virtual desktops in a straight line. To shift between the desktops, use the Windows logo key + Ctrl and the left or right arrow keys.
Creating a virtual desktop on Mac OS

Mac OS has had a long, long history of having virtual desktops. In the earlier versions of Mac OS, there was a feature called Expose, which could bring various desktops as an option with a few clicks of a button or by bringing your mouse to a designated area on the screen.
Apple says that Mission Control is “Mac command central”. It gives users a quick overview of every application that they are running on their computer at a given time.
With just one click, Mission Control can show you everything that’s currently open on your Mac; you’ll see all your open windows as small previews – just like in Expose. This makes it easy to switch between different applications.
Modern Mac OS like El Capitan use Mission Control. This is toggled the same way, simply choose specific corner on your desktop to trigger the feature and all windows and virtual desktops appear accessible. For Mac users, Virtual Desktops are designated as Spaces and these are usually shown in a horizontal row on top of all the windows once Mission Control is enabled.
 Other ways to enable Mission Control to gain access to Spaces include pressing the designated Mission Control keyboard (F3 or the Expose Key). Using a four finger swipe up (for trackpad users only, obviously) and accessing the app from the Applications icon. Some users with programmable mice have the option of connecting specific buttons to Mission Control to quickly toggle through their preferred virtual desktops.
Adding new virtual desktops is as easy as clicking on the + icon in the corner and the system automatically creates a new desktop and even designates a number which you are free to change to any number of name.
Conclusion
Virtual desktops are a clever and intuitive way to better organize our PCs and Macs for improved productivity. While having multiple displays is an ideal way to manage the bulk of applications and tasks we may have, being limited to one display makes having virtual desktops a great second option.
By cutting down on desktop clutter which happens when we have everything in one desktop, virtual desktops can easily make working on multiple projects and tasks feel more efficient. It is a great solution for distributing work and personal applications and themes on a single machine.


Thanks for the Win10 tip. It feels like I have another external monitor.
Comments are closed.