
 There are many types of consumer security cameras available these days. Although the newest trend has been wireless cameras with cloud storage, there are still innovations happening in the wired camera category. I had a chance to test one such system, the Defender 4K DVR system. It comes with 4 bullet cameras that capture a 4K image. I’ll explain how I set it up (I actually set it up twice in 2 very different locations in British Columbia for reasons I’ll explain below). I’ll also give you some tips for getting the most benefit from this system by connecting it to your mobile devices—a fantastic feature to find on a wired system!
Unboxing the Defender 4K security system
Inside the box you’ll find most of the things you’ll need to set up this system. There is the 1 terabyte DVR, 4 cameras, an ethernet and HDMI cable, 4 x 18.2 metre spools of wire (integrated to provide a power connection and video connection from the cameras to the DVR), a Power block that all 4 cameras will get their power from, and a manual. Almost forgot, you also get a little mouse to control the DVR!
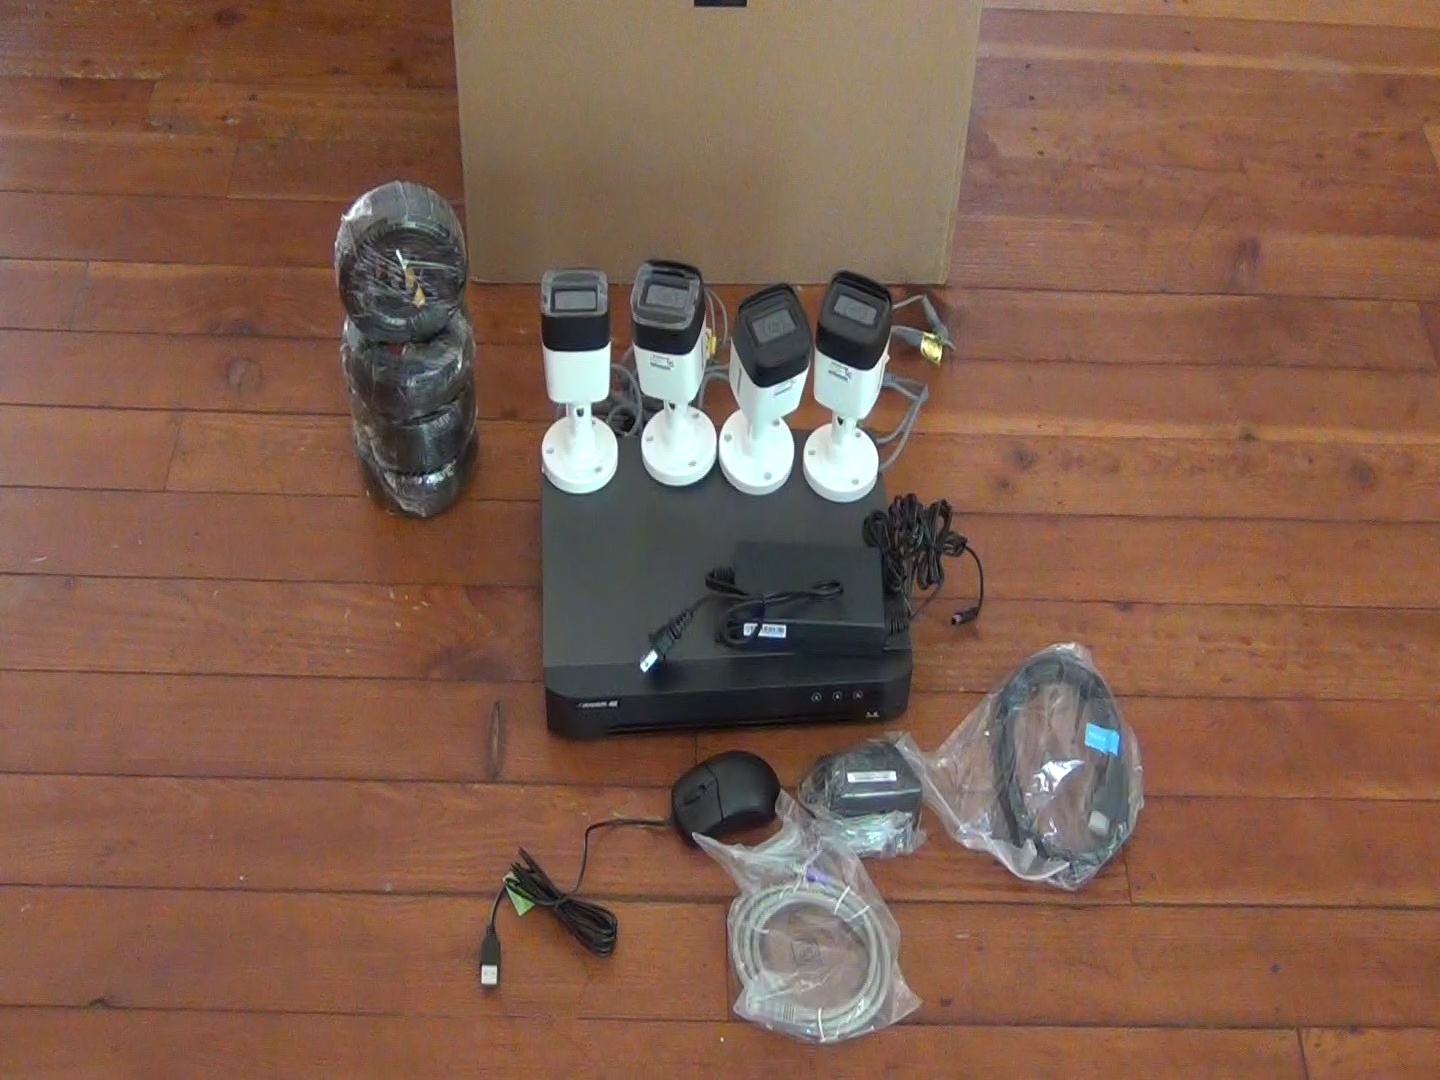
What’s not included
You won’t get a monitor, which is needed to set up the DVR. You can use a computer monitor or a television. I used an older 28″ Samsung HD television, and that worked great. To find out how much better the image might be on a 4K screen, I also connected it to a 55″ Toshiba 4K television (I’ll get into the image quality below, but suffice to say image quality was exceptional.).
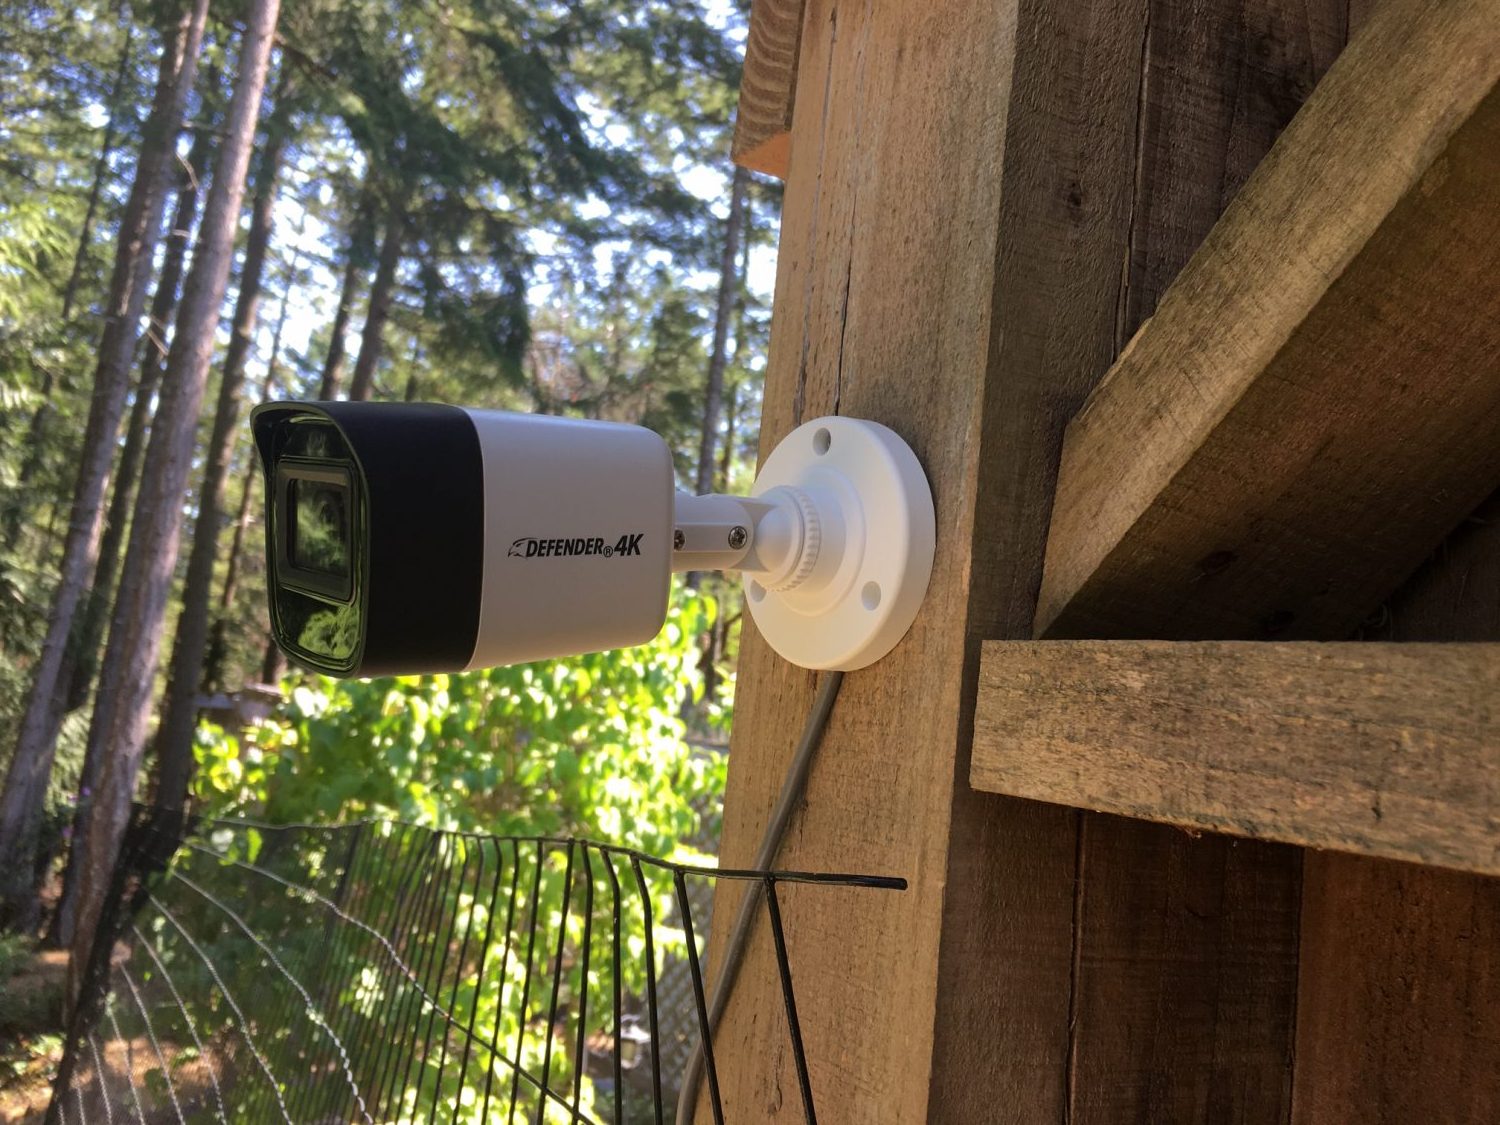
Also not included were the tools needed to mount the cameras (mounting screws were provided). The minimum you might need is a Philips screwdriver to turn the mounting screws and adjust the direction of the cameras. Additionally, you might want to do some cable maintenance, hiding cables where you can, and that might require additional tools like a drill and a ladder (we used these on the second installation of this system).
How difficult is it to install the Defender 4K cameras and DVR
Before beginning the install, I first got familiar with the components: figuring out exactly how the wires connect to the camera, the DVR, the power supply…. I did this in a comfortable setting, before starting to run wire or mount the cameras. Then, I decided on a central place for the DVR, before working out where I might want the cameras to go. In the first installation, that location was a small single room house adjacent to my main house. I temporarily placed the camera that would go the furthest away and ran one of the bundles of wire from the DVR to the camera. Each bundle is 18.2 metres (about 60 feet), which was ample for my needs. Defender does sell extension wire if needed. After successfully mounting and connecting the most distant camera, I continued with the other three cameras.
Total time to get all 4 cameras mounted and the wire run was about 30 minutes the first time I installed it, and about 2 hours the second time (running cable through rafters and drilling holes for getting the wire outside to where the cameras would be mounted resulted in the second install taking more time). Of course, that will vary depending on how easily you can get the wire outside.
Setting up the DVR
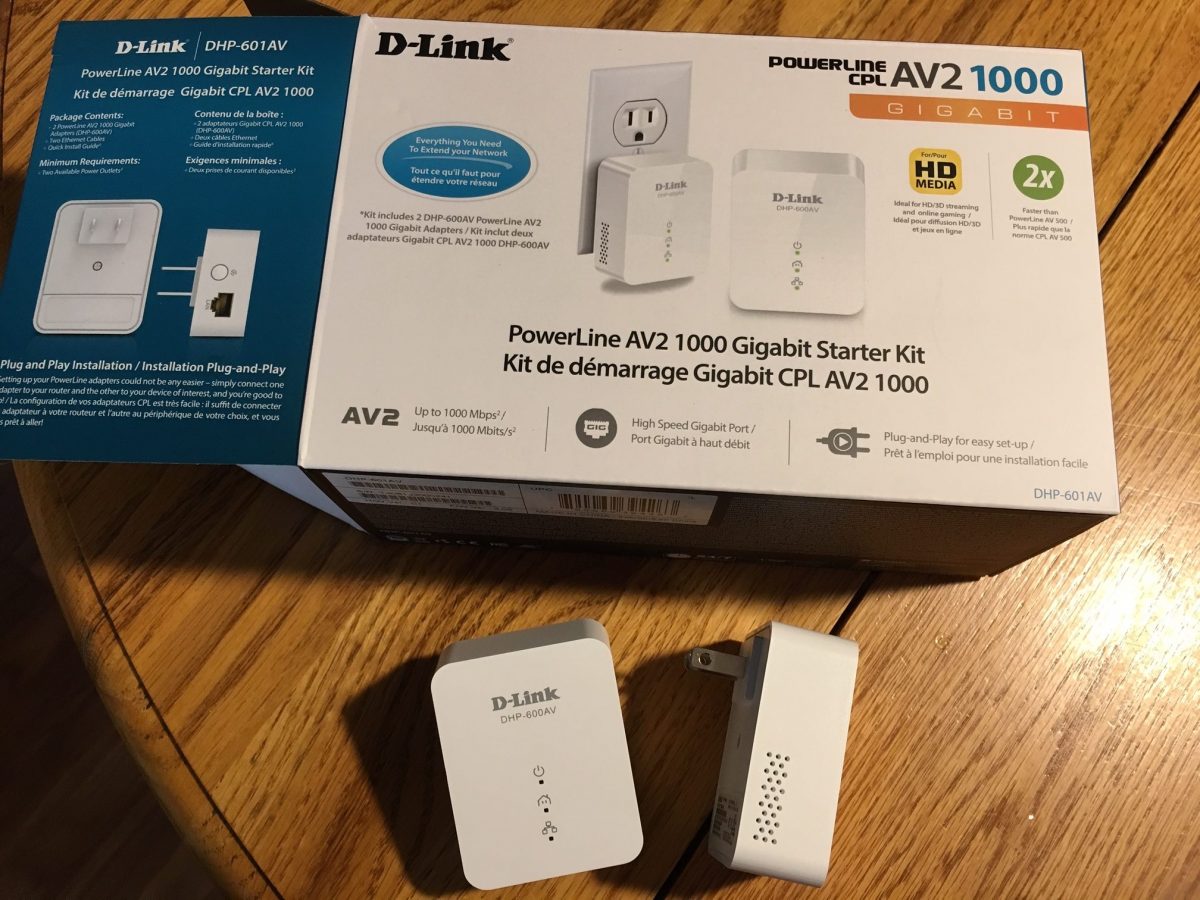
Fortunately, once the wire is placed and cameras are mounted, the rest of the setup is very quick (under a half-hour). I connected the four cameras to the DVR, added an HDMI connection to my TV, then connected the Internet. Many of you may not have a router near the location where you want to place the DVR. I didn’t in either home where I installed this system! So I used a D-Link Powerline. It comes with 2 little boxes that plug into an electrical outlet, effectively using the wiring of your home to transfer your Internet connection wherever you need it. One unit connected to my router in my living room, the other unit connected to the 4K Defender DVR. This worked great.
Using the Defender 4K DVR for the first time
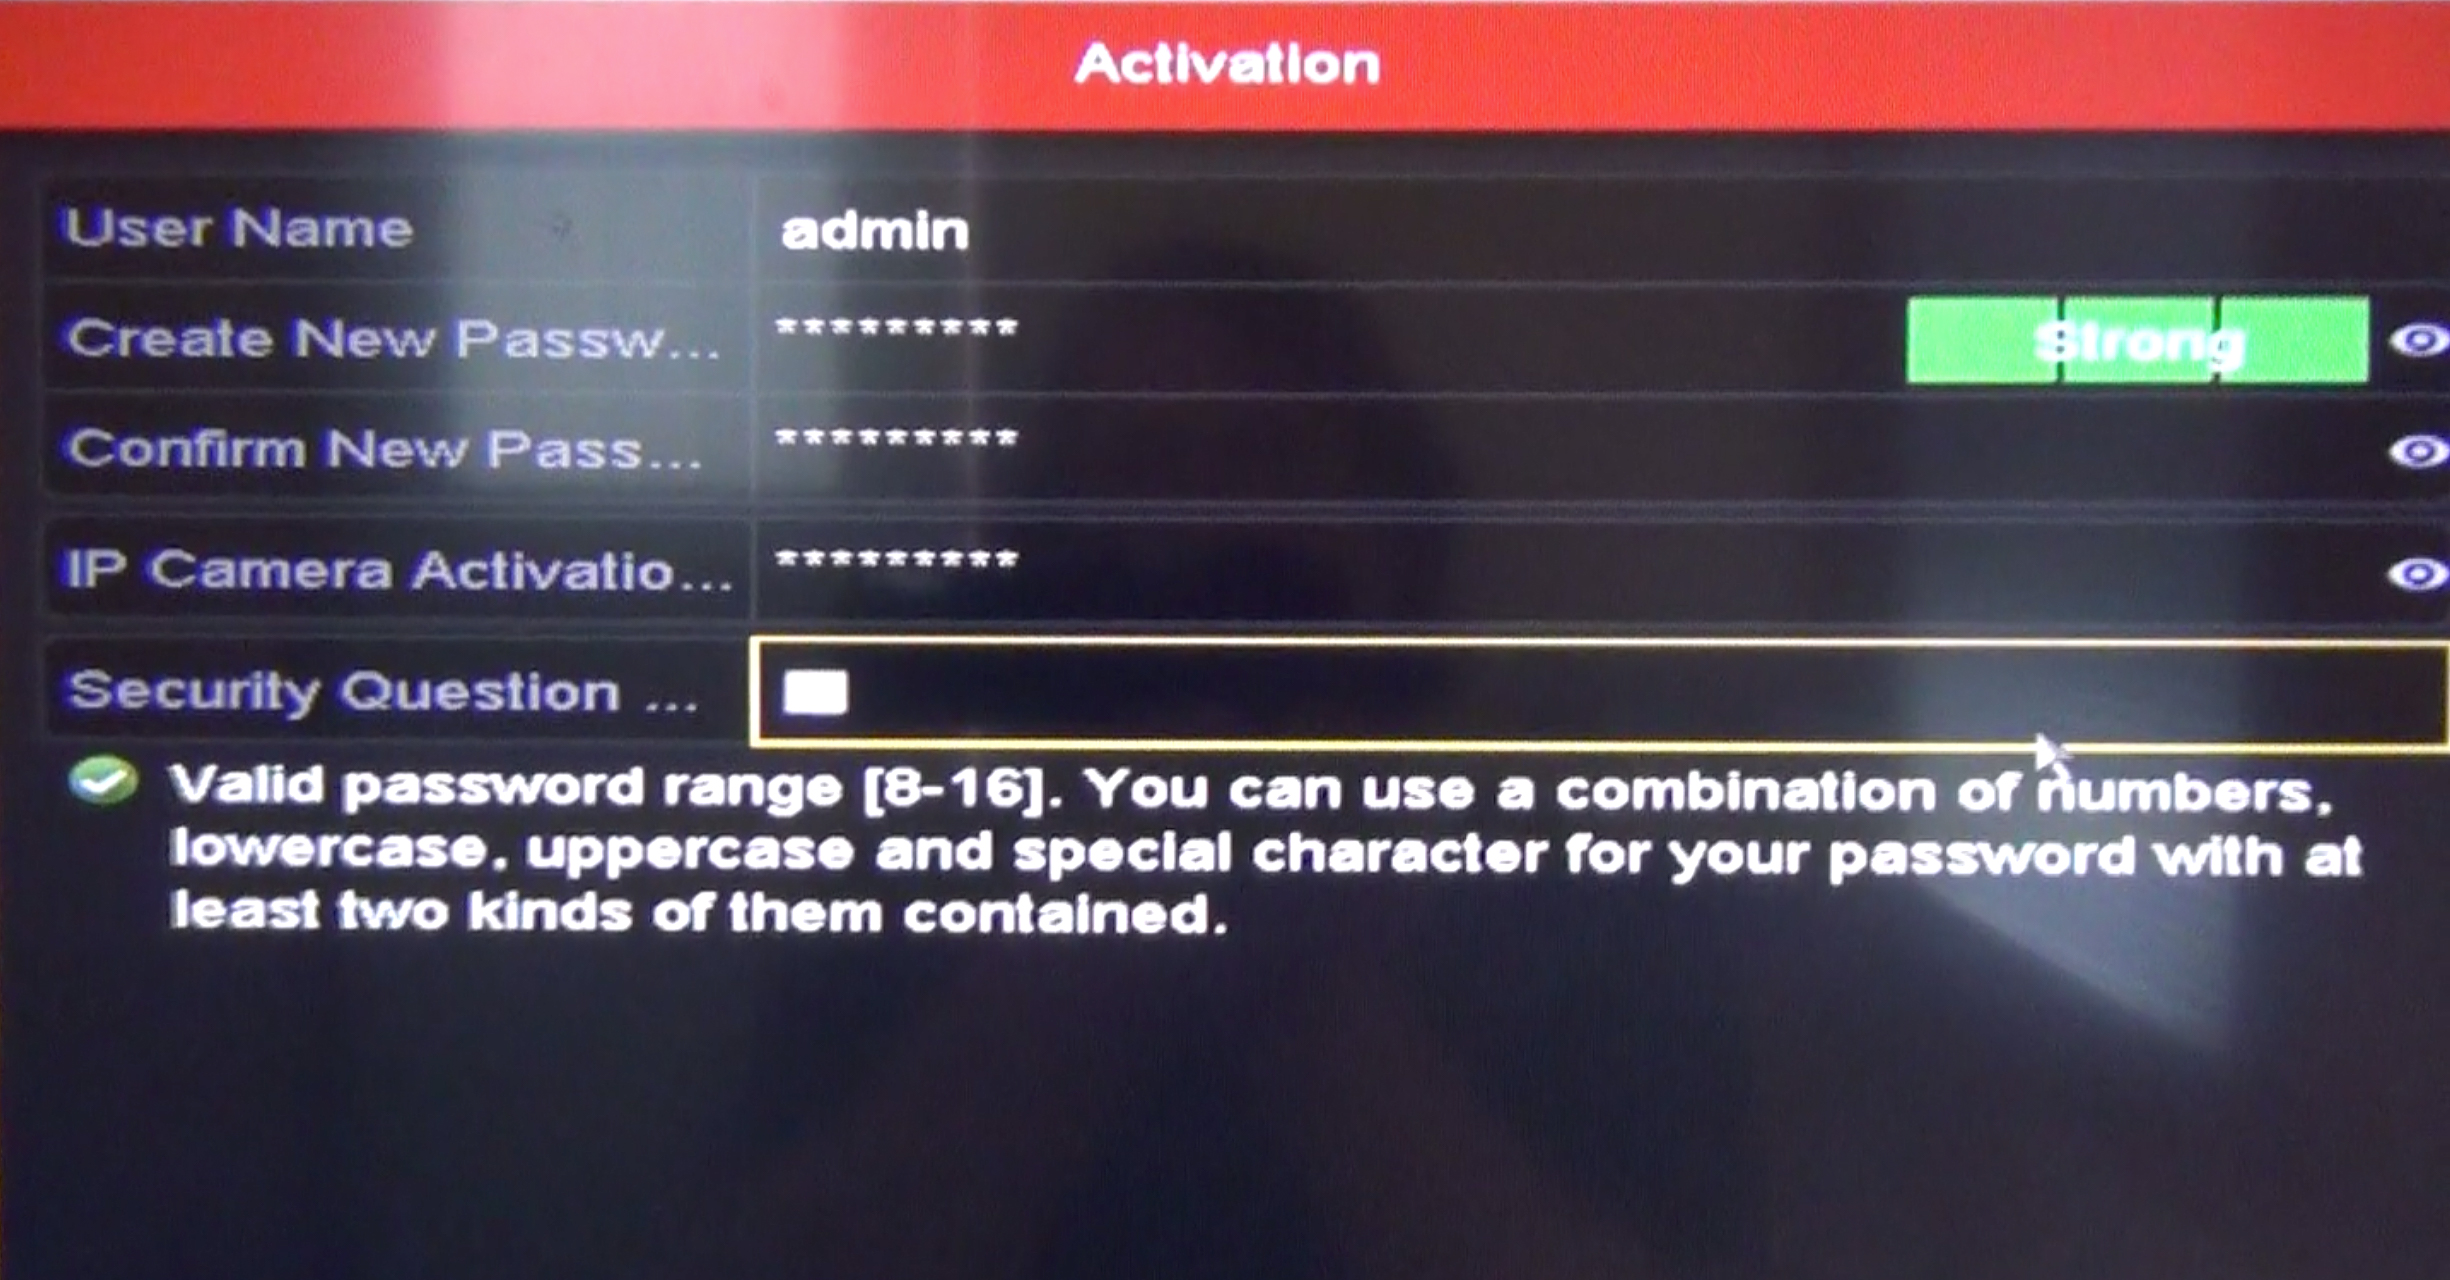
The whole setup process is fairly intuitive. A setup wizard will guide you along the way. There are a couple of things to be cautious about. The first and most important is the Activation screen where you will create your admin password and set up the provisions so you can restore your DVR if you need to. Everyone is aware that people forget passwords, especially ones that are infrequently used. You may never use the password you create for this device again, or you may need it in the future, so choose wisely. Some people may choose to write it down in their Defender manual, then store the manual with your important documents. You should also set up the security questions on the DVR, and set up the GUID code (the wizard will guide you, but you will need to export a GUID file onto a blank USB drive that you can store with your important documents). You can use that GUID file to reset a password in the future.
Lastly, the wizard will also ask you to choose a secure pattern for opening the settings panel. A pattern of nine dots will be displayed, and you must draw a path through all the dots using the mouse. In the future, that pattern alone will enable you to access all of the settings for the cameras, accessing the cameras on app, and Internet settings.
Why do you need an Internet connection
You don’t! If you just want the DVR to capture video and you will only ever check the feed from the DVR periodically or after an incident (like a theft on the property, etc), then the system will function just fine without the Internet. In fact, that’s one of the advantages of a wired system like this over wireless: you don’t have to have an Internet connection. However, adding an Internet connection will enable you to view the camera feeds from a mobile device, from anywhere. Personally, I do almost everything on my phone, so I want to see the camera feeds using the Defender 24/7 App.
Setting up the Defender 24-7 App
 I set up the app on an iPhone 6s and on a fairly new iPad. Really it’s very straight-forward. You can even just set it up on one device then share the link to the system with a second device (that already has the app installed). Yes, the app is also available for Android devices (Android 8 and higher, and iOS 7 and higher).
 One thing to note: this system uses the Defender 24-7 App. Other Defender cameras may use a different app, so be prepared if you already have a Defender camera or system. For example, I’m also testing a Defender 2K 4MP wireless IP exterior camera, and it uses an app from Defender called “SmartSignal”—you can’t set up the 4k camera system using this app (I tried just to see, and it would not work).
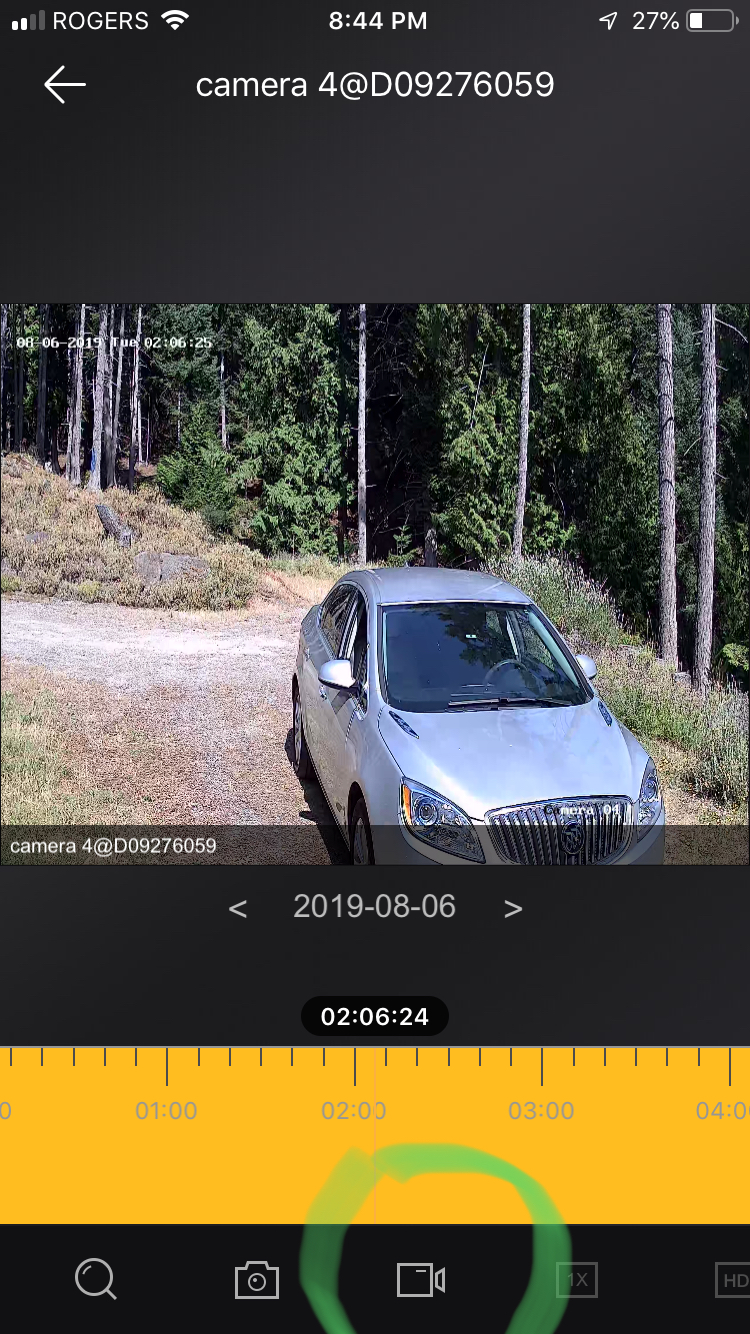
The Defender 24-7 App has some cool features. Of course, you can see the live feed from all 4 cameras. You can also use the “playback” feature to go back in time. The system records continuously on the DVR and will send the feed through the Internet to your mobile device: no cloud service required! You can see day and night what happened around your home from anywhere in the world on the Internet.
If you see something in the app that you want to save on your phone, it’s simple. I put a green circle in the image to the left around a video icon. While the camera footage is playing, select that icon and a video starts recording until you select it again. That video clip is now saved on your phone or tablet. It is just that easy.
Use the Defender App to zoom in on activity
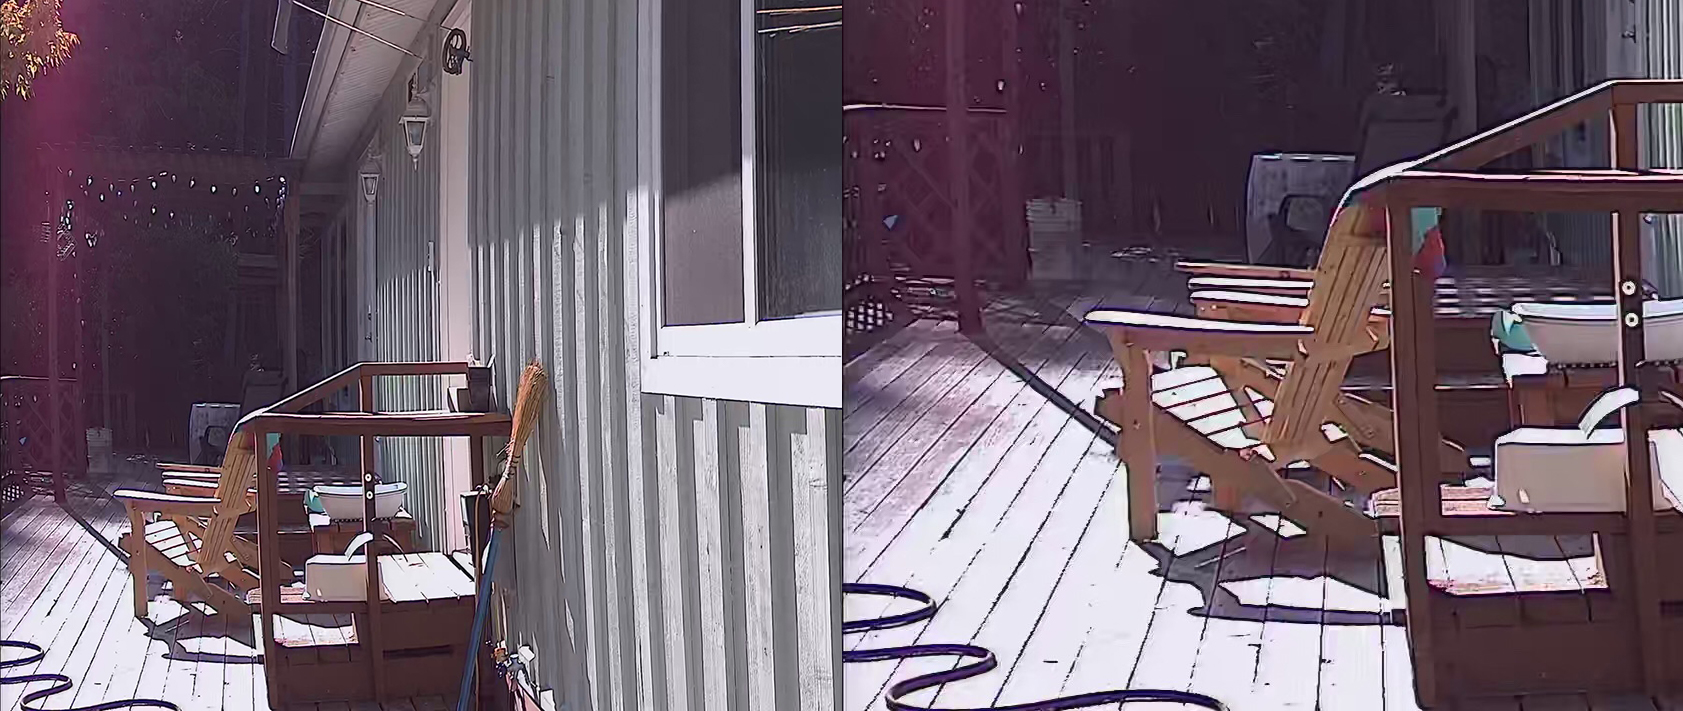
One of the things that is challenging for many other camera systems is digital zoom. Honestly, that is one of the things I liked most about the defender 4K and its app. It is recording at such a great resolution that focusing on a portion of the image is still useful for security. On my phone, I could just stretch the area of the image that I want to see closer up, and it was crystal clear. For example, the photo shown below is the same scene from my iPhone 6s, the one on the left is the full image, the one on the right is zoomed in. Do this with many other camera systems, and the second image would be quite blurry. With the Defender 4K, you would be able to see facial details of a thief on your property, or a licence plate on a vehicle.
Where the Defender 4K system delivers maximum benefit
One of the key advantages of a wired system with a DVR over a Wi-Fi system with cloud storage is the immediacy and quality of the recording regardless of the bandwidth of Internet in your area. I think it’s an unfortunate reality that in the 21st century really dependable Wi-Fi is only available in areas close to a major city. In Vancouver, my home has fantastic Wi-Fi, usually running at 100 MBPS or so. At my home on Mayne Island, Wi-Fi is considerably slower, though passable, running at about 15 MBPS on the best days. However, drive a few hours away from Vancouver and the Wi-Fi can be quite poor.
I initially installed the Defender 4K system on Mayne Island so that I could test many of the features before offering to install it on a working farm in the interior of BC where there isn’t great home Internet. The farm that I chose has Internet, but it’s very slow (1 MBPS at best!) and often goes offline. So it is not a great location for cloud based security cameras. A DVR camera security system is a much better option. Furthermore, since the area needing surveillance has several farm buildings with equipment, a 4K system that enables a clear image even when zooming is ideal.
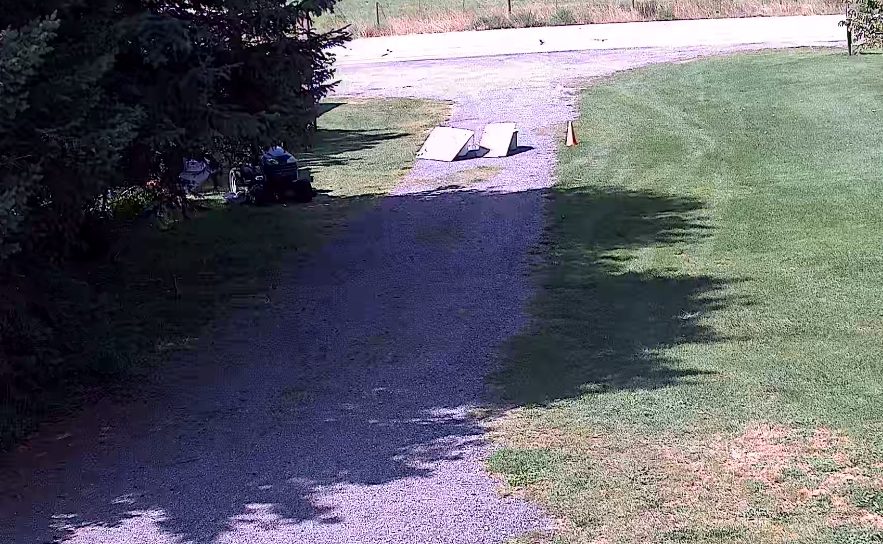
I installed the system so that each camera captures a different section of the farm, then installed the Defender App on the farmer’s iPad. Despite them having very slow Internet, they can usually see the recordings and the live view from all 4 cameras, with substantial buffering, from anywhere—even if they are away on vacation. Here is the image as it appears on the iPad from one of those cameras. This is using the “basic” setting in the app rather than “HD”. As you can see, it is a bit grainy, but the full 4K image is stored on the DVR, so that’s fine.
Of course, if anything did get stolen, as often happens on farms in remote areas, they would not have to rely on their Internet to playback the captured video: they could take the 4K high quality footage directly from the DVR, download it to a USB drive, and share it with authorities.
Note that the Defender 4K does have the ability to send push notifications and e-mail notifications when motion is detected. In my experience, however, these notifications can’t be relied on in many situations, especially if the Internet isn’t stable. Also, it is very easy to miss a notification (for example, if you have the sound off on your device). Lastly, they can become overwhelming on a farm where animals are moving around. In any case, you can review events from the previous day with the app timeline very quickly to see if any of them were important.
How does the Defender 4K system fare in extreme weather conditions
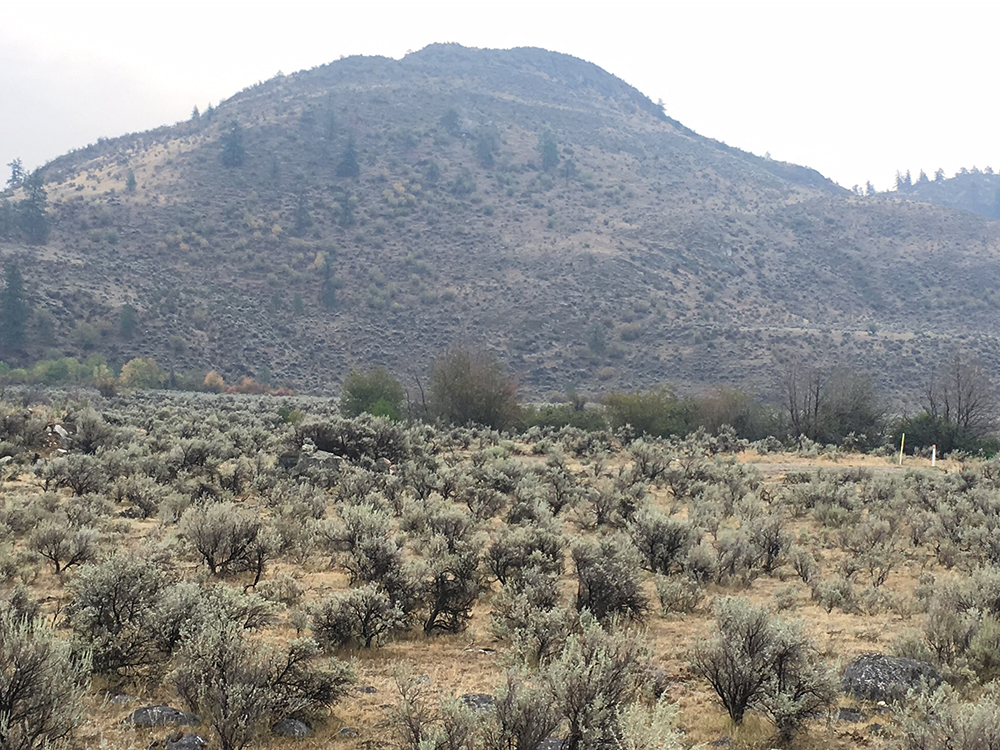 Installing any camera system in the Vancouver area or on Mayne Island (the two places I live and work) is not a good test of weather durability: we just don’t often see the kind of variations in weather that the rest of Canada gets. However, the BC interior does see extreme weather. For most of the week before I visited this area, the temperatures were around 40 degrees Celsius each day. The picture on the right shows the desert-like conditions when I arrived. This area has very hot summers, followed by fairly cold winters. After October, this area can experience prolonged below-zero temperatures, wind, and snow like that experienced by most of the country. I’ll be sure to add to this review once I learn how well the system is able to cope with a variety of temperature extremes. For now though, it handles the heat just fine.
Would I recommend the Defender 4K camera system
This camera system is probably not for everyone: if you have a very strong Wi-Fi, want a simple camera setup that can record to the cloud, or prefer not to have to place and hide wires, then there are many other systems available that can do those things (in fact, I’ll soon be posting a review of the Defender 2K system that might suit your needs). However, if you want amazing recorded video quality, on site storage of your camera footage with no additional fees for cloud storage of video, along with many of the benefits of a modern camera system that connects to your mobile devices, then the Defender 4K system would be a smart option.


I purchased the defender 4 k wireless system and when a problem with the NVR occurred they would not stand behind their product . They suggested a buy a new system after I spent over $700.00 . Very poor customer service and buyer beware this company is a joke to deal with .
Comments are closed.