


Your smartphone is already a camera, audio recorder and gaming device, but you can also use it to record whatever it is you’re doing onscreen.
Taking screenshots is easy enough on any phone, but screen recording used to often require a third-party app. Now, tools like that are often built-in, cutting down the number of steps to get there.
If you’re wondering why you’d even want to record your screen, there are several reasons. One could be to show a friend or family member how to do something on their phone, be it tech support or something interesting on a new app.
Another might be to include clips as part of videos you post on social media or video-sharing sites, like YouTube. Whether it’s to help demystify something for viewers, or part of something you’re reviewing, it’s a nifty way to pass on information. Or, you might be a mobile gamer, and this would be one way to share your own gameplay.
And it’s getting easier to do. Here’s how, for both iOS and Android.
Screen recording on your iPhone
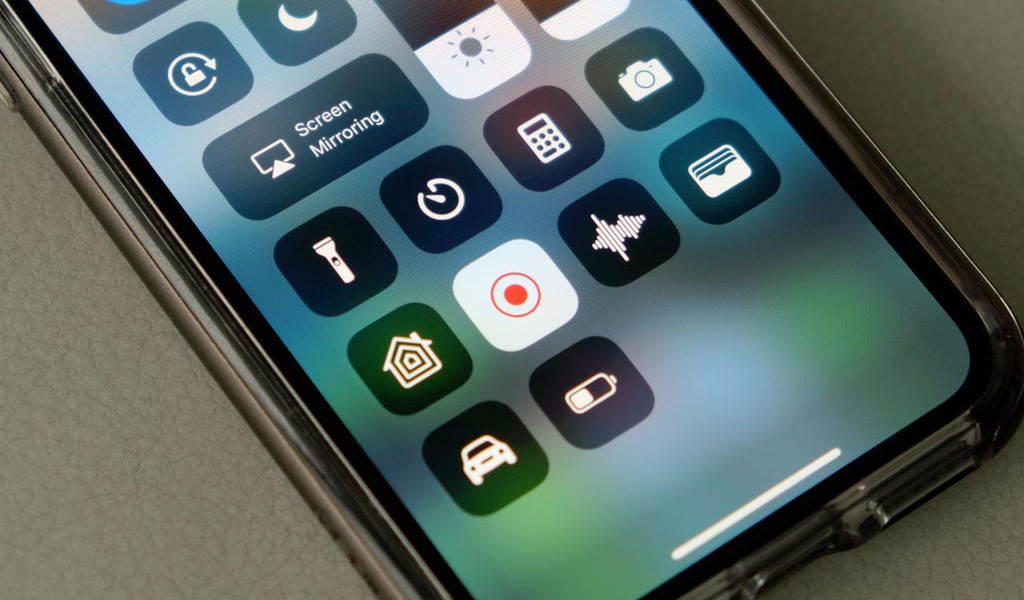
Apple initially included its own built-in screen recording feature with iOS 11, and has maintained it since. You can find it by swiping down from the upper right-hand side of the screen to get to the Control Center. Look for the icon of a circle with a dot in the middle. If you don’t see it there, you may need to add it first.
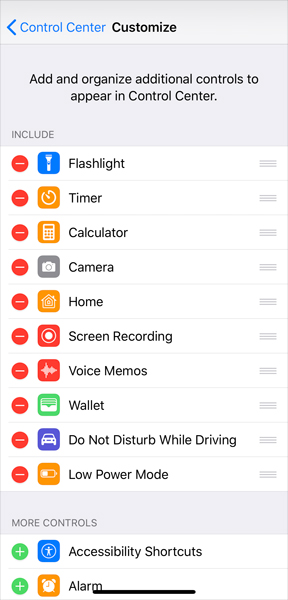
Go to Settings>Control Center>Customize Controls, and you will see the option to add shortcuts to the Control Center menu. Tap the + icon next to Screen Recording and it will fall under the “Include” list. Swipe down from the top again and you should see the Screen Recording icon on your Control Center menu.
Every time you tap it, there’s a three-second countdown until the video recording actually starts. A red line at the top of the screen or a microphone icon will indicate recording is active until you tap it again to end it.
The finished clip immediately saves to your Camera Roll. Note that videos will record in portrait or landscape, depending on how you’re holding the phone. The accelerometer just works naturally, so you don’t have to select an orientation ahead of time.
Bear in mind, also, that the top-left corner (where the time shows) does appear in red in the recorded clip, and there’s no way to turn that off. If you want to get away from that, read on for the alternative method.
Screen recording on older iOS versions
If, for whatever reason, you’re using an older version of iOS, like with an old iPad, for example, you can still record your screen. You just have to do it a different way. You can go through this process if you want to get rid of the red strip at the top of the clip.
There is no shortage of third-party screen recording apps on the App Store, so browsing through some of those may be worth your while. I just haven’t tested any of them extensively, and can’t speak to any that might rise above the pack.
Perhaps a little more cumbersome, but you could also do this through a Mac. Unfortunately, it stopped working on Windows PCs after Apple cut off support for Quicktime on that operating system.
- Plug in your iPhone and open Quicktime on your Mac (it’s pre-installed on your Mac).
- Go to File and select New Movie Recording.
- A window will pop up. Look for the arrow pointing down (next to the red record button).
- Click that for a drop-down menu where you will select your iPhone.
You should now see your phone’s screen appear. If you want, you can also switch the microphone settings. Click the same arrow for the menu and look for the microphone options. Here, you will have the choice to record sound from your iPhone, your computer’s microphone or an external mic plugged into your computer.
This is great for whatever you’re looking to do. If you’re recording footage of a game or multimedia app and need the phone’s sound, you will get that. If you want to do a voiceover, you have that option, too, which is great for tutorials.
You can even choose between High or Maximum image quality. Totally up to you on what you prefer. The accelerometer will determine what orientation the video appears in. Hold your phone upright for portrait or sideways for landscape. If you’re going to lock the orientation, you will have to do it on the phone first.
When you’re done, hit the stop button on Quicktime, and that’s it. Save the file on your computer. To move it to your phone, use AirDrop on your Mac for the quickest transfer.
One last thing: you may notice that the time is always 9:41 A.M. Why? Because Apple always uses that time in its ads. In the past, Apple tried to time its biggest product unveiling at 40 minutes after a keynote started. It’s changed since then, but alas, the timestamp remains.
Screen recording on your Android phone
Using a Pixel phone
![]() Google finally unlocked this feature for Pixel devices, making it super easy to use. You can find the built-in screen recorder by swiping down the notification pane twice to see the quick settings. Swipe left and you should see Screen record appear in the list.
Google finally unlocked this feature for Pixel devices, making it super easy to use. You can find the built-in screen recorder by swiping down the notification pane twice to see the quick settings. Swipe left and you should see Screen record appear in the list.
If, for whatever reason, it’s not there, that’s an easy fix. Tap the edit icon (the pen symbol) and you will have the option to drag and drop whichever tiles you want into your existing list. That’s how you can add Screen record and place it wherever you prefer.
When you’re ready to start recording, a pop-up will appear with a toggle for audio. By default, it’s off, meaning it won’t record any audio at all. If you want it to record the sounds the screen makes, then toggle it on for Device audio. Music, calls, and ringtones will come through. This is great if you want to record a video call with a loved one, for instance.
But to make that even better, tap the downward arrow and select Device audio and microphone so that both the phone and any sounds the microphone picks up, like your voice, are recorded. This is not only great for calls, but also for walking someone through how to do something on the phone.
Using a Samsung Galaxy phone
Samsung’s latest smartphones have a built-in screen recorder you can use at will. Just swipe down the notification pane and swipe right to find it among the other icons. Samsung added this a few years ago, and it’s now a staple of its One UI overlay. Any Samsung device running One UI 2.0 or later will show you the screen recorder in the pane. You can also move the icon to a more convenient location in the quick settings under the notifications pane.
If you’re using something that doesn’t at least have One UI 2.0, then things get a little complicated. I would recommend using a third-party app to make it easier on yourself, in that case.
Using a Motorola phone
Motorola added this feature some time ago, and it works similarly to others. Drag down the notification pane until you see your list of quick settings. Look for Screen record and tap it. Or you can hold it to bring up a new menu letting you choose resolution, viewfinder size, recording time limit, and whether you want touch points to be visible.
Once you’ve started a recording, a strip appears on screen letting you also determine if you want any sound, or even add the selfie camera to film yourself as the screen records. This is great if you’re gaming and want to add yourself to the recorded footage. The Moto Gametime app has its own screen recording shortcut for just such a purpose.
Using a OnePlus phone
OnePlus added a native screen recorder starting with the OnePlus 7 Pro. Subsequent models also have the feature, and the company added it to the OnePlus 6 and 6T as well. To get it, all you need to do is swipe down from the top to get to the quick settings in the notification pane. Swipe left and you will see it on the second page of selections.
Using third-party Android apps
One option is to use a third-party app you can download from Google Play. Searching for a screen recording app will produce a laundry list of results. Which one is best? I personally have used AZ Screen Recorder, Mobizen and Vysor as among the best ones.
What I like about Mobizen, in particular, is that it is free to use, and presents you with options in how you want to record. They could include screen resolution, whether taps should be visible and if sound should be muted or not, among others. It also works on any Android device after version 5.0 Lollipop. There are even versions on the Play Store specific to the make of the phone.
Using your computer
Another alternative is to do it through a computer. This method applies to both Mac and PC.
You will need to download and install a program called AndroidTool, which is free. On your phone, go to Settings>About phone>Build number and tap it seven times. A pop-up message will show that “Developer Options” are now on. Go back out, tap Developer Options and slide USB Debugging to on.
After launching AndroidTool, plug in your phone to your computer and it should recognize it instantly. Note that devices running on Android 8.0 Oreo or later may not appear so easily. I’ll get to an alternative on that right after this.
With AndroidTool seeing your phone, you can go to AndroidTool>Preferences>Quality to move the sliders and do things like adjusting image quality. From there, you can just click the red recording button and start a video. When finished, click the stop button. Your finished clip will save to an AndroidTool folder on your computer.
Vysor will work with almost any version of Android, and is pretty robust. Not all features are free, mind you, but you can try it for free. You just have to pay to remove watermarks and get all the features.
An extra benefit in using Vysor is that you can also control your phone from your computer. It’s a cool way to type messages faster or just use apps on the phone while doing something else on a computer application.
Check out the latest iPhones and Android smartphones available now.


Cool
Comments are closed.