


 Staring up at the night sky and marveling at the beauty and majesty of the stars is something humans have been doing since…well, since we’ve had working eyeballs and the inclination to train our gaze to the heavens. Don’t ask me, I’m not an evolutionary scientist, or whatever, but like most people, I just love to look up at the stars.
I first got interested in astronomy when my grandfather would set up an old telescope on his back porch, and show the grandkids the moon, stars and constellations. I loved learning about the stars, and it inspired in me a love of science and technology at a very early age that continues today. I’m one of those geeks who got excited every time NASA released new photos of deep space taken by the Hubble Telescope. But, you don’t have to wait for the geniuses at the space program to deliver you photos of the stars, because it’s actually pretty easy to get into astrophotography on your own with your own telescope and a camera. Sound like fun? Then let me give you some beginner tips for taking pictures of the sky.
Three Things You Need for Astrophotography
Once, humans could only appreciate the stars with their naked eyes. However, today we use things like telescopes and cameras to augment our vision, so why wouldn’t you use the two technologies together to take amazing photos of constellations and distant galaxies from your backyard? All you need other than a telescope and camera, is an adapter to connect one to the other.
Choosing a Telescope
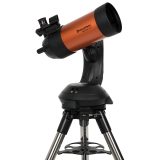
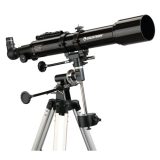 Telescopes come in two flavours, essentially (and for simplicity): reflector and refractor. Refactors need less maintenance and are light and easy to carry around, while reflectors offer the better value for your money for astronomy as they have a better “size for your dollar” ratio. But really, as a general rule, the higher the aperture, the better the quality, but the higher the price. So, always try to budget for the highest aperture possible. For astrophotography, you could go with the more expensive Celestron Nexstar 4SE 102 x 1323mm Maksutov Telescope, which has lots of automated features, and is equipped with SkyAlign technology so your telescope gets aligned and ready for observing in a matter of minutes. Or, you could try the more budget-friendly Celestron PowerSeeker 70EQ 70 x 700mm Refractor Telescope that is ideal for beginners and offers the perfect combination of quality, value, features and power. Either way, both are ready for you to attach your DSLR camera using a T-Ring (more on that below).
Choosing a Camera
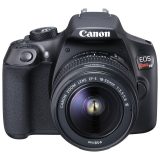
Choosing a camera is a bit of a challenge these days, as several companies offer great products used by the pros. I’ve always been partial to the Canon line of cameras, but maybe that’s because my first camera was a Canon, and I continued to use one as a professional journalist and photojournalist, as did many of my peers. You certainly can’t go wrong with the Canon EOS Rebel T6 DSLR Camera with EF-S 18-55mm f/3.5-5.6 DC III Lens Kit as an amazing entry-level setup. Of course, those of my pro photographer friends who don’t use Canon, seem to always favour Nikon, which is also a name you can trust when It comes to cameras. So, beginners could take a look at the Nikon D5300 DSLR Camera with AF-S DX NIKKOR 18-55mm VR II Lens Kit when trying to find a good camera to start a new astrophotography hobby.
An Adapter to Connect Camera to Telescope
Now that you have a cool telescope and a sweet new camera, all you need is some way to get the two of them to work together to shoot some amazing celestial photography. Luckily, getting your camera connected to a telescope is as easy as buying a little adapter, such as the Celestron Canon EOS Camera T-Ring (also available for Nikon and other brands, as well). Using the T-Ring, you can simply attach the camera to your telescope, like the scope was some sort of super lens (called direct objective or prime focus). Sure, you could direct the camera at the eyepiece of the telescope (called afocal) but that isn’t going to get you spectacular pictures like direct objective. You can also find adapters that can be used with your smartphone, because the cameras in those things are pretty decent on their own.
Some tips for astrophotography I can share include making sure your camera’s flash is turned off, and using a remote camera trigger to reduce vibration and blur from movement. Objects in the night sky also vary in brightness, so vary your camera settings accordingly.
So, did I miss anything? Do you think you’d like to try out astrophotography this summer? Let me know what you think in the comment section below. And, if you’re still having trouble choosing a telescope, take a look at my blog covering five tips for buying your first telescope.


